In this manual: Kia Sorento XM 2011-2023 Repair Manual
9steps
~54min
2/5difficulty
Tightening torque found on this page
Done 0 of 9
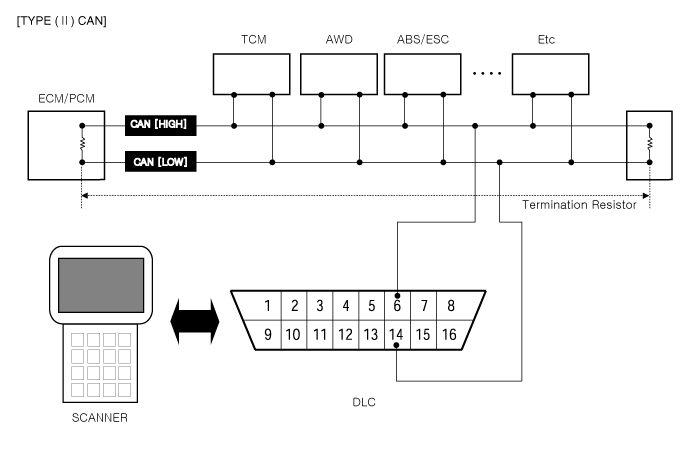
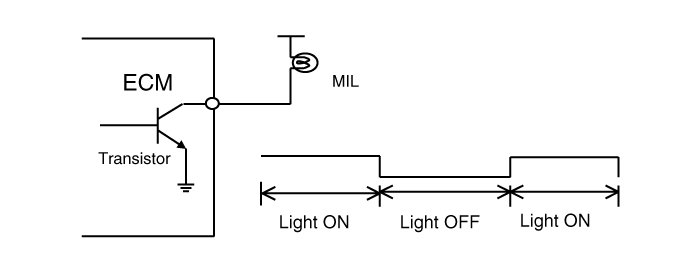
1. Overview. The California Air Resources Board (CARB) began regulating On-Board Diagnostics (OBD) for vehicles sold in California, starting with the 1988 model year. The first stage, OBD-I, required monitoring of the fuel metering system, the Exhaust Gas Recirculation (EGR) system, and additional emission-related components. The Malfunction Indicator Lamp (MIL) was to illuminate to warn the driver of a malfunction and the need for service of the emission control system. Associated with the MIL was a fault code, or Diagnostic Trouble Code (DTC), identifying the specific location of the malfunction. The OBD system was proposed by CARB to improve air quality by identifying vehicles that exceed emission standards. The adoption of amendments to the Federal Clean Air Act in 1990 also prompted the Environmental Protection Agency (EPA) to develop On-Board Diagnostic requirements. CARB OBD-II regulations were followed until 1999, when federal regulations were used. The OBD-II system monitors the emission control system. When a system or component exceeds the emission threshold or a component operates outside of its tolerance, a DTC will be stored and the MIL will illuminate. The Diagnostic Executive is a computer program in the Engine Control Module (ECM) or Powertrain Control Module (PCM) that coordinates the self-diagnostic functions of the OBD-II system. This program controls all monitors and interactions, DTC and MIL operation, freeze frame data, and the scan tool interface. Freeze frame data describes the stored engine conditions, such as engine status, fuel control status, spark, engine speed, load, and warm-up status at the point at which the first malfunction was detected. Previously stored conditions will be overwritten only when a fuel or misfire malfunction is detected. This data is available with a scan tool to assist in vehicle repair. The center of the OBD-II system is a microprocessor called the Engine Control Module (ECM) or Powertrain Control Module (PCM). The ECM or PCM receives data from sensors and other electronic components (switches, relays, etc.). Based on the received and programmed information stored in its memory (keep-alive memory, etc.), the ECM or PCM generates output signals to control various relays, solenoids, and actuators. 2. Hardware Configuration and Related Terms 1) GST (Generic Scan Tool)2) MIL (Malfunction Indicator Lamp) - MIL transistor operationThe Malfunction Indicator Lamp (MIL) is connected to the ECM or PCM connector. The Malfunction Indicator Lamp is powered by the battery (open-collector driver). On most vehicles the MIL is installed on the instrument panel. The driver circuit cannot be damaged by a short circuit. Lamps with power dissipation significantly exceeding the total power dissipation of the MIL, and lamps in the tester, may cause a false malfunction indication. ▷ With the ignition ON and engine speed (rpm) < MIN. RPM, the MIL switches ON for a bulb check by the driver. 3) MIL Illumination. When the ECM or PCM detects an emission-related malfunction during the first driving cycle, the DTC and engine data are stored in freeze frame memory. The MIL illuminates only when the ECM or PCM detects the same malfunction associated with the DTC in two consecutive driving cycles. 4) MIL Extinguishing
Misfire and Fuel System Malfunctions: If a misfire or fuel system malfunction occurs, the MIL may be turned off if the same malfunction is not detected during monitoring in three consecutive driving cycles in which conditions are similar to those in which the malfunction was first detected.
All Other Faults: For all other faults, the MIL may be turned off after three subsequent consecutive driving cycles during which the monitoring system responsible for illuminating the MIL functions without detecting the fault, and provided no other fault has been detected that could illuminate the MIL independently under the requirements stated above.
5) DTC Erasing. The diagnostic system may erase a DTC if the same malfunction is not re-registered within at least 40 engine warm-up cycles, and the MIL is not illuminated for that DTC. 6) Controller Area Network (CAN) Communication Line
Bus Topology: Line (bus) structure
Wiring: Twisted pair
DLC External Cable Length: 5 m max.
Data Transfer Rate
Diagnostics: 500 kbps
Service mode (reprogramming, VIN write): 500 kbps or 1 Mbps
7) Driving Cycle. A driving cycle consists of engine start and engine shutdown. 8) Warm-up Cycle. A warm-up cycle means sufficient vehicle operation such that the engine coolant temperature has risen at least 40 °F from engine start and reaches a minimum temperature of at least 160 °F. 9) DTC Format
Diagnostic Trouble Code (SAE J2012)
DTCs used on OBD-II vehicles begin with a letter followed by four numbers.
The letter at the beginning of the DTC identifies the function of the malfunctioning controlled device. The letter "P" indicates a powertrain device, "C" indicates a chassis device, "B" for a body device, and "U" indicates a network or data communication device. The first number indicates whether the code is generic (common to all manufacturers) or manufacturer-specific. "0" and "2" denote generic, "1" indicates manufacturer-specific. The second digit indicates the system affected, a number from 1 to 7. The list below shows which numbers are assigned to each system.
1: Fuel and Air Metering
2: Fuel and Air Metering (injector circuit malfunction only)
3: Ignition System or Misfire
4: Auxiliary Emission Controls
5: Vehicle Speed Control and Idle Control System
6: Computer Output Circuits
7: Transmission
The last two digits of the DTC indicate the component or section of the system in which the malfunction is located. 10) Freeze Frame Data. When a freeze frame event is triggered by an emission-related DTC, the ECM or PCM stores various information about the vehicle as it existed at the time the malfunction occurred. The DTC number together with the engine data can be helpful to the technician in determining the cause of the malfunction. Once the data from the first driving cycle in which the DTC appeared is stored in freeze frame memory, it will remain there even if the malfunction occurs again (second driving cycle) and the MIL illuminates.
Freeze Frame List
Calculated Load Value
Engine Speed
Fuel Trim
Fuel Pressure (if available)
Vehicle Speed (if available)
Engine Coolant Temperature
Intake Manifold Pressure (if available)
Closed Loop or Open Loop Operation
Malfunction Code
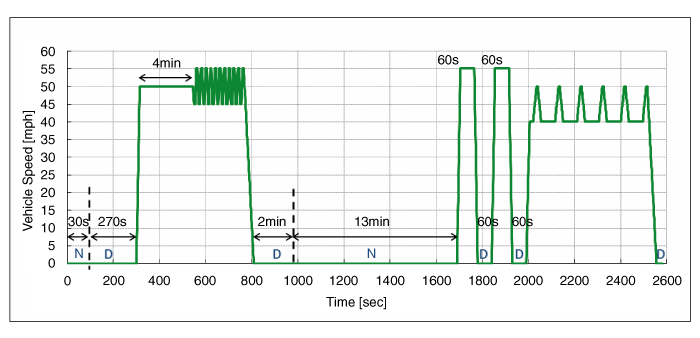
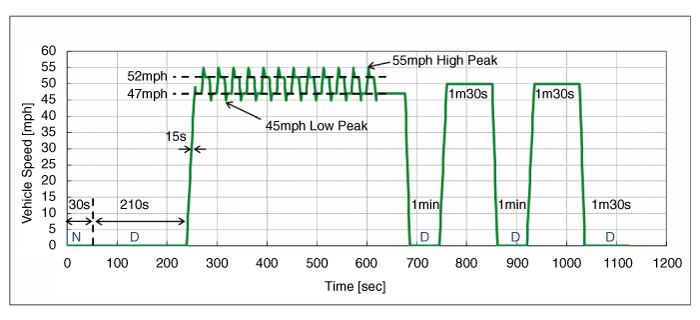
3. OBD-II Readiness Check. [Kia Motors Drive Cycle] The Kia OBDII Drive Cycle is designed to perform and complete the OBDII monitors. To complete a specific monitor for repair verification, follow the driving cycle shown in the diagram below. The Kia OBDII driving cycle consists of two modes (Mode 1 and Mode 2), and Mode 2 is intended for catalyst diagnosis only on Delphi EMS.
Continental, Bosch or Kefico EMS: Perform the Mode 1 driving cycle once to diagnose all systems.
Delphi EMS: Perform the Mode 2 driving cycle twice in succession after performing Mode 1 once to diagnose all systems.
 Engine Control System
 Component Location