Replacing Exterior Light Bulbs
Headlights (With LED Headlights)
LEDs cannot be replaced individually because they form part of the entire assembly.
LEDs must be replaced together with the entire assembly. If replacement is necessary, we recommend a Mazda Authorized Service Center.
Headlights (With Halogen Headlights)
1. When replacing the right bulb, start the engine, turn the steering wheel fully to the left and turn off the engine. When replacing the left bulb, turn the steering wheel to the right and turn off the engine.
2. Make sure the light switch is in the OFF position.
3. Press the center of each plastic clip and remove them.
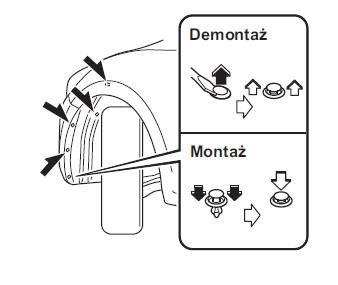
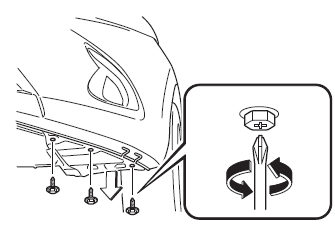
4. Turn the plastic clip screws counterclockwise, remove the clips, then partially pull back the wheel arch liner.
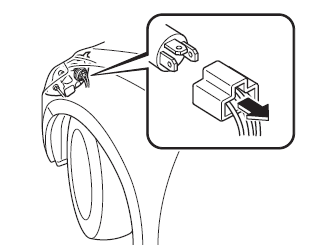
5. Disconnect the connector from the bulb.
6. Remove the rubber sealing cover from the bulb.
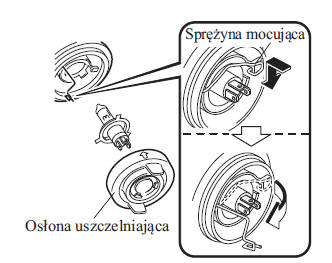
7. Release the bulb retaining spring.
8. Turn the retaining spring so that the bulb can be removed freely.
9. Carefully remove the bulb from the socket by pulling it straight back.
10. Replace the bulb.
11. Install the new bulb by performing the steps in reverse order.
CAUTION
To replace the bulb, consult a specialist. We recommend a Mazda Authorized Service Center.
If a halogen bulb is accidentally touched, clean it with alcohol before installing it.
To keep children away from used bulbs, store bulbs in their original packaging.
When reinstalling the sealing cover, make sure it is properly secured.
Daytime Running Lights/Position Lights (With LED Headlights)
LEDs cannot be replaced individually because they form part of the entire assembly.
LEDs must be replaced together with the entire assembly. If replacement is necessary, we recommend a Mazda Authorized Service Center.
Front Turn Signal Lights, Daytime Running Lights*/Position Lights (With Halogen Headlights)
1. When replacing the right bulb, start the engine, turn the steering wheel fully to the left and turn off the engine. When replacing the left bulb, turn the steering wheel to the right and turn off the engine.
2. Make sure the light switch is in the OFF position.
3. Press the center of each plastic clip and remove them.
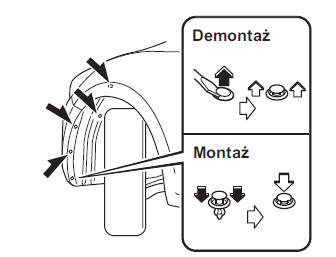
4. Turn the plastic clip screws counterclockwise, remove the clips, then partially pull back the wheel arch liner.
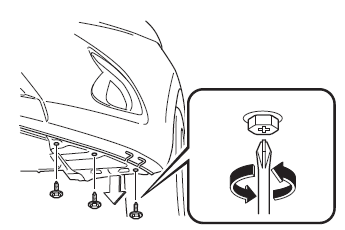
5. Turn the bulb socket assembly counterclockwise and remove it.
6. Remove the bulb from the socket.
Front Turn Signal Lights (With Halogen Headlights) *
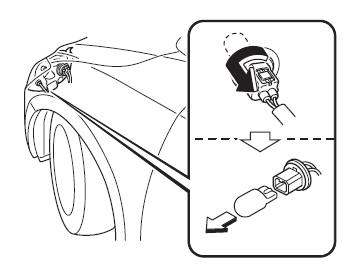
Daytime Running Lights/Position Lights (With Halogen Headlights) *
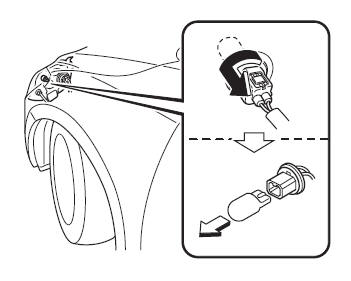
Position Lights (With Halogen Headlights)
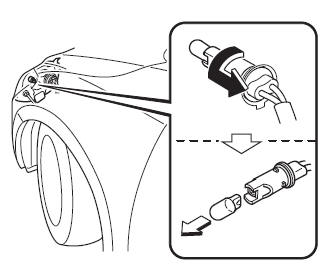
7. Install the new bulb by performing the steps in reverse order.
Front Fog Lights*
1. Make sure the ignition and the fog light switch are in the OFF position.
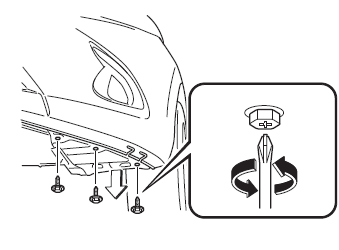
2. Turn the plastic clip screws counterclockwise, remove the clips, then partially pull back the wheel arch liner.
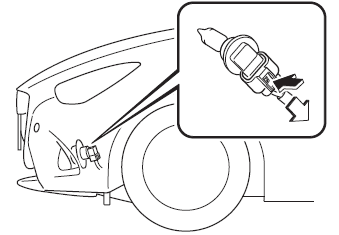
3. Disconnect the electrical connector from the assembly housing by pressing the latch on the connector with your finger and pulling the connector down.
4. Turn the bulb socket assembly and remove it. Carefully remove the bulb from the socket in the headlight by pulling it gently in a straight line.
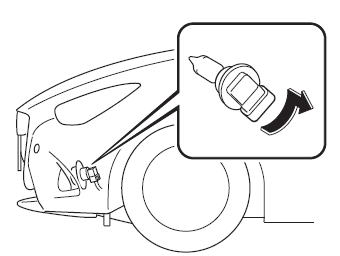
5. Install the new bulb by performing the steps in reverse order.
Side Turn Signal Lights, Third Brake Light
LEDs cannot be replaced individually because they form part of the entire assembly.
LEDs must be replaced together with the entire assembly. If replacement is necessary, we recommend a Mazda Authorized Service Center.
Rear Turn Signal Lights, Brake Lights/Tail Lights
Sedan
1. Make sure the ignition and the headlight switch are in the OFF position.
2. Remove the cover.
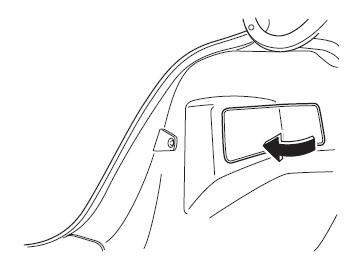
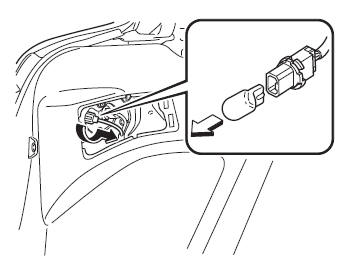
3. Turn the bulb socket assembly counterclockwise and remove it.
4. Remove the bulb from the socket.
Rear Turn Signal Lights
Brake Lights/Tail Lights
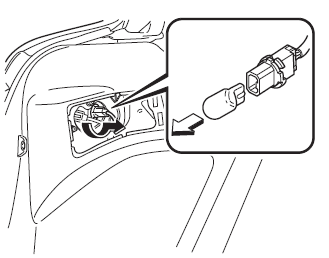
5. Install the new bulb by performing the steps in reverse order.
6. Insert the cover hooks and install the cover in place.
CAUTION
Check that the cover is installed correctly.
Hatchback
1. Make sure the ignition and the headlight switch are in the OFF position.
2. Remove the screws.
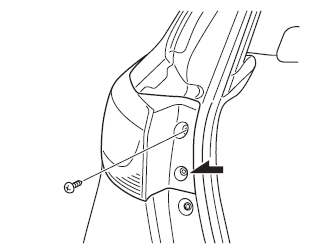
3. Pull the lamp assembly rearward and remove it.
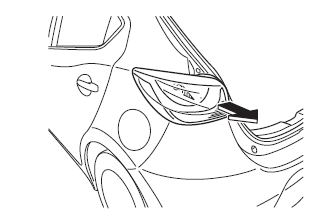
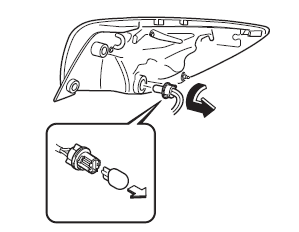
4. Turn the bulb socket assembly counterclockwise and remove it.
5. Remove the bulb from the socket.
Rear Turn Signal Lights
Brake Lights/Tail Lights (With LEDs)
LEDs cannot be replaced individually because they form part of the entire assembly.
LEDs must be replaced together with the entire assembly. If replacement is necessary, we recommend a Mazda Authorized Service Center.
With Halogen Bulb
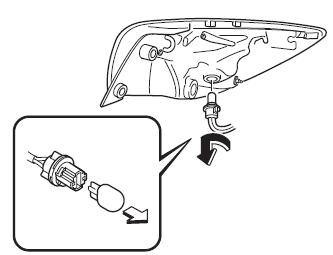
6. Install the new bulb by performing the steps in reverse order.
Reversing Lights
Sedan
1. Make sure the ignition and the headlight switch are in the OFF position.
2. Press the center of each plastic clip and remove them.
3. Fold back the trim on the trunk lid.
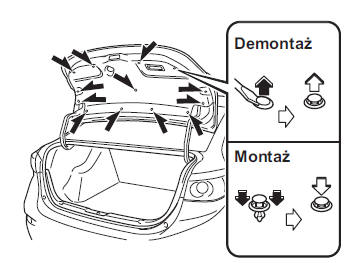
4. Disconnect the electrical connector from the bulb by pressing the latch on the connector with your finger and pulling the connector.
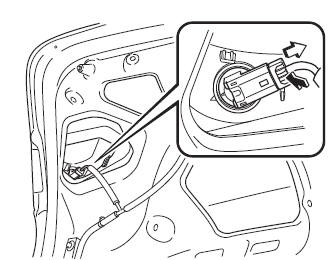
5. Turn the bulb socket assembly counterclockwise and remove it.
6. Remove the bulb from the socket.
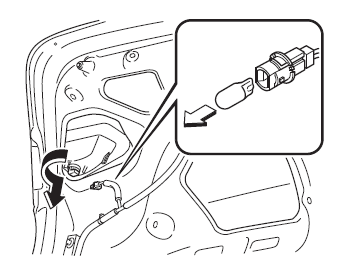
7. Install the new bulb by performing the steps in reverse order.
Hatchback
1. Make sure the ignition and the headlight switch are in the OFF position.
2. Press the center of each plastic clip and remove them.
3. Remove the cover located on the inner surface of the trunk lid.
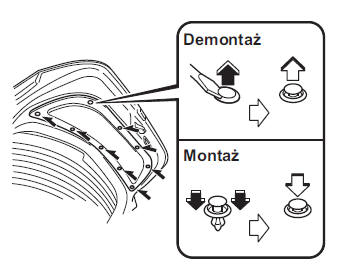
4. Disconnect the connector from the socket.
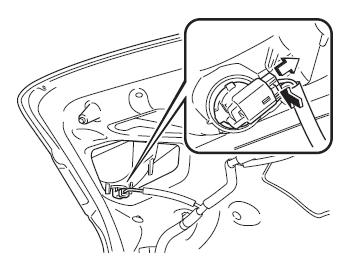
5. Turn the bulb socket assembly counterclockwise and remove it.
6. Remove the bulb from the socket.
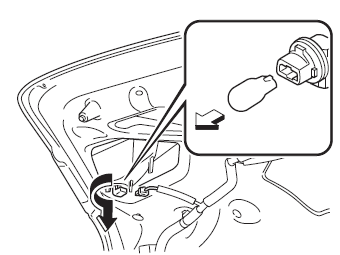
7. Install the new bulb by performing the steps in reverse order.
Rear Fog Light*
Sedan
1. Make sure the ignition and the headlight switch are in the OFF position.
2. Turn the bulb socket assembly counterclockwise and remove it.
3. Remove the bulb from the socket.
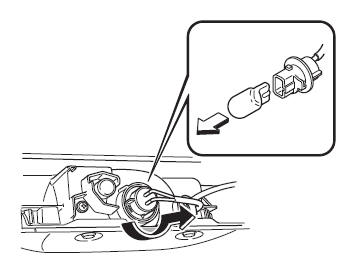
4. Install the new bulb by performing the steps in reverse order.
Hatchback
1. Make sure the ignition and the headlight switch are off.
2. Turn the plastic clip screws counterclockwise, remove the clips, then partially pull back the wheel arch liner.
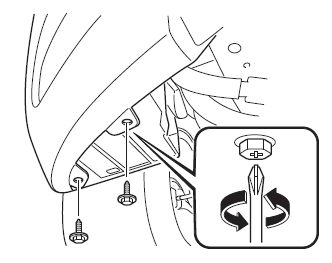
3. Turn the bulb socket assembly counterclockwise and remove it.
4. Remove the bulb from the socket.
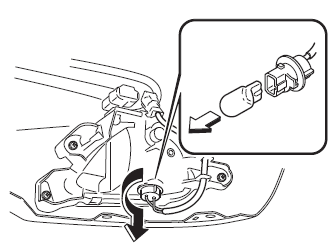
5. Install the new bulb by performing the steps in reverse order.
Number plate lamp
Sedan
1. Make sure the ignition and the headlight switch are in the OFF position.
2. Press the center of each plastic clip and remove them.
3. Fold back the trim on the trunk lid.
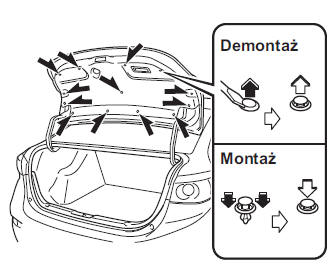
4. Turn the bulb socket assembly counterclockwise and remove it.
5. Remove the bulb from the socket.
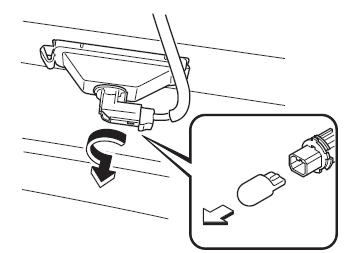
6. Install the new bulb by performing the steps in reverse order.
Hatchback
1. Make sure the ignition and the headlight switch are in the OFF position.
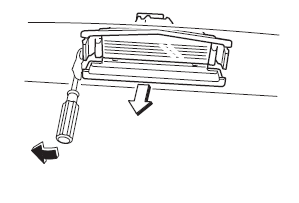
2. Wrap a flat-blade screwdriver in a soft cloth to avoid damaging the lamp.
3. Insert the flat-blade screwdriver at the point shown in the illustration and pull the lamp outward.
4. Disconnect the electrical connector from the bulb by pressing the latch on the connector with your finger and pulling the connector.
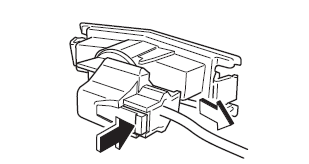
5. Turn the bulb socket assembly counterclockwise and remove it.
6. Remove the bulb from the socket.
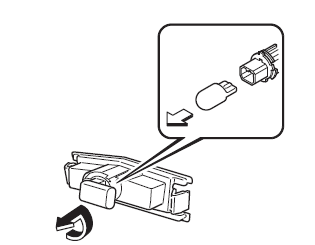
7. Install the new bulb by performing the steps in reverse order.
Test yourself
A quick Mazda 2 quiz: every answer comes with an explanation and a link to the manual page.