Brake System LHD

Brake pedal

In this manual: Brake System LHD
Foreword — 1General information — 45Engine Mechanical MR16DDT — 61Engine Mechanical HR16DE — 52Engine Mechanical K9K — 46Engine Lubrication System MR16DDT — 18Engine Lubrication System HR16DE — 14Engine Lubrication System K9K — 11Engine Cooling System MR16DDT — 28Engine Cooling System HR16DE — 29Engine Cooling System K9K — 24Engine Control System MR16DDT — 163Engine Control System HR16DE — 115Engine Control System K9K — 129Fuel System MR16DDT — 13Fuel system HR16DE — 11Fuel system K9K — 12Exhaust system MR16DDT — 7Exhaust system HR16DE — 10Exhaust system K9K — 7Starting system — 24Accelerator control system — 6Clutch — 25Driveline transfer: TY21B — 77Driveline rear propeller Shaft: 3Fφ16-ETJ75 — 12Driveline rear final drive: RTVS — 31Transaxle & transmission 5MT: RS5F92R — 31Transaxle & transmission 6MT: RS6F94R — 30Transaxle & transmission CVT: RE0F10B — 93Transaxle & transmissioN CVT: RE0F11A — 103Front Axle MR16DDT — 18Front Axle HR16DE — 17Front Axle K9K — 17Rear Axle 2WD — 6Rear Axle 4WD — 13Front Suspension — 21Rear Suspension 2WD — 13Rear Suspension 4WD — 17Road Wheels & Tires — 6Brake System LHD — 24Brake System RHD — 24Parking Brake System — 8Brake Control System without ESP — 44Brake Control System with ESP — 63Steering System — 14Steering Control System — 27Seat Belt — 8SRS Airbag — 24SRS Airbag Control System — 93Ventilation System — 11Heater & Air Conditioning System HR16DE — 28Heater & Air Conditioning System MR16DDT — 28Heater & Air Conditioning Control System Type 1 — 49Heater & Air Conditioning Control System Type 2 — 51Heater & Air Conditioning Control System Type 3 — 32Heater & Air Conditioning Control System Type 4 — 40Heater & Air Conditioning Control System Type 5 — 21Interior — 16Instrument Panel — 10Seat — 18Door & Lock Type 1 — 83Door & Lock type 2 — 80Door & Lock type 3 — 65Door & Lock type 4 — 60Security Control System with intelligent key system — 82Security Control System without intelligent key system — 41Glass & Window System — 15Power Window Control System — 28Body Repair — 13Exterior — 20Mirrors — 26Exterior Lighting System Halogen type — 51Interior Lighting System — 24Wiper & Washer — 45Defogger — 31Horn — 4Power Outlet — 4Body Control System With intelligent key system — 21Body Control System Without intelligent key system — 23LAN system can fundamental — 6LAN system can — 31LAN System can system (type 1) — 1LAN System can system (type 2) — 1LAN System can system (type 3) — 1LAN System can system (type 4) — 1LAN System can system (type 5) — 1LAN System can system (type 6) — 1LAN System can system (type 7) — 2LAN System can system (type 8) — 1LAN System can system (type 9) — 1LAN System can system (type 10) — 1LAN System can system (type 11) — 1Power Control System IPDM E/R (with I-key) — 14Power Control System IPDM E/R (without I-key) — 14Power Control System Power distribution system — 25Charging System — 22Power Supply, Ground & Circuit Elements — 20Meter, Warning Lamp & Indicator — 33Warning Chime System — 22Audio, Visual & Navigation System Audio without navigation — 30Audio, Visual & Navigation System Audio with navigation — 33Audio, Visual & Navigation System NISSAN dynamic control system — 22Cruise Control System — 1Drive Mode System — 10Maintenance — 14
~2min read

Exploded View

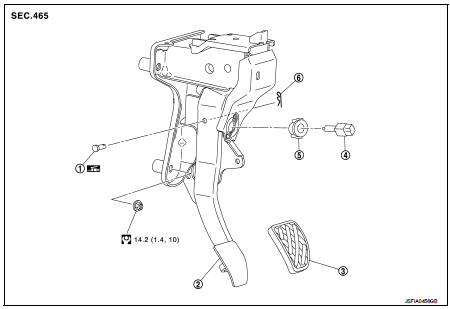
WITHOUT ESP

1. Clevis pin

1. Clevis pin
2. Brake pedal assembly 3. Brake pedal pad
4. Stop lamp switch
5. Clip
6. Snap pin

: N·m (kg-m, ft-lb): Apply multi-purpose grease.


WITH ESP: N·m (kg-m, ft-lb)


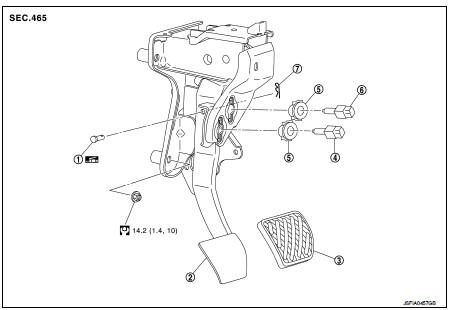
WITH ESP

1. Clevis pin

1. Clevis pin
2. Brake pedal assembly 3. Brake pedal pad
4. Brake switch/brake pedal position switch
5. Clip
6. Stop lamp switch
7. Snap pin

: N·m (kg-m, ft-lb): Apply multi-purpose grease.


Removal and Installation: N·m (kg-m, ft-lb)


Removal and Installation

REMOVAL

1. Remove instrument lower panel. Refer to IP-13, "Removal and Installation". 2. Disconnect the stop lamp switch and the brake switch/brake pedal position switch harness connectors. 3. Rotate the stop lamp switch and the brake switch/brake pedal position switch (1) counter clockwise to remove.

4. Disconnect the accelerator pedal harness connector and harness clip.
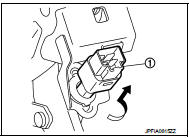
5. Remove snap pin (1) and clevis pin (2) from clevis (3) of brake

5. Remove snap pin (1) and clevis pin (2) from clevis (3) of brake booster.
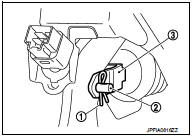
6. Remove the steering member stay (1).

6. Remove the steering member stay (1).

7. Remove the brake pedal assembly.

CAUTION:
Hold the brake booster and master cylinder assembly so as not to drop out or contact them other parts.
8. Remove accelerator pedal from brake pedal assembly. Refer to ACC-3, "Removal and Installation".

9. Perform inspection after removal. Refer to BR-22, "Inspection and Adjustment".
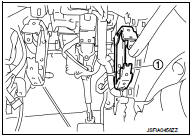
INSTALLATION

INSTALLATION

Note the following, and install in the reverse order of removal.

• Apply the multi-purpose grease to the clevis pin and the mating faces. (Not necessary if grease has been already applied) NOTE

:
The clevis pin may be inserted in either direction.

• Perform adjustment after installation. Refer to BR-22, "Inspection and Adjustment".

Inspection and Adjustment

INSPECTION AFTER REMOVAL

• Check for the following items and replace the brake pedal assembly if necessary. - Check the brake pedal upper rivet (made by aluminum) (A) for deformation. - Check the brake pedal for bend, damage, and cracks on the welded parts.

- Check the lapping length (D) of sub-bracket (B) and slide plate (C).

D : 6.5 mm (0.256 in) or more

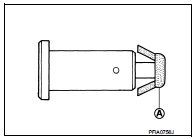
• Check clevis pin and plastic stopper (A) for damage and deformation.

• Check clevis pin and plastic stopper (A) for damage and deformation.

If any is found, replace clevis pin.
ADJUSTMENT AFTER INSTALLATION

ADJUSTMENT AFTER INSTALLATION

• Adjust each item of brake pedal after installing the brake pedal assembly to the vehicle. Refer to BR-9, "Inspection and Adjustment".

• Perform the release position learning of the accelerator pedal.

- MR16DDT: Refer to EC-134, "Work Procedure".

- HR16DE: Refer to EC-542, "Work Procedure".