Vacuum lines
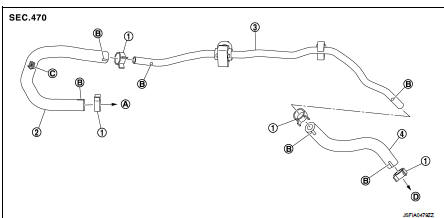
MR16DDT : Exploded View
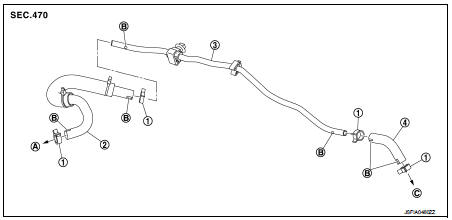
1. Clamp
2. Vacuum hose A
3. Vacuum piping
4. Vacuum hose B
A. To engine side
B. Paint mark C. To brake booster
MR16DDT : Removal and Installation
REMOVAL
1. Remove air duct and air cleaner case. Refer to EM-161, "Removal and Installation". 2. Remove the vacuum hose and vacuum piping.3. Perform inspection after removal. Refer to BR-49, "MR16DDT : Inspection".
INSTALLATION
Note the following, install the vacuum hose.
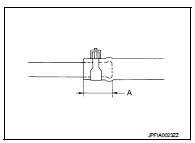
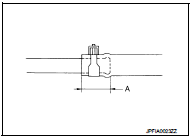
• When installing vacuum hose, insert it until its tip reaches the back-end of length (A) or further as shown in the figure.
CAUTION:Never use lubricating oil during assembly.
A : 24 mm (0.95 in) or mor
- Face the paint mark of vacuum hose A (engine side) upward to assemble. - Face the other paint marks to vehicle front side to assemble.- For clamp mounting direction (the orientation of pawl), refer to BR- 49, "MR16DDT : Exploded View".
MR16DDT : Inspection
INSPECTION AFTER REMOVAL
Appearance
Check for correct assembly, damage and deterioration.
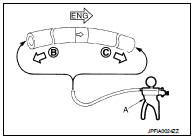
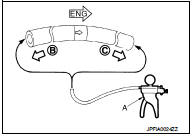
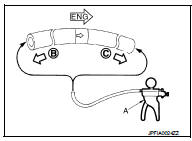
Check Valve Airtightness • Use a handy vacuum pump (A) to check.
When connected to the booster side (B): Vacuum should decrease within 1.3 kPa (9.8 mmHg, 0.38 inHg, 0.013 bar) for 15 seconds under a vacuum of −66.7 kPa (−500 mmHg, −19.70 inHg, −0.667 bar).When connected to the engine side (C): Vacuum should not exist.
• Replace vacuum hose if vacuum hose is malfunctioning.
HR16DE : Exploded View
1. Clamp
2. Vacuum hose (built-in check valve) 3. Vacuum piping
4. Vacuum hose
A. To intake manifold B. Paint mark
C. Stamp indicating engine direction D. To brake booster
HR16DE : Removal and Installation
REMOVAL
1. Remove air duct and air cleaner case. Refer to EM-161, "Removal and Installation". 2. Remove the vacuum hose and vacuum piping.3. Perform inspection after removal. Refer to BR-51, "HR16DE : Inspection".
INSTALLATION
Note the following, install the vacuum hose
• When installing vacuum hose, insert it until its tip reaches the back-end of length (A) or further as shown in the figure.
CAUTION:Never use lubricating oil during assembly.
A : 24 mm (0.95 in) or more
- Face the paint mark of vacuum hose (built-in check valve, intake manifold side) upward to assemble. - Face the other paint marks to vehicle front side to assemble.
- For clamp mounting direction (the orientation of pawl), refer to BR- 50, "HR16DE : Exploded View".
HR16DE : Inspection
INSPECTION AFTER REMOVAL
Appearance
Check for correct assembly, damage and deterioration.
Check Valve Airtightness • Use a handy vacuum pump (A) to check.
When connected to the booster side (B): Vacuum should decrease within 1.3 kPa (9.8 mmHg, 0.38 inHg, 0.013 bar) for 15 seconds under a vacuum of −66.7 kPa (−500 mmHg, −19.70 inHg, −0.667 bar).When connected to the engine side (C): Vacuum should not exist.
• Replace vacuum hose assembly if vacuum hose and check valve are malfunctioning.
K9K : Exploded View
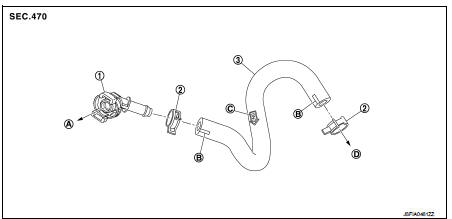
1. Connector
2. Clamp
3. Vacuum hose (built-in check valve)
A. To vacuum pump
B. Paint mark
C. Stamp indicating engine direction D. To brake booster
K9K : Removal and Installation
REMOVAL
1. Remove air duct and air cleaner case. Refer to EM-161, "Removal and Installation". 2. Remove the vacuum hose and connector.3. Perform inspection after removal. Refer to BR-52, "K9K : Inspection".
INSTALLATION
Note the following, install the vacuum hose.
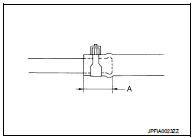
• When installing vacuum hose, insert it until its tip reaches the back-end of length (A) or further as shown in the figure.
CAUTION:Never use lubricating oil during assembly.
A : 24 mm (0.95 in) or more
- Face the paint mark of vacuum hose (built-in check valve, connector side) to the vehicle left side to assemble. - Face the paint mark of vacuum hose (built-in check valve, brake booster side) to the front side to assemble.- For clamp mounting direction (the orientation of pawl), refer to BR- 51, "K9K : Exploded View".
K9K : Inspection
INSPECTION AFTER REMOVAL
Appearance
Check for correct assembly, damage and deterioration.
Check Valve Airtightness • Use a handy vacuum pump (A) to check.
When connected to the booster side (B): Vacuum should decrease within 1.3 kPa (9.8 mmHg, 0.38 inHg, 0.013 bar) for 15 seconds under a vacuum of −66.7 kPa (−500 mmHg, −19.70 inHg, −0.667 bar).When connected to the engine side (C): Vacuum should not exist.
• Replace vacuum hose assembly if vacuum hose and check valve are malfunctioning.