Front coil spring and strut
Exploded View
2WD
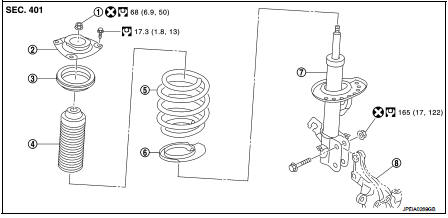
1. Piston rod lock nut 2. Mounting insulator
3. Mounting bearing
4. Bound bumper
5. Coil spring
6. Lower rubber seat
7. Strut
8. Steering knuckle
 : N·m (kg-m, ft-lb)
 : Always replace after every
disassembly
4WD

1. Piston rod lock nut 2. Mounting insulator 3. Mounting bearing 4. Bound bumper 5. Coil spring 6. Lower rubber seat 7. Strut 8. Steering knuckle
: N·m (kg-m, ft-lb) : Always replace after every
disassembly.
Removal and Installation
REMOVAL
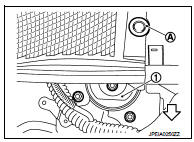
1. Remove tires. Refer to WT-7, "Removal and Installation". 2. Remove lock plate from strut assembly. Refer to BR-29, "FRONT : Removal and Installation" (LHD), BR- 95, "FRONT : Removal and Installation" (RHD). 3. Remove wheel sensor. Refer to BRC-84, "FRONT WHEEL SENSOR : Removal and Installation" (Without ESP), BRC-224, "FRONT WHEEL SENSOR : Removal and Installation" (With ESP). 4. Remove stabilizer connecting rod from strut assembly. Refer to FSU-16, "Removal and Installation". 5. Remove strut mounting bolts and nuts from steering knuckle.6. Remove grommet (A) of cowl top cover.
 : Vehicle front
NOTE
:
Remove mounting bolt of mounting insulator (1) from grommet hole.
7. Remove mounting bolt of mounting insulator, and then remove strut assembly.
INSTALLATION
Note the following, and install in the reverse order of removal.
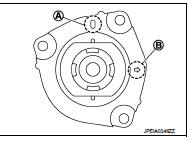
• Install strut assembly with the identification mark (A) of mounting insulator faced forward of the vehicle and the arrow (B) faced outside.
NOTE:
The identification mark "0" shows the right mounting insulator and "1" shows left.
• After replacing the strut absorber, always follow the disposal procedure to discard the strut absorber. Refer to FSU-12, "Disposal".
Disassembly and Assembly
DISASSEMBLY
CAUTION:Never damage strut assembly piston rod when removing components from strut assembly.
1. Install strut attachment (A) (SST: ST35652000) to strut assembly and secure it in a vise.
CAUTION:When installing the strut attachment to strut assembly, wrap a shop cloth around strut to protect from damage.
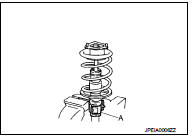
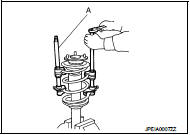
2. Using a spring compressor (A) (commercial service tool), compress coil spring between spring upper seat and lower seat (strut assembly) until coil spring with a spring compressor is free.
CAUTION:Be sure a spring compressor is securely attached to coil spring. Compress coil spring. 3. Check coil spring with a spring compressor between spring upper seat and lower seat (strut assembly) is free. And then remove piston rod lock nut while securing the piston rod tip so that piston rod does not turn. 4. Remove mounting insulator, mounting bearing, and bound bumper from strut.
5. After removing coil spring with a spring compressor, then gradually release a spring compressor.
CAUTION:Loosen while making sure coil spring attachment position does not move. 6. Remove lower rubber seat.
7. Perform inspection after disassembly. Refer to FSU-12, "Inspection".
ASSEMBLY
CAUTION:Never damage strut assembly piston rod when installing components from strut assembly.
1. Install strut attachment (SST: ST35652000) to strut and secure it in a vise.
CAUTION:When installing the strut attachment to strut assembly, wrap a shop cloth around strut to protect from damage. 2. Install lower rubber seat.
3. Compress coil spring using a spring compressor (commercial service tool), and install it onto strut assembly.
• Be careful with the vertical direction of the coil spring. : Upper side
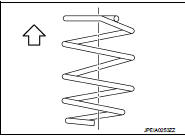
• Align the lower end of coil spring (1) with (A) of lower rubber seat (2) as shown in the figure.
4. Apply soapy water to bound bumper.
CAUTION:Never use machine oil. 5. Insert bound bumper into mounting insulator.
6. Install mounting bearing.
CAUTION:Never apply oils, such as grease, when installing the mounting bearing
.

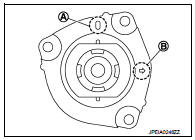
7. Check the location of identification mark (A) of the mounting insulator and install it with the arrow (B) faced outside of the vehicle to the strut.
NOTE:
The identification mark "0" shows right mounting insulator and "1" shows left.
8. Secure piston rod tip so that piston rod does not turn, then tighten piston rod lock nut with specified torque.
CAUTION:Never reuse piston rod lock nut.
9. Gradually release a spring compressor (A), and remove coil spring.
CAUTION:Loosen while making sure coil spring attachment position does not move.
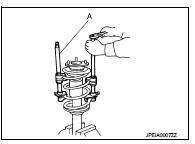
10. Remove the strut attachment (A) from strut assembly.

Inspection
INSPECTION AFTER DISASSEMBLY
Check the following items, and replace the parts if necessary.
Strut
• Strut for deformation, cracks or damage • Piston rod for damage, uneven wear or distortion • Oil leakage
Strut Mounting Insulator and bound bumper Check strut mounting insulator and bound bumper for cracks, wear or damage.
Coil Spring
Check coil spring for cracks, wear or damage.
INSPECTION AFTER INSTALLATION
1. Check wheel sensor harness for proper connector. Refer to BRC-84, "FRONT WHEEL SENSOR : Exploded View" (Without ESP), BRC-224, "FRONT WHEEL SENSOR : Exploded View" (With ESP).2. Check wheel alignment. Refer to FSU-7, "Inspection".
Disposal
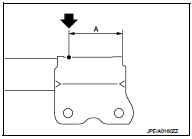
1. Set strut assembly horizontally to the ground with the piston rod fully extracted.2. Drill 2 – 3 mm (0.08 – 0.12 in) hole at the position (
) from top as shown in the figure to release gas gradually.
• Be careful with metal chips or oil blown out by the compressed gas.
NOTE:• Drill vertically in this direction (
 ).
• Directly to the outer tube avoiding brackets.
• The gas is clear, colorless, odorless, and harmless.
A : 20 – 30 mm (0.79 – 1.18 in)
3. Position the drilled hole downward and drain oil by moving the piston rod several times.
CAUTION:Dispose of drained oil according to the law and local regulations.