Front seat (4WD)
Exploded View
DRIVER SEAT
LHD models

1. Headrest
2. Headrest holder (locked) 3. Headrest holder (free) 4. Seatback assembly (with heater seat only)
5. Inner lower cover
6. Seatback trim (without heater seat only) 7. Seatback pad (without heater seat only) 8. Seat belt buckle
9. Anchor bolt
10. Seat cushion inner finisher 11. Reclining device inner cover (front) 12. Reclining device inner cover (rear) 13. TORX bolt
14. Seat cushion trim (without heater seat only) 15. Seat cushion pad (without heater seat only) 16. Seat cushion silencer 17. Seat cushion assembly (with heater seat only)
18. Lifter link
19. Lifter lever knob
20. Lifter lever knob cap 21. Reclining lever knob 22. Seat cushion outer finisher 23. Spring
24. Reclining device outer cover (front) 25. Reclining device outer cover (rear) 26. Outer lower cover
27. Side air bag module
28. Seatback silencer
29. Seat frame & adjuster assembly
 : Pawl
 : Metal clip
 : Do not reuse
 : N·m (kg-m, in-lb)
 : N·m (kg-m, ft-lb)
PASSENGER SEAT
CAUTION:Always replace seat cushion as an assembly because occupant detection unit is equipped.
LHD models
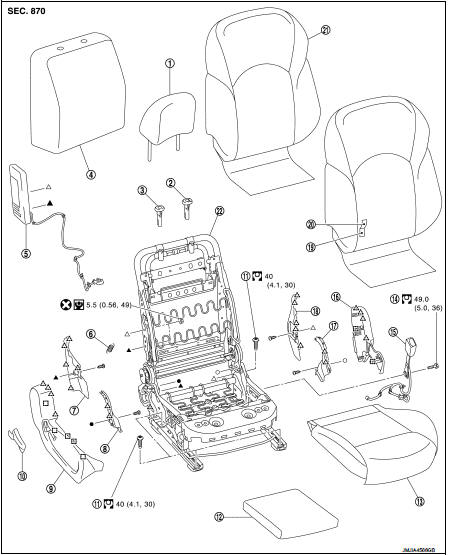
1. Headrest
2. Headrest holder (locked) 3. Headrest holder (free) 4. Seatback silencer
5. Side air bag module
6. Spring
7. Reclining device outer cover (rear) 8. Reclining device outer cover (front) 9. Seat cushion outer finisher 10. Reclining lever knob 11. TORX bolt
12. Seat cushion silencer 13. Seat cushion assembly 14. Anchor bolt
15. Seat belt buckle
16. Seat cushion inner finisher 17. Reclining device inner cover (front) 18. Reclining device inner cover (rear) 19. Seatback pad (without heater seat only) 20. Seatback trim (without heater seat only) 21. Seatback assembly (with heater seat only)
22. Seat frame & adjuster assembly
 : Pawl
 : Metal clip
 : Do not reuse
 : N·m (kg-m, in-lb)
 : N·m (kg-m, ft-lb)
Removal and Installation
REMOVAL
CAUTION:Before servicing, disconnect the battery cable from negative terminal or remove the fuse. 1. Remove headrest. 2. Set the seatback vertically. 3. Slide seat to the frontmost position. 4. Remove rear outer mounting TORX bolt. 5. Remove rear inner mounting TORX bolt. 6. Slide seat to the rearmost position. 7. Remove front outer mounting TORX bolt. 8. Remove front inner mounting TORX bolt.
9. Remove seat cushion lower harness connectors and harness fixing clamps.
CAUTION:Before performing removal operation, check the installation position of harness connectors and harness fixing clamps. 10. Remove seat from the vehicle. CAUTION:
When removing and installing, use shop cloths to protect parts from damage.
INSTALLATION
Note the following items, and install in the reverse order of removal.
CAUTION:• When removing and installing, use shop cloths to protect parts from damage.
• When installing, tighten mounting TORX bolts according to the numerical order (1, 2, 3, and 4 as shown in the figure), starting from front inner mounting TORX bolt.
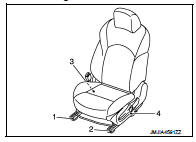
• Always fix the harness fixing clamp in position.
Seatback : Disassembly and Assembly
DISASSEMBLY
CAUTION:For models with heater seat, always replace heater seat as a seatback assembly without disassembling trim and pad. 1. Remove seatback retainer installed in the lower portion of seat cushion.
2. Remove harness installed in the lower portion of seat cushion.
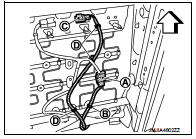
1. Disconnect seatback heater unit harness connector (A).(with heater seat only.) 2. Remove seatback heater unit harness connector fixing clips (A) and harness fixing clamp (B). (with heater seat only) 3. Remove side air bag module harness connector fixing clips (C) and harness fixing clamp (D).
 : Vehicle front
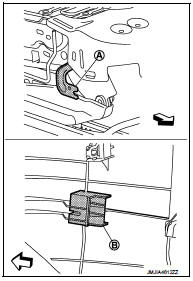
3. Open seatback fastener (A) and remove seatback retainer (B).
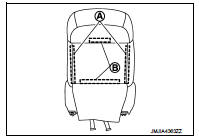
4. Remove side air bag module harness fixing clamps from seat frame & adjuster assembly.
5. Use pincers, etc., to press up pawls as shown by the arrows in the figure, and remove headrest holder from seatback.
(front/rear and right/left)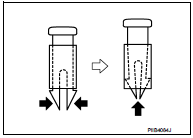
6. Remove side air bag module mounting nuts.
7. Remove seatback trim and seatback pad from seat frame & adjuster assembly.
CAUTION:Never subject side air bag module to impact by dropping or hitting.
8. Remove side air bag module from seatback pad.
CAUTION:For handling of side air bag module, refer to SR-22, "Removal and Installation"
.
9. Separate the seatback trim and seatback pad. (without heater seat only) Remove hog rings, and separate the seatback trim and seatback pad.
CAUTION:Before performing separating operation, check the installation position of hog rings.
10. Remove seatback silencer from seat frame & adjuster assembly.
ASSEMBLY
Note the following, and assemble in the reverse order of disassembly.
CAUTION:Always install the hog ring in position.
Seat cushion : Disassembly and Assembly
DISASSEMBLY
CAUTION:For models with heater seat and occupant detection unit, always replace heater seat and reminder as a seat cushion assembly without disassembling trim and pad.
1. Remove seat cushion outer finisher.
1. Disengage pawls and remove lifter lever knob cap (1).
(Driver seat only)
2. Remove fixing screws and remove lifter lever knob (2).
(Driver seat only)
 : Pawl
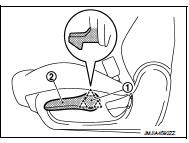
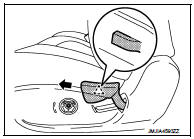
3. Disengage pawl using a screwdriver while pulling reclining lever knob. Slide reclining lever knob toward seat front and remove it.
 : Pawl
4. Pull seat cushion outer finisher toward seat front. Disengage pawls and metal clips. Slide seat cushion outer finisher toward seat front. Remove seat cushion outer finisher.
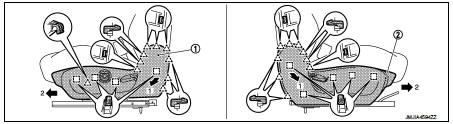
1.
Seat cushion outer finisher (Driver seat)
2.
Seat cushion outer finisher (Passenger seat)
 : Pawl
 : Metal cli
2. Remove harness installed in the lower portion of seat cushion.
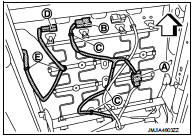
Driver seat
1. Disconnect seat cushion heater unit harness connector (A).
(with heater seat only) 2. Remove seat cushion heater unit harness connector fixing clip (B) and harness fixing clamps (C). (with heater seat only) 3. Remove seat belt buckle harness connector fixing clip (D) and harness fixing clamps (E).
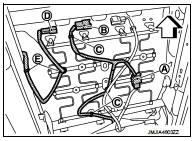
 : Vehicle front
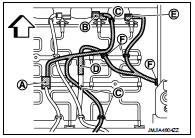
Passenger seat
1. Disconnect seat cushion heater unit harness connector (A).
2. Remove seat cushion heater unit harness connector fixing clip (B) and harness fixing clamps (C). (with heater seat only)
3. Disconnect occupant detection unit harness connector (D).
4. Remove seat belt buckle harness connector fixing clip (E) and harness fixing clamps (F).
 : Vehicle front
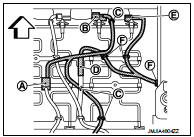
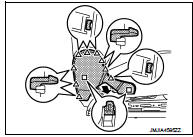
3. Remove seat cushion inner finisher.
1. Remove harness fixing clamp of seat belt buckle installed on seat frame & adjuster assembly. 2. Remove seat belt buckle mounting anchor bolt, and then remove seat belt buckle from seat frame &adjuster assembly.3. Pull seat cushion inner finisher forward. Disengage pawls and metal clips.
 : Pawl
 : Metal clip

4. Remove seat cushion retainer from seat frame & adjuster assembly. Remove seat cushion trim and seat cushion pad. 5. Remove hog rings, and separate the seat cushion trim and seat cushion pad. (without driver heater seat only) CAUTION:
Before performing separating operation, check the installation position of hog rings. 6. Remove seat cushion silencer from seat frame & adjuster assembly. 7. Remove seatback trim and seatback pad from seat frame & adjuster assembly. Refer to SE-27, "SEATBACK : Disassembly and Assembly". 8. Remove reclining device cover. • Remove fixing screw, and then remove reclining device outer cover (front and rear).
• Remove fixing screw, and then remove reclining device inner cover (front and rear).
9. Remove following parts from seat frame & adjuster assembly. • Remove reclining spring.• Remove fixing screws. Pull outer lower cover toward seat outer. Disengage metal clips. Remove outer lower cover. (driver seat only) • Remove fixing screws, and then remove inner lower cover. (driver seat only)
ASSEMBLY
Note the following, and assemble in the reverse order of disassembly.
CAUTION:• Always install the hog rings in position.
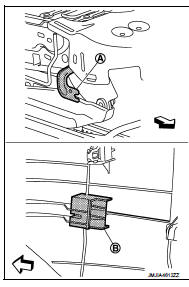
• When installing seat cushion finisher, always slide seat cushion outer finisher toward seat rear, engage portion (A) of seat frame & adjuster assembly and portion (B) of seat cushion outer finisher, and then install pawls and metal clips of seat cushion outer finisher.
 : Vehicle front
1. Disconnect seat cushion heater unit harness connector (A).
(with heater seat only)
2. Remove seat cushion heater unit harness connector fixing clip (B) and harness fixing clamps (C). (with heater seat only)
3. Remove seat belt buckle harness connector fixing clip (D) and harness fixing clamps (E).
 : Vehicle front
Passenger seat
1. Disconnect seat cushion heater unit harness connector (A).
2. Remove seat cushion heater unit harness connector fixing clip (B) and harness fixing clamps (C). (with heater seat only)
3. Disconnect occupant detection unit harness connector (D).
4. Remove seat belt buckle harness connector fixing clip (E) and harness fixing clamps (F).
 : Vehicle front
3. Remove seat cushion inner finisher.
1. Remove harness fixing clamp of seat belt buckle installed on seat frame & adjuster assembly. 2. Remove seat belt buckle mounting anchor bolt, and then remove seat belt buckle from seat frame &adjuster assembly.3. Pull seat cushion inner finisher forward. Disengage pawls and metal clips.
 : Pawl
 : Metal clip
4. Remove seat cushion retainer from seat frame & adjuster assembly. Remove seat cushion trim and seat cushion pad. 5. Remove hog rings, and separate the seat cushion trim and seat cushion pad. (without driver heater seat only) CAUTION:
Before performing separating operation, check the installation position of hog rings. 6. Remove seat cushion silencer from seat frame & adjuster assembly. 7. Remove seatback trim and seatback pad from seat frame & adjuster assembly. Refer to SE-27, "SEATBACK : Disassembly and Assembly". 8. Remove reclining device cover. • Remove fixing screw, and then remove reclining device outer cover (front and rear).
• Remove fixing screw, and then remove reclining device inner cover (front and rear).
9. Remove following parts from seat frame & adjuster assembly. • Remove reclining spring.• Remove fixing screws. Pull outer lower cover toward seat outer. Disengage metal clips. Remove outer lower cover. (driver seat only) • Remove fixing screws, and then remove inner lower cover. (driver seat only)
ASSEMBLY
Note the following, and assemble in the reverse order of disassembly. CAUTION:• Always install the hog rings in position.
• When installing seat cushion finisher, always slide seat cushion outer finisher toward seat rear, engage portion (A) of seat frame & adjuster assembly and portion (B) of seat cushion outer finisher, and then install pawls and metal clips of seat cushion outer finisher.
 : Vehicle front