Transaxle & transmission CVT: RE0F10B

Unit disassembly and assembly
In this manual: Transaxle & transmission CVT: RE0F10B
Foreword — 1General information — 45Engine Mechanical MR16DDT — 61Engine Mechanical HR16DE — 52Engine Mechanical K9K — 46Engine Lubrication System MR16DDT — 18Engine Lubrication System HR16DE — 14Engine Lubrication System K9K — 11Engine Cooling System MR16DDT — 28Engine Cooling System HR16DE — 29Engine Cooling System K9K — 24Engine Control System MR16DDT — 163Engine Control System HR16DE — 115Engine Control System K9K — 129Fuel System MR16DDT — 13Fuel system HR16DE — 11Fuel system K9K — 12Exhaust system MR16DDT — 7Exhaust system HR16DE — 10Exhaust system K9K — 7Starting system — 24Accelerator control system — 6Clutch — 25Driveline transfer: TY21B — 77Driveline rear propeller Shaft: 3Fφ16-ETJ75 — 12Driveline rear final drive: RTVS — 31Transaxle & transmission 5MT: RS5F92R — 31Transaxle & transmission 6MT: RS6F94R — 30Transaxle & transmission CVT: RE0F10B — 93Transaxle & transmissioN CVT: RE0F11A — 103Front Axle MR16DDT — 18Front Axle HR16DE — 17Front Axle K9K — 17Rear Axle 2WD — 6Rear Axle 4WD — 13Front Suspension — 21Rear Suspension 2WD — 13Rear Suspension 4WD — 17Road Wheels & Tires — 6Brake System LHD — 24Brake System RHD — 24Parking Brake System — 8Brake Control System without ESP — 44Brake Control System with ESP — 63Steering System — 14Steering Control System — 27Seat Belt — 8SRS Airbag — 24SRS Airbag Control System — 93Ventilation System — 11Heater & Air Conditioning System HR16DE — 28Heater & Air Conditioning System MR16DDT — 28Heater & Air Conditioning Control System Type 1 — 49Heater & Air Conditioning Control System Type 2 — 51Heater & Air Conditioning Control System Type 3 — 32Heater & Air Conditioning Control System Type 4 — 40Heater & Air Conditioning Control System Type 5 — 21Interior — 16Instrument Panel — 10Seat — 18Door & Lock Type 1 — 83Door & Lock type 2 — 80Door & Lock type 3 — 65Door & Lock type 4 — 60Security Control System with intelligent key system — 82Security Control System without intelligent key system — 41Glass & Window System — 15Power Window Control System — 28Body Repair — 13Exterior — 20Mirrors — 26Exterior Lighting System Halogen type — 51Interior Lighting System — 24Wiper & Washer — 45Defogger — 31Horn — 4Power Outlet — 4Body Control System With intelligent key system — 21Body Control System Without intelligent key system — 23LAN system can fundamental — 6LAN system can — 31LAN System can system (type 1) — 1LAN System can system (type 2) — 1LAN System can system (type 3) — 1LAN System can system (type 4) — 1LAN System can system (type 5) — 1LAN System can system (type 6) — 1LAN System can system (type 7) — 2LAN System can system (type 8) — 1LAN System can system (type 9) — 1LAN System can system (type 10) — 1LAN System can system (type 11) — 1Power Control System IPDM E/R (with I-key) — 14Power Control System IPDM E/R (without I-key) — 14Power Control System Power distribution system — 25Charging System — 22Power Supply, Ground & Circuit Elements — 20Meter, Warning Lamp & Indicator — 33Warning Chime System — 22Audio, Visual & Navigation System Audio without navigation — 30Audio, Visual & Navigation System Audio with navigation — 33Audio, Visual & Navigation System NISSAN dynamic control system — 22Cruise Control System — 1Drive Mode System — 10Maintenance — 14
~1min read
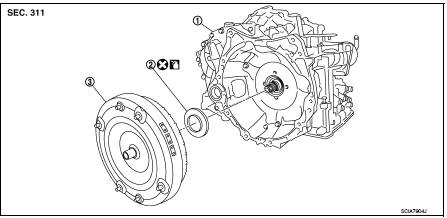
Torque converter and converter housing oil seal Exploded View
1. Transaxle assembly

1. Transaxle assembly 2. Converter housing oil seal 3. Torque converter

disassembly.: Always replace after every
disassembly.

Disassembly: Apply CVT Fluid NS-2.


Disassembly 1. Remove transaxle assembly. Refer to TM-301, "Removal and Installation".

2. Remove torque converter from transaxle assembly.

CAUTION:
Never damage bush on the inside of torque converter sleeve when removing torque converter.

3. Remove converter housing oil seal using a flat-bladed screwdriver.

CAUTION:
Be careful not to scratch converter housing.
Assembly

Note the following, and install in the reverse order of removal.

• Drive converter housing oil seal (1) evenly using a drift (A) (commercial service tool) so that converter housing oil seal protrudes by the dimension (B) respectively.

2 : Transaxle assembly
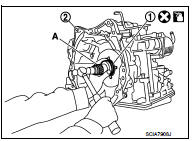

2 : Transaxle assembly


NOTE:

NOTE

:
Converter housing oil seal pulling direction is used as the reference.

• After completing installation, check for CVT fluid leakage and CVT fluid level. Refer to TM-184, "Inspection".
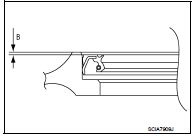
• Attach the pawl (A) of the torque converter to the drive sprocket

• Attach the pawl (A) of the torque converter to the drive sprocket hole (B) on the transaxle assembly side.

CAUTION:
• Rotate the torque converter for installing torque converter.

• Never damage the bushing inside the torque converter sleeve when installing the converter housing oil seal.

Inspection

Inspection

INSPECTION AFTER INSTALLATION

• After inserting a torque converter to the CVT, check dimension (A) with in the reference value limit.

B : Scale
C : Straightedge

Dimension (A) : Refer to TM-308, "Torque Converter".

Service data and specifications (SDS)