Central locking remote control
GENERAL
These vehicles may be fitted with an infrared or radio frequency central locking remote control with rolling code, to prevent copying.
When replacing a transmitter, it is therefore necessary to resynchronise it so that it is back in phase with the decoder box.
This remote control is used only for locking and unlocking the doors (it has no effect on the immobiliser).
CAUTION: This system cannot operate with three remote controls (the decoder box can manage only two different rolling codes).
The TRANSMITTER
Replacing or adding a remote control with immobiliser, without replacing the decoder box
Order a replacement key head using the number stamped on one of the old keys or on the label normally supplied with the keys when the vehicle was delivered (eight alphanumeric characters).
If a key is being added or has been lost, also order a key insert cut to the key number.
Carry out a resynchronisation specific to this case using the XR25 tool case.
This procedure brings the remote control back in phase with the decoder box (rolling code) only when the decoder box is not replaced (immobiliser models only).
1. Ignition off, connect the XR25 tool case (rotary switch on S8, code D56).
For vehicles fitted with an infrared remote control, enter command mode G04* (forced protected mode), then switch the ignition on and enter the vehicle's fault-finding code (see procedure in chapter 82).
For vehicles fitted with a radio frequency remote control, go to step 2.
2. Switch the ignition off and enter command mode G32*.
From this point, the operator has 10 seconds to carry out the next step.
NOTE: The 10 seconds can be monitored by the steady illumination of the red immobiliser warning light and the left-hand segment of bar graph 17 on the XR25 tool case (code D56, sheet no. 56).
3. Press the remote control twice (the doors lock and unlock and the red light goes out).
NOTE:
When replacing a key head, resynchronising the second remote control (if fitted) is not always necessary.
Check that the second one works; if not, resynchronise it.If both remote controls (if fitted) are out of sync, two resynchronisation procedures must be carried out (one for each remote control).
CAUTION: For the infrared code to be transmitted correctly, the remote control must be pointed accurately at the receiver. If the procedure fails, start again from the beginning (infrared remote control only).
4. The procedure is complete; check that the central locking operates correctly.
88-
Replacing or adding a remote control without immobiliser, without replacing the decoder box
On a vehicle without immobiliser, the remote control does not contain a specific number.
It is therefore sufficient to order a key head with remote control, without a number.
If a key is being added or has been lost, also order a key insert cut to the key number.
Carry out a resynchronisation specific to this case using the XR25 tool case.
This procedure brings the remote controls back in phase with the decoder box (rolling code) only when the decoder box is not replaced (immobiliser models only).
Ignition off, connect the XR25 tool case (rotary switch on S8, code D56).
Enter command mode G32* (the doors lock and unlock).
From this point, the operator has 10 seconds to carry out the next step.
NOTE: The 10 seconds can be monitored by the illumination of the left-hand segment of bar graph 17 on the XR25 tool case (code D56, sheet no. 56).
3. Press the remote control twice (the doors lock and unlock).
NOTE:
When replacing a key head, resynchronising the second remote control (if fitted) is not always necessary.
Check that the second one works; if not, resynchronise it.If both remote controls (if fitted) are out of sync, two resynchronisation procedures must be carried out (one for each remote control).
CAUTION: For the infrared code to be transmitted correctly, the remote control must be pointed accurately at the receiver. If the procedure fails, start again from the beginning (infrared remote control only).
4. The procedure is complete; check that the central locking operates correctly.
Simple resynchronisation procedure
This procedure brings the remote controls back in phase with the decoder box (rolling code).
This procedure is used:
when the remote control code is no longer within the receiving range of the decoder box (more than 1000 consecutive presses of the remote control out of range),
when only the decoder box is replaced (new decoder box),
when a remote control is replaced and the decoder box is new (replacement of a complete set).
REMINDER: For replacing or adding a remote control with immobiliser without replacing the decoder box, see "Replacing or adding a remote control with or without immobiliser, without replacing the decoder box" (specific resynchronisation procedure).
Ignition off:
1. Press and hold the central locking button for a few seconds until the doors lock and unlock.
From this point, the operator has 10 seconds to carry out the next step.
NOTE: The 10 seconds can be monitored by the steady illumination of the red immobiliser warning light (if fitted) and by the left-hand segment of bar graph 17 on the XR25 tool case (code D56, sheet no. 56).
2. Press the remote control button twice (the doors lock and unlock, and the red indicator light goes out if equipped).
NOTE: If both remote controls (if equipped) are out of sync, two resynchronization procedures must be carried out (one for each remote control).
CAUTION: For the infrared code to be transmitted correctly, the remote control must be pointed accurately at the receiver. If the procedure fails, start again from the beginning (infrared remote control only).
3. The procedure is complete. Check that the central locking operates correctly.
DECODER UNIT
The decoder unit is located in the left-hand side of the dashboard (A).
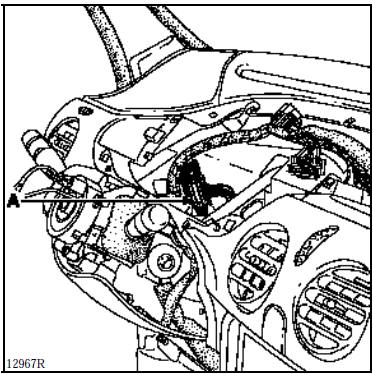
Removal - Refitting
To remove the decoder unit, the dashboard must be partially removed.
Remove:
the steering wheel with the wheels straight,
the lower steering column shrouds,
knee protection panel under the steering column,
the lighting and wiper/washer control assembly,
the dashboard surround,
the dashboard,
the trim at the bottom of the driver's side dashboard,
the two speaker grilles on the dashboard,
the dashboard mountings.
Pull the dashboard away as far as possible, disconnect the decoder unit and remove its two mounting screws (B) using a small ratchet fitted with a Torx 20 bit.
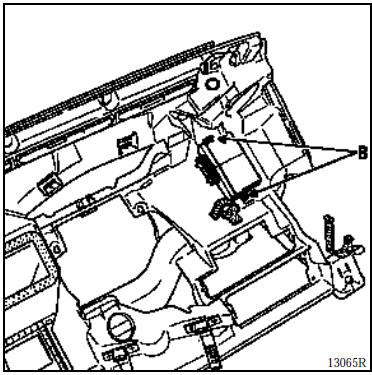
Replacement
For vehicles equipped with immobilizer, see chapter 82 (learning procedure). The decoder unit communicates with the immobilizer.
For vehicles without immobilizer, carry out a resynchronization.
NOTE: Remote control diagnosis can be carried out using the XR25 tester (diagnostic sheet No. 56).
REMOTE CONTROL RECEIVER
It is located near the courtesy light.
It receives the remote control code and transmits it to the decoder unit. Its role is to amplify the signal.
The remote control receiver is replaced independently of the transmitter and the decoder unit (it is not coded).
Removal - Refitting
Remove:
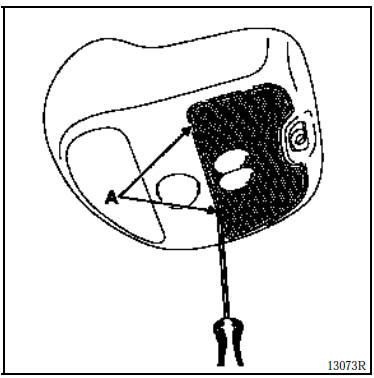
the light diffuser by levering it at the two points (A) using a small screwdriver,
the two mounting screws of the courtesy light console (B).
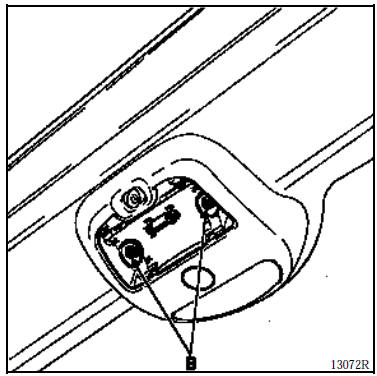
Release the assembly towards the front and disconnect the connector.
After removing the bulb, remove the screw (C) and unclip the holder (D).
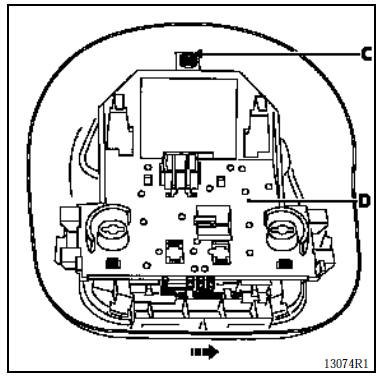
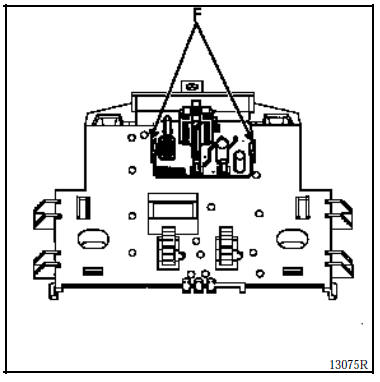
Remove the receiver and its circuit board by spreading the tabs (F) (example: infrared receiver).
Refitting note
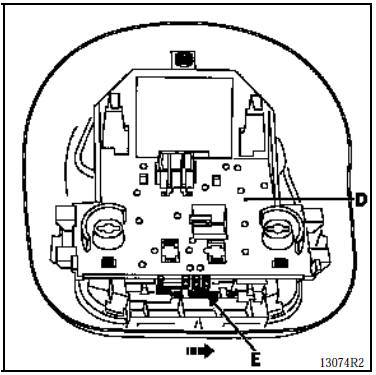
When refitting the holder (D), make sure the switch (E) is positioned to the right (see drawing) so that the contacts are not damaged when clipping.
Test yourself
A quick Renault Kangoo quiz: every answer comes with an explanation and a link to the manual page.