Chassis
Steering assembly
In this manual: Chassis
~2min read
Axial tie rod end
Essential special tools |
|
| Tav. 476 | Ball joint extractor |
| Dir. 1306-04 | Rack immobilising tool |
| Dir. 1305-01 | Axial ball joint removal and refitting tool |
Essential equipment |
| diagnostic tool |
Tightening torques |
|
| axial ball joint | 8 daN.m |
| toe adjustment locknut | 5.3 daN.m |
| steering ball joint nut | 3.7 daN.m |
| wheel bolt | 11 daN.m |
| battery cover screw | 0.4 daN.m |

REMOVAL
- Position the vehicle on a two-post lift.
- Unlock the steering column lock using the diagnostic tool.
- Disconnect the battery, starting with the negative terminal.
- Extract the steering ball joint using the tool (Tav.476).
- Loosen the toe adjustment locknut.
- Note the number of thread turns engaged so that toe can be pre-set when refitting.
- Remove:
- the ball joint housing,
- the locknut,
- the bellows retaining clips,
- the bellows.
Take care not to deform the bellows: risk of irreversible damage.
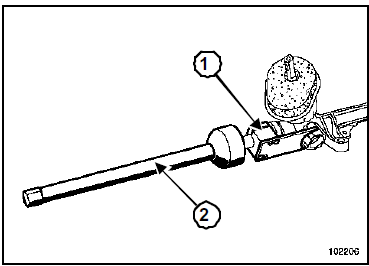
- Fit the tool (Dir. 1306-04)(1) onto the steering rod on the pinion side.
- Release the axial ball joint using tool (Dir. 1305-01)(2).
INSTALLATION
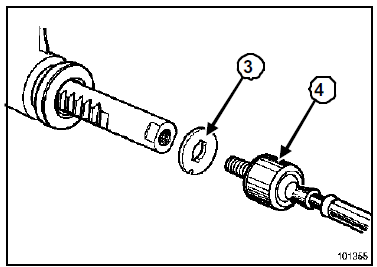
- Always replace the washer (3).
- Refit:
- the washer (3),
- the axial ball joint (4).
- Torque the axial ball joint (8 daN.m) using tool (Dir. 1305-01).
- Apply lithium grease to:
- the rack,
- the axial ball joint.
- Refit:
- the bellows,
- the metal clip,
- the new plastic clip, identical to the original fitting,
- the locknut,
- the ball joint housing.
- Screw the steering ball joint housing back on by the number of turns noted during removal.
- Refit the steering ball joint.
- Tighten to the following torques:
- the toe adjustment locknut (5.3 daN.m),
- the steering ball joint nut (3.7 daN.m),
- the wheel fixing bolts (11 daN.m).
Reconnect the battery; carry out the necessary relearn procedures (Chapter Battery).
- Torque the battery cover screws (0.4 daN.m).
- Adjust the wheel alignment.
Carry out the torque and angle sensor relearn using the diagnostic tool.
Note: Be sure to initialise the xenon headlamp system (if the vehicle is equipped with it; see Electrical equipment chapter).Test yourself
A quick Renault Megane quiz: every answer comes with an explanation and a link to the manual page.
Was this page helpful?