Removal
1. REMOVE NO. 1 INSTRUMENT CLUSTER FINISH PANEL GARNISH

2. REMOVE NO. 2 INSTRUMENT CLUSTER FINISH PANEL GARNISH
3. REMOVE FRONT NO. 1 CONSOLE BOX INSERT
4. REMOVE FRONT NO. 2 CONSOLE BOX INSERT
5. REMOVE SHIFT LEVER KNOB SUB-ASSEMBLY
6. REMOVE SHIFT LEVER KNOB SUB-ASSEMBLY (for VF2A)
7. REMOVE UPPER CONSOLE PANEL SUB-ASSEMBLY
8. REMOVE NO. 2 CONSOLE BOX RETAINER
9. REMOVE REAR CONSOLE BOX ASSEMBLY
10. REMOVE NO. 1 POWER OUTLET SOCKET ASSEMBLY
(a) Disconnect the power outlet socket assembly connector.
(b) Using a screwdriver, detach the claw to remove the No. 1 power outlet socket assembly. Text in Illustration
HINT: Tape the screwdriver tip before use. |
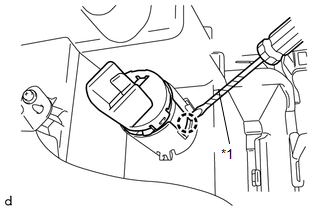 |
11. REMOVE NO. 1 POWER OUTLET SOCKET COVER
(a) Detach the 2 claws to remove the No. 1 power outlet socket cover. |
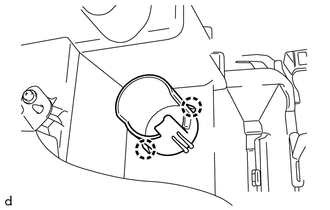 |
12. REMOVE REAR CONSOLE END PANEL
13. REMOVE NO. 3 POWER OUTLET SOCKET ASSEMBLY
(a) Detach the connector clamp.
(b) While pulling the claw of the No. 3 power outlet socket assembly in the direction of the arrow, push the No. 3 power outlet socket assembly toward the inside of the chamber to remove it. HINT: Use the same procedure as for the other sides. |
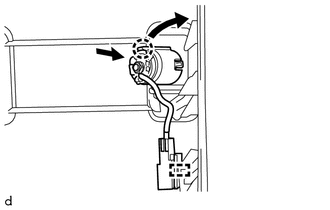 |
14. REMOVE CENTER POWER OUTLET SOCKET COVER
(a) Detach the 2 claws to remove the center power outlet socket cover. HINT: Use the same procedure as for the other sides. |
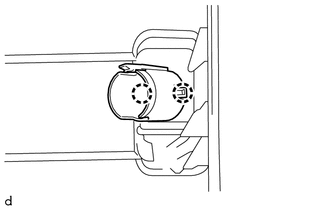 |
Test yourself
A quick Toyota 4Runner quiz: every answer comes with an explanation and a link to the manual page.