Sliding Roof Control Switch Circuit
The sliding roof drive gear sub-assembly (sliding roof ECU) receives sliding roof switch signals and drives its built-in motor.
WIRING DIAGRAM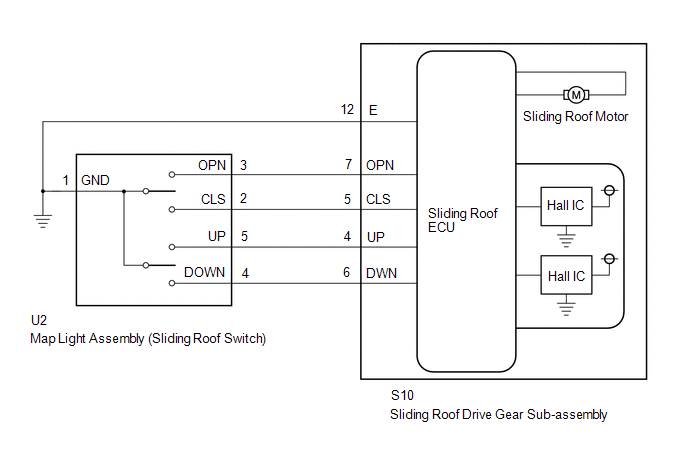
CAUTION / NOTICE / HINT
NOTICE:
When the sliding roof drive gear sub-assembly (sliding roof ECU) is removed and reinstalled or replaced, the sliding roof drive gear sub-assembly (sliding roof ECU) must be initialized (See page  ).
PROCEDURE
PERFORM ACTIVE TEST USING TECHSTREAM (SLIDING ROOF)
(a) Select the Active Test, use the Techstream to generate a control command, and then check that the sliding roof slides open/closed and tilts up/down (See page ).
Sliding Roof
Tester Display | Test Part | Control Range | Diagnostic Note |
|---|---|---|---|
Slide Roof |
Operate sliding roof |
Opn/Dwn: Sliding roof slide open or tilt down operation occurs Clos/Up: Sliding roof slide close or tilt up operation occurs OFF: Sliding roof not operating |
- |
OK:
The sliding roof operates normally.
| NG |  | REPLACE SLIDING ROOF DRIVE GEAR SUB-ASSEMBLY (SLIDING ROOF ECU) |
|

READ VALUE USING TECHSTREAM (SLIDING ROOF)
(a) Using the Techstream, read the Data List (See page ).
Sliding Roof
Tester Display | Measurement Item/Range | Normal Condition | Diagnostic Note |
|---|---|---|---|
Open Switch |
Slide open switch signal / ON or OFF |
ON: Slide open switch pressed OFF: Slide open switch not pressed |
- |
Close Switch |
Slide close switch signal / ON or OFF |
ON: Slide close switch pressed OFF: Slide close switch not pressed |
- |
Up Switch |
Tilt up switch signal / ON or OFF |
ON: Tilt up switch pressed OFF: Tilt up switch not pressed |
- |
Down Switch |
Tilt down switch signal / ON or OFF |
ON: Tilt down switch pressed OFF: Tilt down switch not pressed |
- |
OK:
When operating the switch, the Techstream displays as shown in the table.
| OK | | REPLACE SLIDING ROOF DRIVE GEAR SUB-ASSEMBLY (SLIDING ROOF ECU) |
|
INSPECT MAP LIGHT ASSEMBLY (SLIDING ROOF SWITCH)
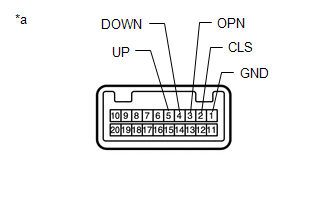
*a |
Component without harness connected (Map Light Assembly (Sliding Roof Switch)) |
(a) Remove the map light assembly (sliding roof switch) (See page ).
(b) Measure the resistance according to the value(s) in the table below.
Standard Resistance:
Tester Connection | Switch Condition | Specified Condition |
|---|---|---|
5 (UP) - 1 (GND) |
Tilt up switch pressed |
Below 1 Ω |
5 (UP) - 1 (GND) |
Tilt up switch not pressed |
10 kΩ or higher |
4 (DOWN) - 1 (GND) |
Tilt down switch pressed |
Below 1 Ω |
4 (DOWN) - 1 (GND) |
Tilt down switch not pressed |
10 kΩ or higher |
3 (OPN) - 1 (GND) |
Slide open switch pressed |
Below 1 Ω |
3 (OPN) - 1 (GND) |
Slide open switch not pressed |
10 kΩ or higher |
2 (CLS) - 1 (GND) |
Slide close switch pressed |
Below 1 Ω |
2 (CLS) - 1 (GND) |
Slide close switch not pressed |
10 kΩ or higher |
| NG | | REPLACE MAP LIGHT ASSEMBLY (SLIDING ROOF SWITCH) |
|
CHECK HARNESS AND CONNECTOR (SLIDING ROOF DRIVE GEAR SUB-ASSEMBLY (SLIDING ROOF ECU) - MAP LIGHT ASSEMBLY (SLIDING ROOF SWITCH) AND BODY GROUND)
(a) Disconnect the S10 sliding roof drive gear sub-assembly (sliding roof ECU) connector.
(b) Disconnect the U2 map light assembly (sliding roof switch) connector.
(c) Measure the resistance according to the value(s) in the table below.
Standard Resistance:
Tester Connection | Condition | Specified Condition |
|---|---|---|
S10-4 (UP) - U2-5 (UP) |
Always |
Below 1 Ω |
S10-6 (DWN) - U2-4 (DOWN) |
Always |
Below 1 Ω |
S10-7 (OPN) - U2-3 (OPN) |
Always |
Below 1 Ω |
S10-5 (CLS) - U2-2 (CLS) |
Always |
Below 1 Ω |
U2-1 (GND) - Body ground |
Always |
Below 1 Ω |
S10-12 (E) - Body ground |
Always |
Below 1 Ω |
S10-4 (UP) or U2-5 (UP) - Body ground |
Always |
10 kΩ or higher |
S10-6 (DWN) or U2-4 (DOWN) - Body ground |
Always |
10 kΩ or higher |
S10-7 (OPN) or U2-3 (OPN) - Body ground |
Always |
10 kΩ or higher |
S10-5 (CLS) or U2-2 (CLS) - Body ground |
Always |
10 kΩ or higher |
| OK | | REPLACE SLIDING ROOF DRIVE GEAR SUB-ASSEMBLY (SLIDING ROOF ECU) |
| NG | | REPAIR OR REPLACE HARNESS OR CONNECTOR |
Test yourself
A quick Toyota 4Runner quiz: every answer comes with an explanation and a link to the manual page.