Removal
REMOVAL
PRECAUTION / NOTICE / HINT
The necessary procedures (adjustment, calibration, initialization or registration) that must be performed after parts are removed and installed or replaced during removal and installation of the front suspension crossmember sub-assembly are shown below.
Procedures Required After Replacement / Removal / Installation of PartsReplaced Part or Performed Procedure | Required Procedure | Effect/Inoperative Function When Required Procedure Is Not Performed | Link |
|---|---|---|---|
Front wheel alignment adjustment |
|
|
 |
Suspension, tires, etc. (Vehicle height changes after replacing the suspension or tires) |
Initialize Left Headlight ECU Sub-assembly No. 1 |
Automatic Headlight Leveling System |
|
PROCEDURE
1. ALIGN FRONT WHEELS STRAIGHT AHEAD
2. FIX STEERING WHEEL
Click here
3. REMOVE STEERING COLUMN HOLE COVER SOUND INSULATOR SHEET
Click here
4. DISCONNECT STEERING INTERMEDIATE SHAFT ASSEMBLY NO. 2
Click here
5. DISCONNECT STEERING COLUMN HOLE COVER SUB-ASSEMBLY NO. 1
Click here
6. REMOVE FRONT WHEELS
Click here
7. REMOVE ENGINE UNDER COVER NO. 1
Click here
8. REMOVE ENGINE UNDER COVER REAR LH
Click here
9. REMOVE ENGINE UNDER COVER REAR RH
Click here
10. REMOVE FRONT FLOOR COVER LH (with cover)
Click here
11. REMOVE FRONT FLOOR COVER RH (with cover)
HINT:
Perform the same procedure as for the left side.
12. REMOVE FRONT SIDE MEMBER REAR REINFORCEMENT SUB-ASSEMBLY LH
(a) Remove the 4 bolts and the LH front side member rear reinforcement sub-assembly from the front suspension crossmember sub-assembly and the vehicle body. |
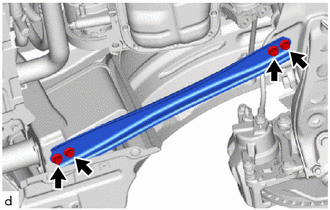 |
13. REMOVE FRONT SIDE MEMBER REAR REINFORCEMENT SUB-ASSEMBLY RH
HINT:
Perform the same procedure as for the left side.
14. DETACH FRONT STABILIZER BAR LINK ASSEMBLY LH
(a) Remove the nut and the LH front stabilizer bar link assembly from the front shock absorber assembly. NOTICE: Be careful not to damage the ball joint boot. HINT: If the ball joint turns together with the nut, hold the stud with a 6 mm hexagon socket wrench. |
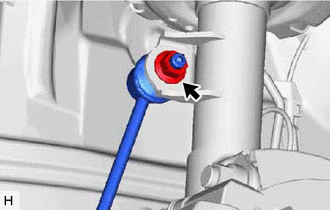 |
15. DETACH FRONT STABILIZER BAR LINK ASSEMBLY RH
HINT:
Perform the same procedure as for the left side.
16. DETACH LH TIE ROD END SUB-ASSEMBLY
Click here
17. DETACH RH TIE ROD END SUB-ASSEMBLY
HINT:
Perform the same procedure as for the left side.
18. DETACH FRONT SUSPENSION LOWER ARM SUB-ASSEMBLY NO. 1 LH
(a) Remove the bolt and 2 nuts, then disconnect the front suspension lower arm sub-assembly No. 1 from the front lower ball joint assembly. |
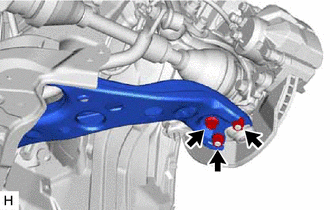 |
19. DETACH FRONT SUSPENSION LOWER ARM SUB-ASSEMBLY NO. 1 RH
HINT:
Perform the same procedure as for the left side.
20. REMOVE FRONT SUSPENSION CROSSMEMBER SUB-ASSEMBLY
(a) Remove the 2 bolts and detach the 2 wire harness clamp brackets from the front suspension crossmember sub-assembly. |
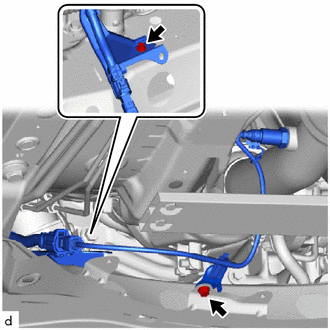 |
(b) Using a transmission jack and a wooden block, support the engine with transaxle assembly.
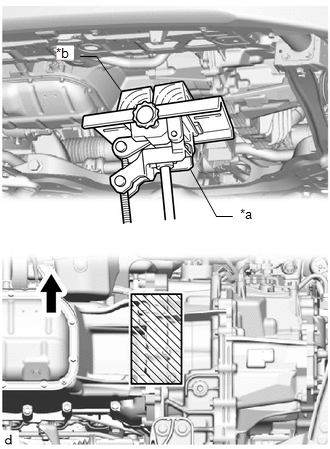
*a |
Transmission jack |
*b |
Wooden Block |
 |
Front of Vehicle |
 |
Wooden Block Location |
CAUTION:
- Support the engine with transaxle assembly while installing the front suspension crossmember sub-assembly.
- If the bracket is removed before installing the front suspension crossmember sub-assembly, the engine with transaxle assembly could fall.
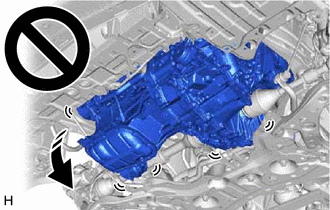
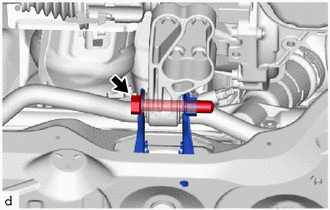
(c) Remove the bolt and detach the engine position control rod. |
 |
(d) Support the front suspension crossmember sub-assembly with an engine lifting device using 4 attachments or equivalent tools as shown in the illustration.
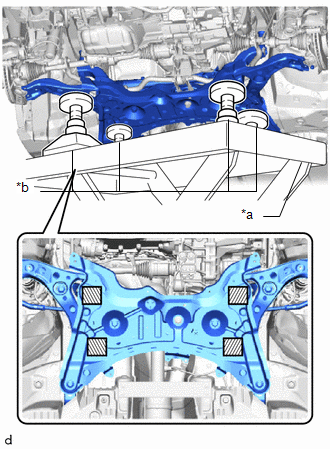
*a |
Engine lifting device |
*b |
Attachment |
|
Attachment location |
CAUTION:
- The front suspension crossmember sub-assembly is a very heavy component. Make sure it is properly supported.
- If the front suspension crossmember sub-assembly is not properly supported, it may fall and cause serious injury.
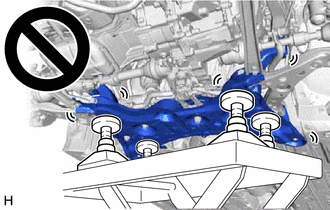
NOTICE:
Use the attachments to keep the front suspension crossmember sub-assembly level.
(e) Remove the 6 bolts and the front suspension crossmember sub-assembly.
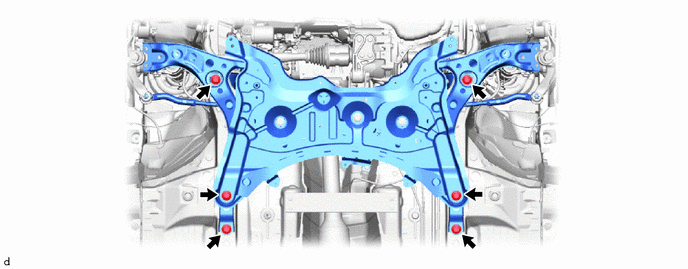
(f) Slowly lower the front suspension crossmember sub-assembly.
NOTICE:
When lowering the front suspension crossmember sub-assembly, take care not to damage the vehicle body or other components installed on the vehicle.
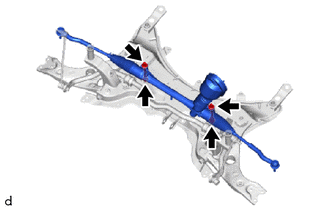
21. REMOVE STEERING LINKAGE ASSEMBLY
(a) Remove the 2 bolts, 2 nuts and steering linkage assembly from the front suspension member sub-assembly. NOTICE: Do not turn the nut as it has a stopper. Loosen the bolt with the nut in place. |
 |
22. REMOVE FRONT STABILIZER BAR BRACKET NO. 1 LH
Click here
23. REMOVE FRONT STABILIZER BAR BRACKET NO. 1 RH
HINT:
Perform the same procedure as for the left side.
24. REMOVE FRONT STABILIZER BAR
Click here
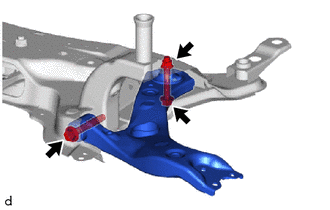
25. REMOVE FRONT SUSPENSION LOWER ARM SUB-ASSEMBLY NO. 1 LH
(a) Remove the 2 bolts, the nut and the LH front suspension lower arm sub-assembly No. 1 from the front suspension crossmember sub-assembly. NOTICE: Do not turn the nut as it has a stopper. Loosen the bolt with the nut in place. |
 |
26. REMOVE FRONT SUSPENSION LOWER ARM SUB-ASSEMBLY NO. 1 RH
HINT:
Perform the same procedure as for the left side.
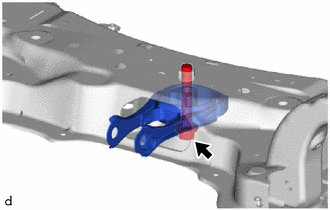
27. REMOVE ENGINE POSITION CONTROL ROD
(a) Remove the bolt and the engine position control rod from the front suspension crossmember sub-assembly. |
 |
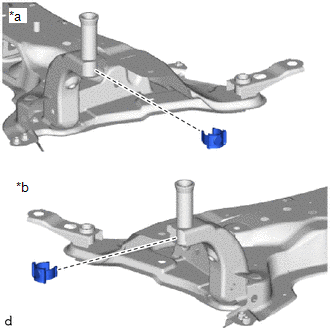
28. REMOVE FRONT SUSPENSION CROSSMEMBER PLATE
(a) Remove the 2 front suspension crossmember brace plates from the front suspension crossmember sub-assembly. |
|
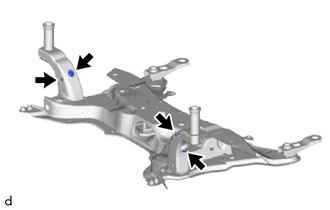
29. REMOVE HOLE PLUG
(a) Remove the 4 hole plugs from the front suspension crossmember sub-assembly. HINT: There are 2 different types of hole plugs. |
 |