Operation Method
OPERATION METHOD
PROCEDURE
1. PRECAUTIONS
Click here
2. REMOVE LUGGAGE COMPARTMENT BOARD ASSEMBLY
Click here
3. REMOVE SPARE WHEEL HOUSE
Click here
4. REMOVE LUGGAGE COMPARTMENT FLOOR BOX LH
Click here
5. REMOVE LUGGAGE COMPARTMENT FLOOR BOX RH
Click here
6. FORCED RELEASE OF PARKING BRAKE
CAUTION:
Work on a flat surface to ensure complete safety.
NOTICE:
- To release the parking brake, follow the procedure using the SST.
- If the parking brake cannot be released, follow the procedure without the SST.
- When moving the vehicle after releasing the parking brake, reinstall all parts except the connector as shown in the illustration.
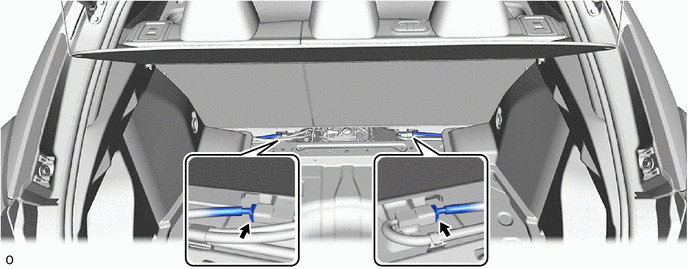
- If the ignition switch is turned to ON or the engine is started while the connector is disconnected, a DTC may be stored. Clear the DTCs after performing the repair.
Click here
(a) Using the SST:
(1) Park the vehicle on a flat surface and shift the shift lever to P.
(2) Turn the ignition switch to OFF and chock the wheels.
(3) Disconnect the connector as shown in the illustration.
(4) Connect the SST (09756-48020) to the SST (09756-48070).
SST: 09756-48020
SST: 09756-48070
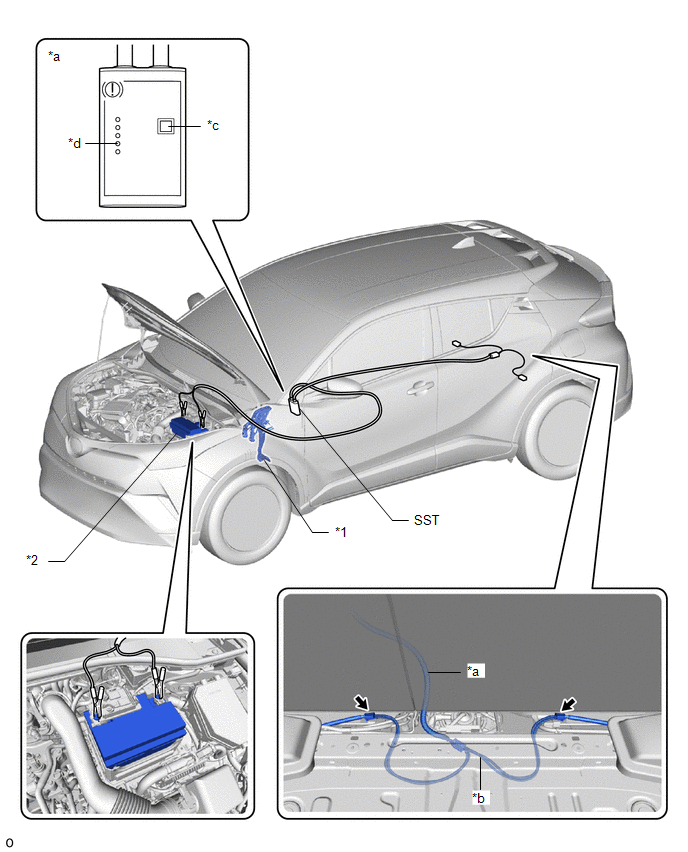
*1 |
Brake Pedal Support Assembly |
*2 |
Battery |
*a |
SST (09756-48020) |
*b |
SST (09756-48070) |
*c |
Release Button |
*d |
Tail Light End |
 |
Connector |
- |
- |
(5) Connect the SST (09756-48070) to the connector inside the vehicle.
(6) Connect the SST (09756-48020) to the battery from outside the vehicle.
(7) Press the release button of the SST (09756-48020) with the brake pedal depressed.
CAUTION:
The vehicle may move suddenly when the parking brake is released. Be sure to perform the release operation with the brake pedal depressed.
HINT:
- Make sure the parking brake is operating by listening for operating noises.
- If there are no operating noises, press the release button of the SST with the brake pedal depressed.
- The parking brake may not release if the battery voltage is too low. In this case, perform the release operation again using a new or fully charged battery.
(8) When the FINISHED indicator on the SST (09756-48020) lights up, release the brake pedal.
(9) Move the vehicle forward and backward to make sure the parking brake is released.
CAUTION:
Use caution during this operation. The vehicle may move suddenly.
NOTICE:
- When moving the vehicle after releasing the parking brake, make sure the connector is disconnected.
- The brake warning light (yellow) comes on when the vehicle is moved after the parking brake is released.
(b) Without using the SST:
NOTICE:
Perform this procedure only when the parking brake cannot be released using the SST.
HINT:
- Repeat the same procedure for the right side and the left side.
- The following procedure applies to the left side.
(1) Park the vehicle on a flat surface and make sure the shift lever is in P.
(2) Turn the ignition switch to OFF and check that the wheels are chocked.
(3) Make sure the connector shown in the illustration has been disconnected.
(4) Remove the rear wheel.
Click here
CAUTION:
When using a jack, do not work on a vehicle supported only by a jack. Be sure to use safety stands.
Click here
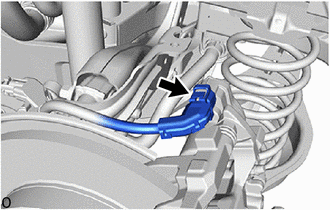
(5) Disconnect the No. 2 parking brake cable assembly connector from the parking brake actuator assembly. |
 |
(6) Remove the parking brake actuator assembly from the rear disc brake cylinder assembly.
Click here
(7) Insert a 6 mm hex key into the rear disc brake cylinder assembly. |
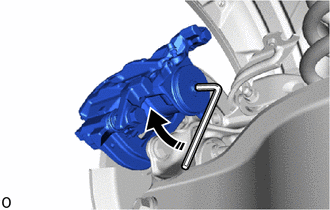 |
(8) Turn the 6 mm hex key 2 turns clockwise to release the parking brake lock.
NOTICE:
- When moving the vehicle after releasing the parking brake, reinstall all parts except the connector as shown in the illustration.
- The brake warning light (yellow) comes on when the vehicle is moved after the parking brake is released.
7. INSTALL LUGGAGE COMPARTMENT FLOOR BOX LH
Click here
8. INSTALL LUGGAGE COMPARTMENT FLOOR BOX RH
Click here
9. INSTALL SPARE WHEEL HOUSE
Click here
10. INSTALL LUGGAGE COMPARTMENT BOARD ASSEMBLY
Click here