Installation
INSTALLATION
PROCEDURE
1. INSTALL FRONT SUSPENSION LOWER ARM SUB-ASSEMBLY NO. 1
(a) Temporarily install the front suspension lower arm sub-assembly No. 1 LH onto the front suspension crossmember sub-assembly with the 2 bolts and nut.
(b) Install the front suspension lower arm sub-assembly No. 1 onto the front lower ball joint assembly LH with the bolt and 2 nuts.
Torque:
89 N·m {908 kgf·cm, 66 ft·lbf}
2. INSTALL FRONT WHEEL
Click here
3. STABILIZE SUSPENSION
Click here
4. FULLY TIGHTEN FRONT SUSPENSION LOWER ARM SUB-ASSEMBLY NO. 1
(a) Fully tighten the front suspension lower arm sub-assembly No. 1 with the 2 bolts. Torque: Bolt A: 240 N·m {2 447 kgf·cm, 177 ft·lbf} Bolt B: 125 N·m {1 275 kgf·cm, 92 ft·lbf} NOTICE: Do not turn the nut as it has a stopper. Tighten the bolt with the nut in place. |
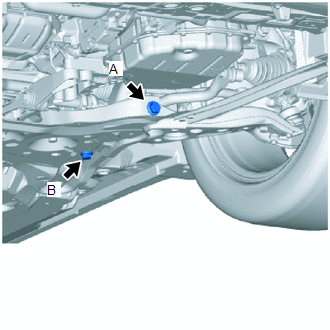 |
5. INSTALL ENGINE UNDER COVER REAR LH
Click here
6. INSTALL ENGINE UNDER COVER SUB-ASSEMBLY NO. 1
Click here
7. INSPECT AND ADJUST FRONT WHEEL ALIGNMENT
Click here