Rear axle carrier sub-assy LH
HINT:
COMPONENTS:
Replace the RH side by the same procedures with the LH side.
- REMOVE REAR WHEEL
- REMOVE STRUT ROD ASSY REAR
- DISCONNECT REAR DISC BRAKE CALIPER ASSY LH (DISC REAR BRAKE TYPE)
- REMOVE REAR DISC (DISC REAR BRAKE TYPE)
- REMOVE REAR BRAKE DRUM SUB−ASSY (DRUM REAR BRAKE TYPE)
- DISCONNECT SKID CONTROL WIRE (W/ ABS)
- DISCONNECT REAR BRAKE TUBE No.4 (DRUM REAR BRAKE TYPE)
a. Using SST, disconnect the rear brake tube No.4 from the LH front or upper rear wheel brake cylinder assy.
SST 09023−00101
- REMOVE REAR AXLE HUB & BEARING ASSY LH
- DISCONNECT REAR SUSPENSION ARM ASSY No.2 LH
a. Remove the bolt, nut and rear suspension arm assy No.2 LH from the rear axle carrier sub−assy LH.
HINT: While fixing the nut, turn and remove the bolt.

Disconnect rear suspension arm assy No.2 LH 10. DISCONNECT REAR SUSPENSION ARM ASSY No.1 LH
a. Remove the bolt, nut and rear suspension arm assy No.1 LH from the rear axle carrier sub−assy LH.
HINT: While fixing the nut, turn and remove the bolt.
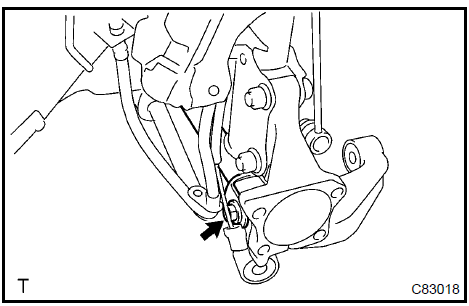
Disconnect rear suspension arm assy No.1 LH 11. REMOVE REAR AXLE CARRIER SUB−ASSY LH
a. Remove the 2 bolts, nuts and rear axle carrier sub−assy LH from the shock absorber assy rear LH.
NOTICE: When removing bolt, stop the bolt from rotating and loosen the nut.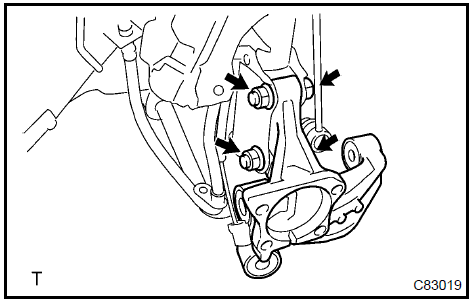
Remove rear axle carrier sub-assy LH 12. INSTALL REAR AXLE CARRIER SUB−ASSY LH
a. Install the rear axle carrier sub−assy LH with the 2 bolts and nuts.
Torque: 255 N·m NOTICE: When installing bolt, stop the bolt from rotating and torque the nut.HINT: Insert the bolt from the rear side of the vehicle and install the nut.
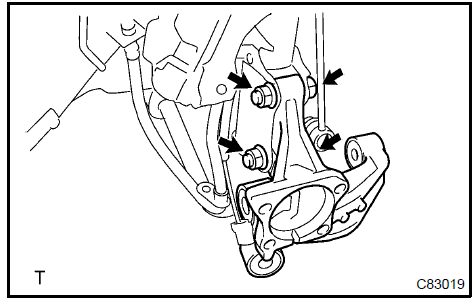
Install rear axle carrier sub-assy LH 13. TEMPORARILY TIGHTEN REAR SUSPENSION ARM ASSY No.1 LH
a. Install the rear suspension arm No.1 to the rear axle carrier sub−assy LH with the bolt and nut, temporarily tighten the bolt.
HINT: Insert the bolt from the front side of the vehicle and while fixing the nut, turn and install the bolt.
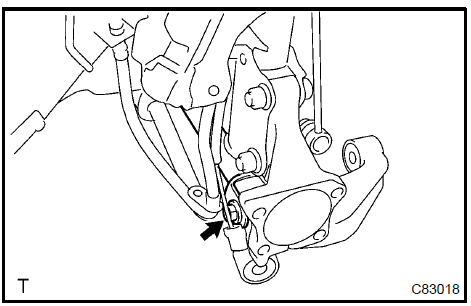
Temporarily tighten rear suspension arm assy No.1 LH 14. TEMPORARILY TIGHTEN REAR SUSPENSION ARM ASSY No.2 LH
a. Install the rear suspension arm No.2 to the rear axle carrier sub−assy LH with the bolt and nut, temporarily tighten the bolt.
HINT: Insert the bolt from the rear side of the vehicle and while fixing the nut, turn and install the bolt.
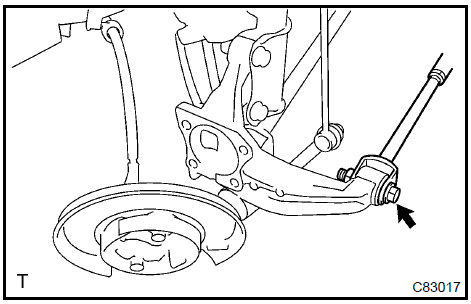
Temporarily tighten rear suspension arm assy No.2 LH
- INSTALL REAR AXLE HUB & BEARING ASSY LH
- INSTALL REAR BRAKE TUBE No.4 (DRUM REAR BRAKE TYPE)
a. Using SST, install the rear brake tube No.4 to the LH front or upper rear wheel brake cylinder assy.
Torque: 15 N·mSST 09023−00101
- INSTALL SKID CONTROL WIRE (W/ ABS)
- INSTALL REAR DISC (DISC REAR BRAKE TYPE)
- INSTALL REAR DISC BRAKE CALIPER ASSY LH (DISC REAR BRAKE TYPE)
- INSTALL REAR BRAKE DRUM SUB−ASSY (DRUM REAR BRAKE TYPE)
- TEMPORARILY TIGHTEN STRUT ROD ASSY REAR
- STABILIZE SUSPENSION
- FULLY TIGHTEN REAR SUSPENSION ARM ASSY No.1 LH
- FULLY TIGHTEN REAR SUSPENSION ARM ASSY No.2 LH
- FULLY TIGHTEN STRUT ROD ASSY REAR
- FILL RESERVOIR WITH BRAKE FLUID (DRUM REAR BRAKE TYPE)
- BLEED MASTER CYLINDER (DRUM REAR BRAKE TYPE) SST 09023−00101
- BLEED BRAKE LINE (DRUM REAR BRAKE TYPE)
- CHECK FLUID LEVEL IN RESERVOIR (DRUM REAR BRAKE TYPE)
- CHECK BRAKE FLUID LEAKAGE (DRUM REAR BRAKE TYPE)
- INSTALL REAR WHEEL Torque: 103 N·m
- INSPECT AND ADJUST REAR WHEEL ALIGNMENT
- CHECK ABS SPEED SIGNAL (W/ ABS)
ABS WITH EBD SYSTEM (BOSCH MADE)
ABS WITH EBD SYSTEM (DENSO MADE)
ABS WITH EBD & BA & TRAC & VSC SYSTEM
Test yourself
A quick Toyota Camry quiz: every answer comes with an explanation and a link to the manual page.