Removal
REMOVAL
COMPONENTS (REMOVAL)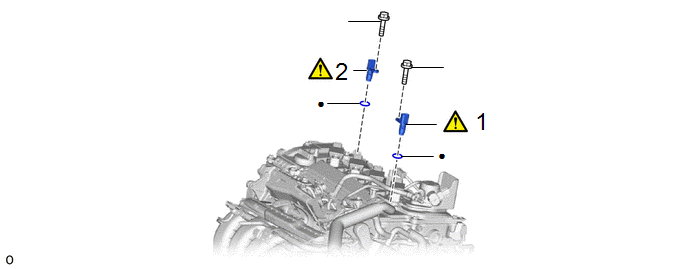
Procedure | Part Name Code |  |  |  |
|
|---|---|---|---|---|---|
1 |
CAMSHAFT POSITION SENSOR (for Intake Side) |
11102A |
 |
- |
- |
2 |
CAMSHAFT POSITION SENSOR (for Exhaust Side) |
11102A |
|
- |
- |
● |
Non-reusable part |
★ |
Precoated part |
NOTICE:
This procedure includes the removal of small-head bolts. Refer to Small-Head Bolts of Basic Repair Hint to identify the small-head bolts.
Click here
PROCEDURE
1. REMOVE CAMSHAFT POSITION SENSOR (for Intake Side)
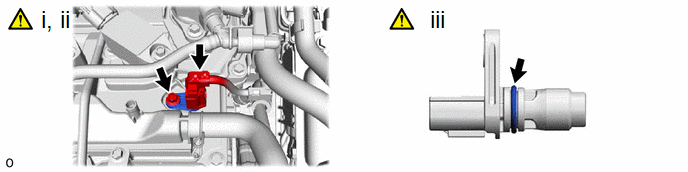
(1) Disconnect the camshaft position sensor connector.
(2) Using an 8 mm socket wrench, remove the bolt and camshaft position sensor from the cylinder head cover sub-assembly.
NOTICE:
If the camshaft position sensor has been struck or dropped, replace it.
(3) Perform this procedure only when reusing the
1. Remove the O-ring from the camshaft position sensor.
NOTICE:
- Make sure to only remove the O-ring with bare hands.
- When removing the O-ring, be careful not to damage the O-ring groove of the camshaft position sensor.
- If the O-ring groove of the camshaft position sensor is damaged, replace the camshaft position sensor with a new one.
2. REMOVE CAMSHAFT POSITION SENSOR (for Exhaust Side)
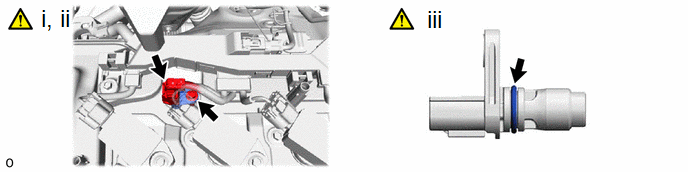
(1) Disconnect the camshaft position sensor connector.
(2) Using an 8 mm socket wrench, remove the bolt and camshaft position sensor from the cylinder head cover sub-assembly.
NOTICE:
If the camshaft position sensor has been struck or dropped, replace it.
(3) Perform this procedure only when reusing the
1. Remove the O-ring from the camshaft position sensor.
NOTICE:
- Make sure to only remove the O-ring with bare hands.
- When removing the O-ring, be careful not to damage the O-ring groove of the camshaft position sensor.
- If the O-ring groove of the camshaft position sensor is damaged, replace the camshaft position sensor with a new one.