Audio & visual
Antenna cord sub–assy
In this manual: Audio & visual
6steps
~36min
2/5difficulty
Done 0 of 6
Replacement Hint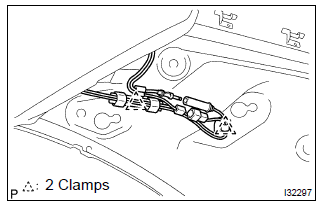
: components:
1. Remove instrument panel sub–assy upper Hint:
- refer to the procedure until the step, ”remove instrument panel sub–assy upper” of instrument panel sub–assy lower.
- Remove the related parts as long as the antenna cord sub–assy can be removed.
:
- refer to the procedure until the step, ”remove visor holder” of roof headlining assy.
- Remove the parts related to the roof headlining assy in the range that antenna cord can be cut off.
- Rear side: disconnect the connector and antenna cord plug.
- rear side: remove the 2 clamps.
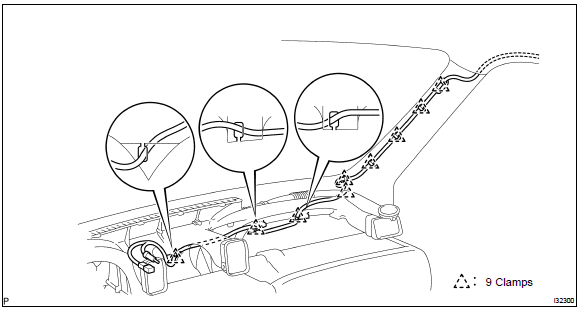
- Front side: remove the 9 clamps.
: do not bend the roof headlining assy.
6. Remove antenna cord sub–assy- remove the antenna cord sub–assy from the roof headlining.
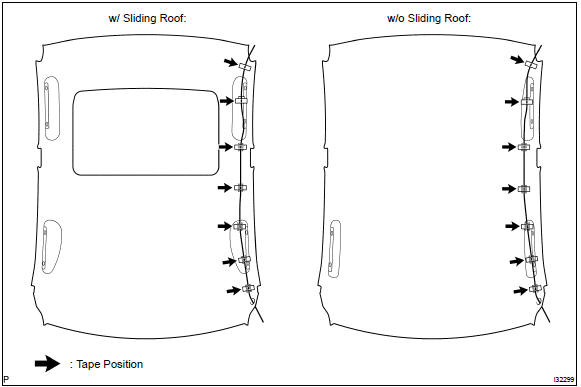
- tape the antenna cord sub–assy at the position of the roof headlining shown in the illustration.
:
- the antenna cord sub–assy should come to the center of the tape (100 mm(3.94 In.) X 25 mm(0.98 In.)) When taped.
- Try not to touch the adhesive side of the tape when taping.
- Install the roof headlining assy .
- engage the 9 clamps at the front side of antenna cord.
- connect the plug and connector at the rear side of antenna cord.
: refer to the procedure until the step, ”install instrument panel sub–assy upper” of instrument panel sub–assy lower.
Test yourself
A quick Toyota Corolla quiz: every answer comes with an explanation and a link to the manual page.
Was this page helpful?