Light bulbs
You may replace the following bulbs yourself. The difficulty level of replacement varies depending on the bulb. If necessary bulb replacement seems difficult to perform, contact your Toyota dealer.
For more information about replacing other light bulbs, contact your Toyota dealer.
- Prepare a replacement light bulb
Check the wattage of the light bulb being replaced.
- Remove the engine compartment cover
- Front bulb locations

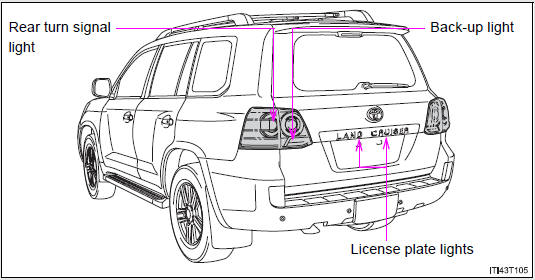
- Rear bulb locations
- Headlight high beam and daytime running light
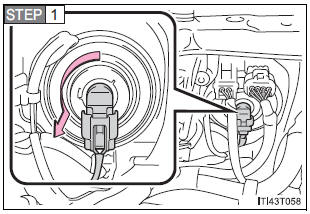
Turn the bulb base counterclockwise.
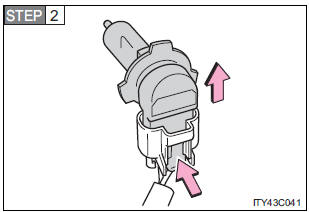
Unplug the connector while depressing the lock release.
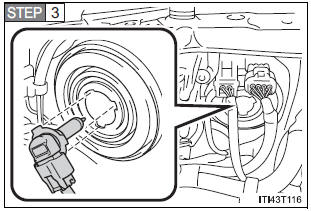
Replace the light bulb, and install the bulb base.
Align the 3 tabs on the light bulb with the mounting, and insert.
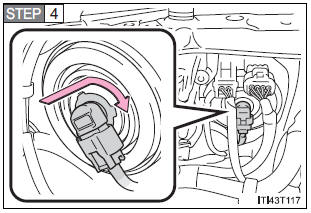
Turn and secure the bulb base.
Shake the bulb base gently to check that it is not loose, turn the headlights on once and visually confirm that no light is leaking through the mounting.
- Fog light
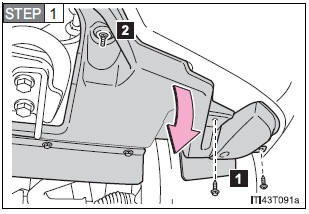
Remove the fender liner bolts, loose the fender liner nut and pull down the fender liner.
- Fender liner bolts
- Fender liner nut
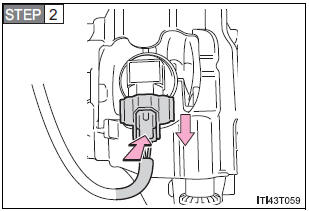
Unplug the connector while depressing the lock release.

Turn the light bulb counterclockwise.
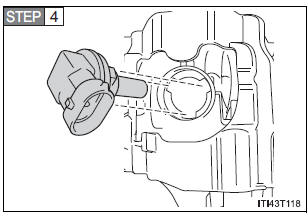
Replace the light bulb.
Align the 3 tabs on the light bulb with the mounting, and insert.
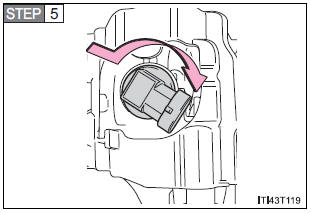
Turn and secure the light bulb
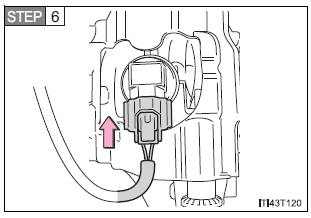
Install the bulb base.
Shake the bulb base gently to check that it is not loose, turn the fog lights on once and visually confirm that no light is leaking through the mounting
STEP 7 When installing the fender liner, conduct STEP 1in reverse.
- Front turn signal light
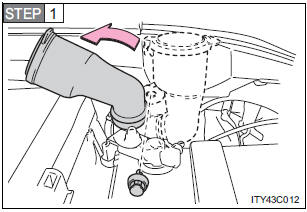
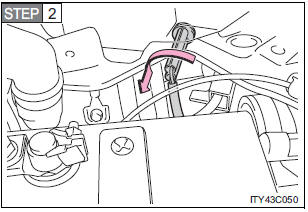
For the left side only: Remove the securing bolt and move the washer fluid filler opening.
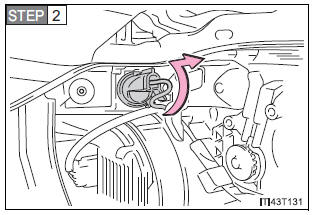
Turn the bulb base counterclockwise.
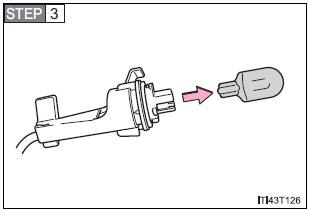
Remove the light bulb.
STEP 4When installing, reverse the steps listed.
- Front side marker light
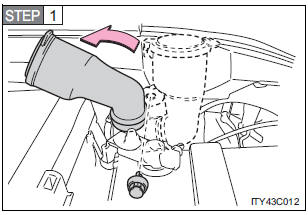
For the left side only: Remove the securing bolt and move the washer fluid filler opening.
Turn the bulb base counterclockwise.
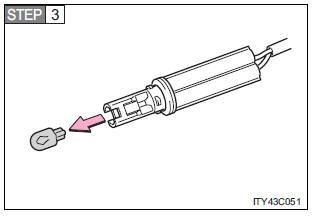
Remove the light bulb.
STEP 4When installing, reverse the steps listed.
- Back-up light
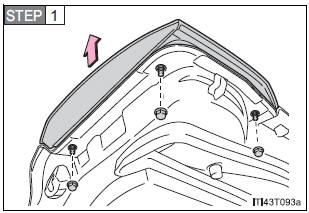
Open the back door and remove the nuts and lamp assembly.
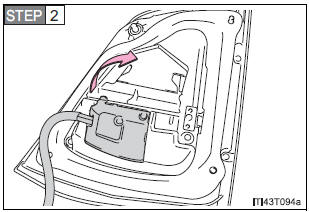
Remove the cover.
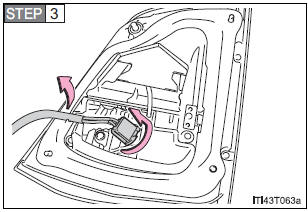
Unclip the connector wire and turn the bulb bases counterclockwise.
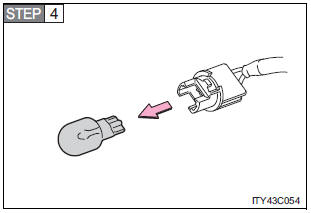
Remove the light bulb.
STEP 5When installing, reverse the steps listed.
- Rear turn signal light
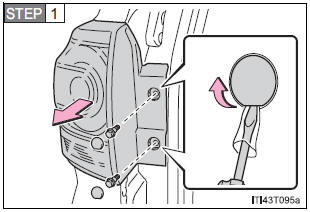
Open the back door and remove the bolts and lamp assembly.
Use a cloth to prevent scratches.
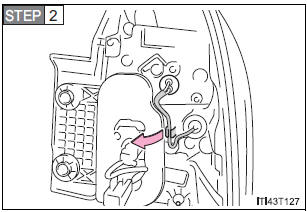
Unclip the connector wire.
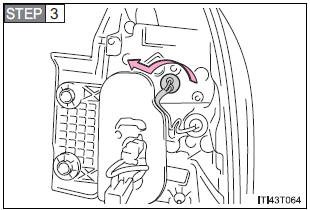
Turn the bulb bases counterclockwise.
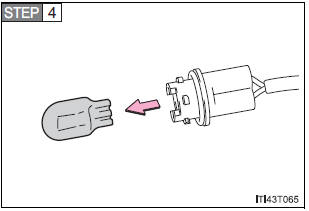
Remove the light bulb.
STEP 5When installing, reverse the steps listed.
- License plate light
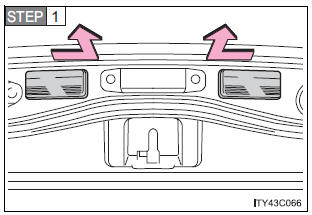
Open the back door and remove the license plate light unit.
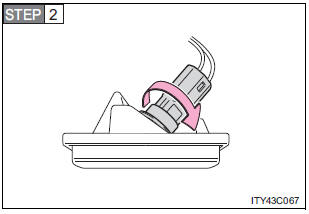
Turn the bulb base counterclockwise.
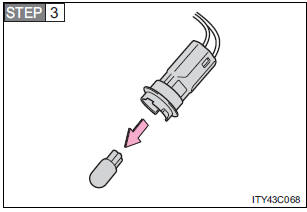
Remove the light bulb
STEP 4When installing, reverse the steps listed.
- Bulbs other than the above
If any of the bulbs listed below has burnt out, have your Toyota dealer replace it.
- Headlight low beam
- Parking light
- Side turn signal light
- Stop/tail lights
- Tail lights
- High mounted stoplight
- Rear side marker lights
- Discharge headlights
If voltage to the discharge bulbs is insufficient, the bulbs may not come on, or may go out temporarily. The discharge bulbs will come on when normal power is restored.
- Condensation build-up on the inside of the lens
Temporary condensation build-up on the inside of the headlight lens does not indicate a malfunction. Contact your Toyota dealer for more information in the following situations:
- Large drops of water are built up on the inside of the lens.
- Water has built up inside the headlight.
- LED lights
The parking light, side turn signal light, stop/tail lights, tail lights, high mounted stoplight and rear side marker lights consist of a number of LEDs. If any LEDs burn out, take your vehicle to your Toyota dealer to have the light replaced.
CAUTION- Replacing light bulbs
- Turn off the headlights. Do not attempt to replace the bulb immediately after turning off the headlights.
The bulbs become very hot and may cause burns.
- Do not touch the glass portion of the light bulb with bare hands. When it is unavoidable to hold the glass portion, use and hold with a clean dry cloth to avoid getting moisture and oils on the bulb.
Also, if the bulb is scratched or dropped, it may blow out or crack.
- Fully install light bulbs and any parts used to secure them. Failing to do so may result in heat damage, fire, or water entering the headlight unit. This may damage the headlights or cause condensation to build up on the lens.
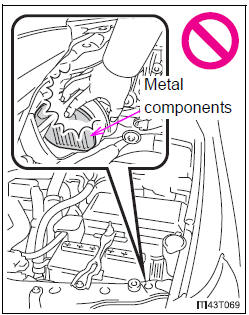
- While the low beam headlights are turned on, and for a short time after they have been turned off, metal components at the rear of the headlight assembly will be extremely hot.
To prevent burns, do not touch these metal components until you are certain they have cooled down.
- Discharge headlights
- Contact your Toyota dealer before replacing high-intensity discharge headlights (including light bulbs).
- Do not touch the high-intensity discharge headlight’s high voltage socket when the headlights are turned on.
An extremely high voltage of 30000 V will be discharged and could result in serious injury or death by electric shock.
- Do not attempt to take apart or repair the low beam discharge headlight bulbs, connectors, power supply circuits, or related components.
Doing so could result in electric shock and serious injury or death.
- To prevent damage or fire
Make sure bulbs are fully seated and locked.
Test yourself
A quick Toyota Land Cruiser quiz: every answer comes with an explanation and a link to the manual page.