Drive shaft
Disassembly (2005/11-2006/01)
In this manual: Drive shaft
33steps
~208min
5/5difficulty
2special tools
Done 0 of 33
- Remove front axle inboard joint boot no. 2 Clamp lh
- One touch type:
- Using a screwdriver, remove the inboard joint boot clamp, as shown in the illustration.
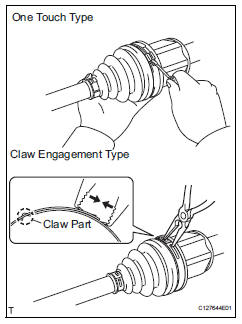
- Claw engagement type:
- Using needle-nose pliers, remove the inboard joint boot clamp, as shown in the illustration.
- Remove front axle inboard joint boot no. 2 Clamp rh
Use the same procedures described for the lh side.
- Remove front axle inboard joint boot clamp lh
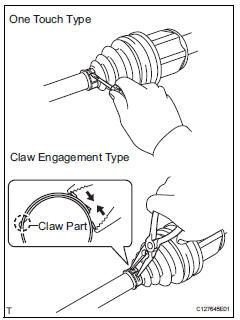
- One touch type:
- Using a screwdriver, remove the inboard joint boot clamp, as shown in the illustration.
- Claw engagement type:
Using needle-nose pliers, remove the inboard joint boot clamp, as shown in the illustration.
- Remove front axle inboard joint boot clamp rh
Use the same procedures described for the lh side.
- Remove front axle inboard joint boot
- Remove the boot from the inboard joint.
- Remove front drive inboard joint assembly lh
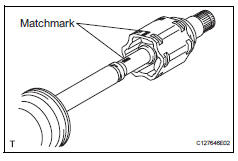
- Remove any old grease from the inboard joint.
- Put matchmarks on the inboard joint and outboard joint shaft.
Do not punch the marks.
- Remove the inboard joint from the outboard joint shaft.
- Using a snap ring expander, remove the shaft snap ring.
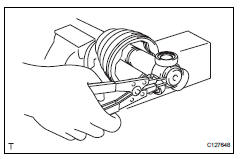
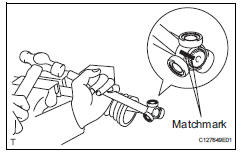
- Put matchmarks on the outboard joint shaft and tripod joint.
Do not punch the marks.
- Using a brass bar and hammer, tap out the tripod joint from the outboard joint shaft.
Do not tap the rollers.
- Remove the inboard joint boot.
- Remove front drive shaft damper clamp lh

- One touch type:
- Using a screwdriver, remove the drive shaft damper clamp, as shown in the illustration.
- Claw engagement type:
Using needle-nose pliers, remove the drive shaft damper clamp, as shown in the illustration.
- Remove front drive shaft damper lh
- Remove the front drive shaft damper from the outboard joint shaft.
- Remove front axle outboard joint boot no. 2 Clamp lh

- Using a screwdriver, remove the outboard joint boot clamp, as shown in the illustration.
- Remove front axle outboard joint boot clamp lh
- Using a screwdriver, remove the outboard joint boot clamp, as shown in the illustration.
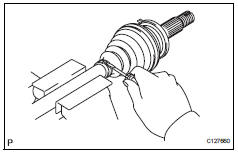
- Remove front axle outboard joint boot
- Remove the outboard joint boot from the outboard joint shaft.
- Remove any old grease from the outboard joint.
- Remove front drive shaft hole snap ring lh
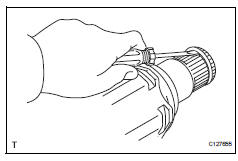
- Using a screwdriver, remove the hole snap ring.
- Remove front drive shaft dust cover lh
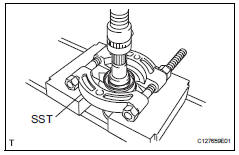
- Using sst and a press, press out the shaft dust cover
Be careful not to drop the inboard joint
- Remove front drive shaft dust cover rh
Use the same procedures described for the lh side.
- Remove drive shaft bearing case
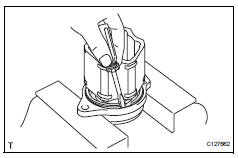
- Using a screwdriver, remove the bearing case snap ring.
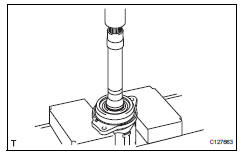
- Using a press, press out the drive shaft bearing case.
Be careful not to drop the inboard joint
- Remove front drive shaft dust cover
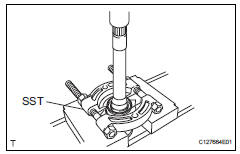
- Using sst and a press, press out the drive shaft dust cover.
Be careful not to drop the inboard joint
- Remove front drive shaft bearing
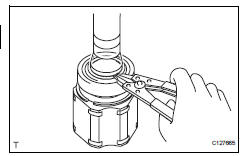
- Using a snap ring expander, remove the snap ring.
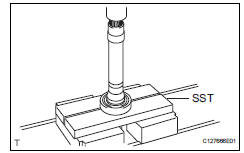
- Using sst and a press, press out the drive shaft bearing.
- Remove the snap ring.
Test yourself
A quick Toyota RAV4 quiz: every answer comes with an explanation and a link to the manual page.
Was this page helpful?