Exterior
Disassembly
In this manual: Exterior
4steps
~24min
2/5difficulty
Done 0 of 4
1. REMOVE FRONT BUMPER ENERGY ABSORBER
2. REMOVE FRONT BUMPER REINFORCEMENT SUBASSEMBLY
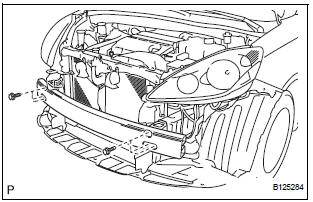
- Remove the 6 bolts and the front bumper reinforcement sub-assembly.
3. REMOVE FRONT BUMPER SIDE SUPPORT LH
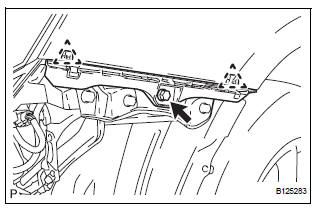
- Remove the screw.
- Disengage the 2 clips and remove the front bumper side support LH.
4. REMOVE FRONT BUMPER SIDE SUPPORT RH
HINT: Perform the same procedure as for the LH side.
5. REMOVE NO. 1 ULTRASONIC SENSOR RETAINER (See page PM-19)
6. REMOVE NO. 1 ULTRASONIC SENSOR (LH side) (w/ Clearance Sonar System) (See page PM-19)
7. REMOVE NO. 1 ULTRASONIC SENSOR (RH side) (w/ Clearance Sonar System)
HINT: Perform the same procedure as for the LH side.
8. REMOVE RADIATOR GRILLE
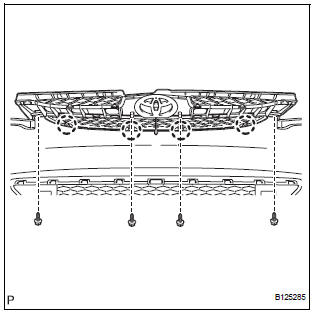
- Remove the 2 bolts and the 2 screws.
- Disengage the 4 claws and remove the radiator grille from the front bumper cover.
9. REMOVE UPPER RADIATOR GRILLE
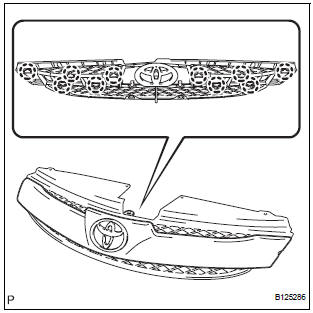
- Disengage the 10 claws and remove the upper radiator grille from the radiator grille.
10. REMOVE FRONT BUMPER EMBLEM
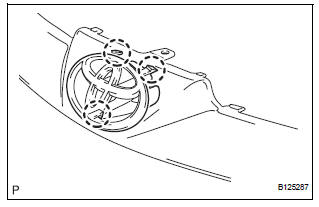
- Disengage the 3 claws and remove the front bumper emblem from the upper radiator grille.
11. REMOVE FRONT BUMPER HOLE COVER LH (w/o Fog Light)
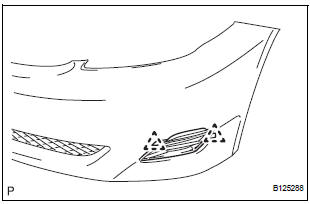
- Disengage the 2 pins and remove the front bumper hole cover LH from the front bumper cover.
12. REMOVE FRONT BUMPER HOLE COVER RH (w/o Fog Light)
HINT: Perform the same procedure as for the LH side.
13. REMOVE FOG LIGHT ASSEMBLY LH (w/ Fog Light) (See page LI-82)
14. REMOVE FOG LIGHT ASSEMBLY RH (w/ Fog Light)
HINT: Perform the same procedure as for the LH side.
15. REMOVE LOWER RADIATOR GRILLE
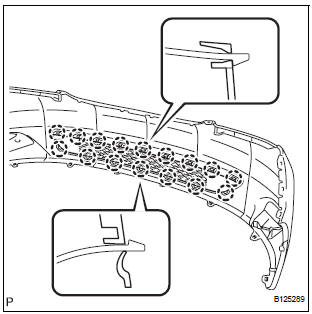
- Disengage the 16 claws and remove the lower radiator grille from the front bumper cover.
Test yourself
A quick Toyota Sienna quiz: every answer comes with an explanation and a link to the manual page.
Was this page helpful?