2GR-FE Engine control system
Installation
In this manual: 2GR-FE Engine control system
11steps
~66min
3/5difficulty
Done 0 of 11
1. INSTALL CAMSHAFT TIMING OIL CONTROL VALVE ASSEMBLY (for Bank 2 Exhaust Side)

- Apply a light coat of engine oil to the new O-ring and install it to the camshaft timing oil control valve.
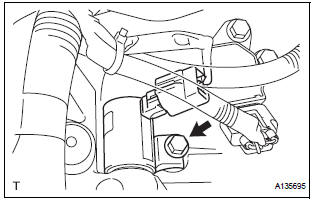
- Install the camshaft timing oil control valve assembly with the bolt.
Torque: 10 N*m (102 kgf*cm, 7 ft.*lbf)
- Connect the camshaft timing oil control valve assembly connector
2. INSTALL CAMSHAFT TIMING OIL CONTROL VALVE ASSEMBLY (for Bank 2 Intake Side)
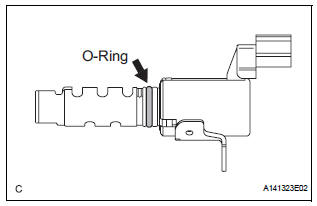
- Apply a light coat of engine oil to the new O-ring and install it to the camshaft timing oil control valve.
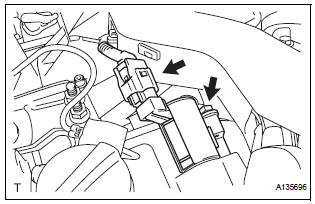
- Install the camshaft timing oil control valve assembly with the bolt.
Torque: 10 N*m (102 kgf*cm, 7 ft.*lbf) Connect the camshaft timing oil control valve assembly connector
3. INSTALL CAMSHAFT TIMING OIL CONTROL VALVE ASSEMBLY (for Bank 1 Exhaust Side)

- Apply a light coat of engine oil to the new O-ring and install it to the camshaft timing oil control valve.
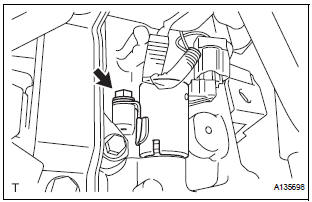
- Install the camshaft timing oil control valve assembly with the bolt.
Torque: 10 N*m (102 kgf*cm, 7 ft.*lbf)
- Connect the camshaft timing oil control valve assembly connector
4. INSTALL CAMSHAFT TIMING OIL CONTROL VALVE ASSEMBLY (for Bank 1 Intake Side)
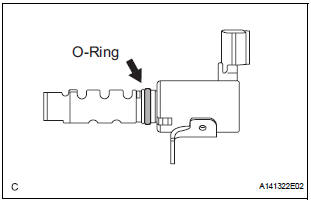
- Apply a light coat of engine oil to the new O-ring and install it to the camshaft timing oil control valve.
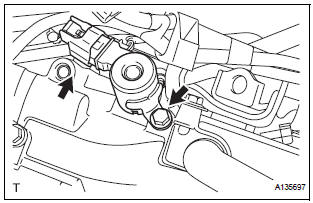
- Install the camshaft timing oil control valve assembly with the bolt.
Torque: 10 N*m (102 kgf*cm, 7 ft.*lbf)
- Connect the camshaft timing oil control valve assembly connector.
5. INSTALL INTAKE AIR SURGE TANK ASSEMBLY
6. INSTALL AIR CLEANER CASE SUB-ASSEMBLY
7. INSTALL AIR CLEANER CAP SUB-ASSEMBLY
8. INSTALL NO. 1 AIR CLEANER INLET
9. INSTALL NO. 2 AIR CLEANER INLET
10. ADD ENGINE COOLANT
11. INSPECT FOR ENGINE COOLANT LEAK
12. INSPECT FOR ENGINE OIL LEAK
13. INSTALL V-BANK COVER SUB-ASSEMBLY
14. INSTALL FRONT OUTER COWL TOP PANEL SUBASSEMBLY
15. INSTALL WINDSHIELD WIPER MOTOR ASSEMBLY
Test yourself
A quick Toyota Sienna quiz: every answer comes with an explanation and a link to the manual page.
Was this page helpful?