Seat
Reassembly
In this manual: Seat
4steps
~24min
2/5difficulty
Done 0 of 4
1. INSTALL NO. 2 SEAT LEG SUB-ASSEMBLY

- Install the No. 2 seat leg sub-assembly with the 3 bolts and 2 nuts.
Torque: 19 N*m (194 kgf*cm, 14 ft.*lbf) NOTICE: Tighten the bolts and nuts in the order shown in the illustration.
- Install the 3 clamps.
2. INSTALL NO. 2 SEAT CUSHION FRAME SUBASSEMBLY
3. INSTALL NO. 2 SEAT CUSHION SPRING ASSEMBLY
4. INSTALL NO. 2 SEAT CUSHION STOPPER
5. INSTALL REAR SEAT WIRE
6. INSTALL NO. 2 SEAT CUSHION PAD
7. INSTALL NO. 2 SEAT CUSHION COVER SUBASSEMBLY
- Using hog ring pliers, install the No. 2 seat cushion cover sub-assembly to the No. 2 seat cushion pad with 10 new hog rings.
NOTICE:
- Be careful not to damage the cover.
- When installing the hog rings, take care to minimize wrinkles as much as possible.
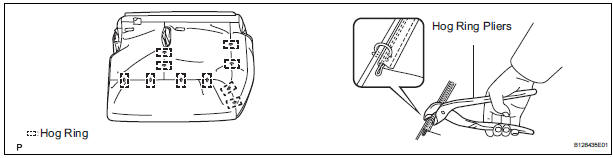
8. INSTALL NO. 2 SEAT CUSHION COVER SUBASSEMBLY WITH PAD
9. INSTALL REAR SEAT COVER
10. INSTALL REAR SEAT BELT ASSEMBLY INNER
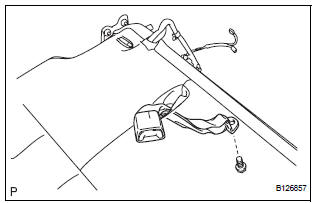
- Install the rear seat belt assembly inner with the bolt.
Torque: 44 N*m (449 kgf*cm, 33 ft.*lbf)
11. INSTALL REAR NO. 2 SEAT BELT ASSEMBLY INNER
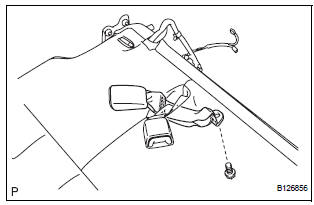
- Install the rear No. 2 seat belt assembly inner with the bolt.
Torque: 44 N*m (449 kgf*cm, 33 ft.*lbf)
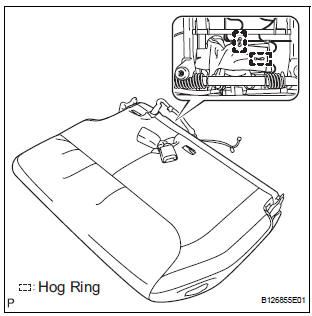
- Using hog ring pliers, install 2 new hog rings.
NOTICE: Be careful not to damage the cover.
12. INSTALL REAR NO. 2 SEAT LAP BELT ASSEMBLY CENTER WITH INNER

- Install the rear No. 2 seat lap belt assembly center with inner with the bolt and washer.
Torque: 44 N*m (449 kgf*cm, 33 ft.*lbf)
13. INSTALL REAR POWER SEAT SWITCH
14. INSTALL RECLINING REMOTE CONTROL LEVER BEZEL
15. INSTALL NO. 2 SEATBACK FRAME SUB-ASSEMBLY
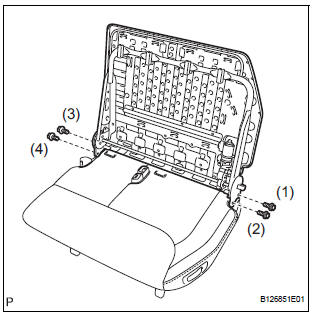
- Install the No. 2 seatback frame sub-assembly with the 4 bolts.
Torque: 44 N*m (449 kgf*cm, 33 ft.*lbf)
NOTICE:
- Tighten the bolts in the following order:
- Temporarily tighten bolt (1).
- Temporarily tighten bolt (2).
- Fully tighten bolt (3).
- Fully tighten bolt (4).
- Fully tighten bolt (1).
- Fully tighten bolt (2).
16. INSTALL FOLD SEAT CONTROL ECU
17. INSTALL NO. 2 SEATBACK PAD
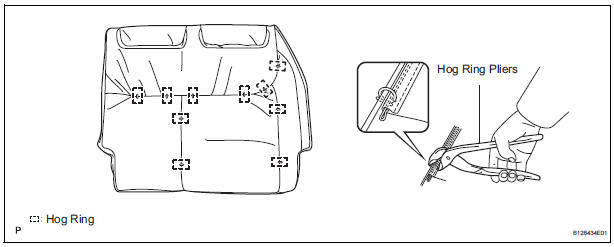
18. INSTALL NO. 2 SEATBACK COVER SUB-ASSEMBLY
- Using hog ring pliers, install the No. 2 seatback cover sub-assembly to the No. 2 seatback pad with 10 new hog rings.
NOTICE:
- Be careful not to damage the cover.
- When installing the hog rings, take care to minimize wrinkles as much as possible.
19. INSTALL NO. 2 SEATBACK COVER SUB-ASSEMBLY WITH PAD
20. INSTALL REAR NO. 2 SEAT HEADREST SUPPORT ASSEMBLY RH
21. INSTALL REAR NO. 2 SEAT HEADREST SUPPORT ASSEMBLY LH
22. INSTALL REAR SEAT HEADREST ASSEMBLY
23. INSTALL REAR SEAT RECLINING COVER RH
24. INSTALL REAR SEAT RECLINING COVER LH
25. INSTALL REAR NO. 2 SEAT COVER BEZEL
Test yourself
A quick Toyota Sienna quiz: every answer comes with an explanation and a link to the manual page.
Was this page helpful?