Installation
1. INSTALL VACUUM WARNING SWITCH ASSEMBLY (for 2GR-FKS)
Click here 
2. INSTALL BRAKE VACUUM CHECK VALVE ASSEMBLY (for 2TR-FE)
(a) Install a new grommet onto the brake booster assembly. |
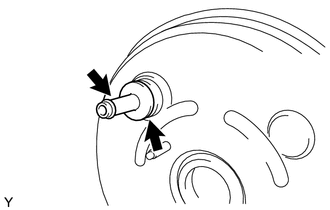 |
(b) Install the vacuum check valve onto the brake booster assembly.
3. INSTALL BRAKE VACUUM CHECK VALVE ASSEMBLY (for 2GR-FKS)
(a) Install a new grommet onto the brake booster assembly.
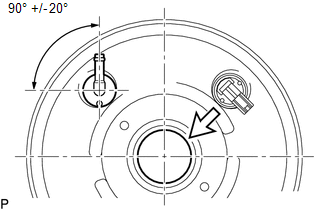 Text in Illustration
 |
Center of the Brake Booster Assembly |
(b) Install brake vacuum check valve assembly to the brake booster assembly as shown in the illustration.
4. INSTALL BRAKE BOOSTER ASSEMBLY
(a) Install the push rod clevis.
(b) Install a new gasket onto the brake booster assembly.
(c) Install the brake booster assembly with the 4 nuts.
Torque:
14 N·m {145 kgf·cm, 10 ft·lbf}
(d) Connect the vacuum hose to the brake booster assembly.
(e) Connect the vacuum warning switch assembly connector. (for 2GR-FKS)
5. INSTALL MASTER CYLINDER PUSH ROD CLEVIS
Click here
6. INSTALL BRAKE MASTER CYLINDER SUB-ASSEMBLY
Click here
7. INSTALL LOWER NO. 1 INSTRUMENT PANEL AIRBAG ASSEMBLY
Click here
8. CONNECT CABLE FROM NEGATIVE BATTERY TERMINAL
NOTICE:
When disconnecting the cable, some systems need to be initialized after the cable is reconnected.
Click here
Test yourself
A quick Toyota Tacoma quiz: every answer comes with an explanation and a link to the manual page.