ON-VEHICLE INSPECTION
PROCEDURE
1. CHECK POWER WINDOW REGULATOR MASTER SWITCH ASSEMBLY (w/o Jam Protection Function) 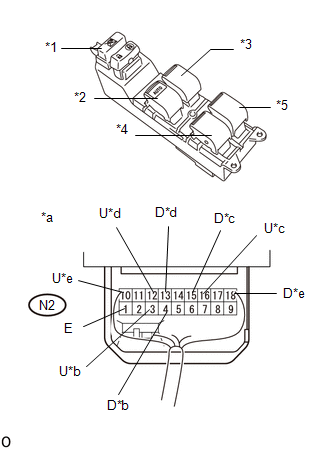
*1 |
Window Lock Switch |
*2 |
Driver Switch |
*3 |
Front Passenger Switch |
*4 |
Rear LH Switch |
*5 |
Rear RH Switch |
*a |
Component with harness connected
(Power Window Regulator Master Switch assembly) |
*b |
for Driver Side |
*c |
Front Passenger Side |
*d |
for Rear LH Side |
*e |
for Rear RH Side |
(a) for Double Cab:
(1) Remove the power window regulator master switch assembly.
Click here 
(2) Reconnect the switch connector.
(3) Measure the voltage according to the value(s) in the table below.
Standard Voltage: for Driver Switch:
Tester Connection | Switch Condition | Specified Condition |
N2-3 (U) - N2-1 (E) |
Ignition switch ON, driver side door power window regulator switch OFF → UP |
Below 1 V → 11 to 14 V |
N2-4 (D) - N2-1 (E) |
Ignition switch ON, driver side door power window regulator switch OFF → DOWN |
N2-4 (D) - N2-1 (E) |
Ignition switch ON, driver side door glass fully closed → power window AUTO DOWN operation → driver side door glass fully open |
Below 1 V → 11 to 14 V → Below 1 V |
for Front Passenger Switch:
Tester Connection | Switch Condition | Specified Condition |
N2-16 (U) - N2-1 (E) |
Ignition switch ON, front passenger side door power window regulator switch OFF → UP |
Below 1 V → 11 to 14 V |
N2-15 (D) - N2-1 (E) |
Ignition switch ON, front passenger side door power window regulator switch OFF → DOWN |
for Rear Switch LH:
Tester Connection | Switch Condition | Specified Condition |
N2-12 (U) - N2-1 (E) |
Ignition switch ON, rear LH side door power window regulator switch OFF → UP |
Below 1 V → 11 to 14 V |
N2-13 (D) - N2-1 (E) |
Ignition switch ON, rear LH side door power window regulator switch OFF → DOWN |
for Rear Switch RH:
Tester Connection | Switch Condition | Specified Condition |
N2-10 (U) - N2-1 (E) |
Ignition switch ON, rear RH side door power window regulator switch OFF → UP |
Below 1 V → 11 to 14 V |
N2-18 (D) - N2-1 (E) |
Ignition switch ON, rear RH side door power window regulator switch OFF → DOWN |
If the result is not as specified, replace the power window regulator master switch assembly.
(b) for CrewMax:
(1) Remove the power window regulator master switch assembly.
Click here
(2) Reconnect the switch connector.
(3) Measure the voltage according to the value(s) in the table below.
Standard Voltage: for Driver Switch:
Tester Connection | Switch Condition | Specified Condition |
N2-3 (U) - N2-1 (E) |
Ignition switch ON, driver side door power window regulator switch OFF → UP |
Below 1 V → 11 to 14 V |
N2-4 (D) - N2-1 (E) |
Ignition switch ON, driver side door power window regulator switch OFF → DOWN |
N2-4 (D) - N2-1 (E) |
Ignition switch ON, driver side door glass fully closed → power window AUTO DOWN operation → driver side door glass fully open |
Below 1 V → 11 to 14 V → Below 1 V |
for Front Passenger Switch:
Tester Connection | Switch Condition | Specified Condition |
N2-16 (U) - N2-1 (E) |
Ignition switch ON, front passenger side door power window regulator switch OFF → UP |
Below 1 V → 11 to 14 V |
N2-15 (D) - N2-1 (E) |
Ignition switch ON, front passenger side door power window regulator switch OFF → DOWN |
for Rear LH Switch:
Tester Connection | Switch Condition | Specified Condition |
N2-12 (U) - N2-1 (E) |
Ignition switch ON, rear LH side door power window regulator switch OFF → UP |
Below 1 V → 11 to 14 V |
N2-13 (D) - N2-1 (E) |
Ignition switch ON, rear LH side door power window regulator switch OFF → DOWN |
for Rear RH Switch:
Tester Connection | Switch Condition | Specified Condition |
N2-10 (U) - N2-1 (E) |
Ignition switch ON, rear RH side door power window regulator switch OFF → UP |
Below 1 V → 11 to 14 V |
N2-18 (D) - N2-1 (E) |
Ignition switch ON, rear RH side door power window regulator switch OFF → DOWN |
If the result is not as specified, replace the power window regulator master switch assembly.
2. CHECK POWER WINDOW REGULATOR MASTER SWITCH ASSEMBLY (w/ Jam Protection Function) 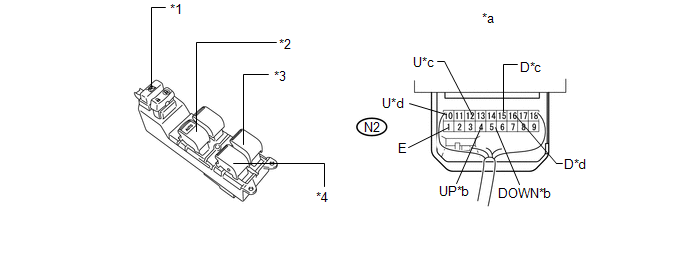 Text in Illustration
*1 |
Window Lock Switch |
*2 |
Driver Switch |
*3 |
Rear RH Switch |
*4 |
Rear LH Switch |
*a |
Component with harness connected
(Master Switch Assembly) |
*b |
for Driver Side |
*c |
for Rear LH Side |
*d |
for Rear RH Side |
(a) Remove the power window regulator master switch assembly.
Click here
(b) Reconnect the switch connector.
(c) Measure the voltage according to the value(s) in the table below.
Standard Voltage: for Driver Switch:
Tester Connection | Switch Condition | Specified Condition |
N2-4 (UP) - N2-1 (E) |
Ignition switch ON, driver side door power window regulator switch OFF → UP |
Below 1 V → 11 to 14 V |
N2-4 (UP) - N2-1 (E) |
Ignition switch ON, driver side door glass fully closed → power window AUTO UP operation → driver side door glass fully open |
N2-5 (DOWN) - N2-1 (E) |
Ignition switch ON, driver side door power window regulator switch OFF → DOWN |
N2-5 (DOWN) - N2-1 (E) |
Ignition switch ON, driver side door glass fully closed → power window AUTO DOWN operation → driver side door glass fully open |
Below 1 V → 11 to 14 V → Below 1 V |
for Rear LH Switch:
Tester Connection | Switch Condition | Specified Condition |
N2-12 (U) - N2-1 (E) |
Ignition switch ON, rear LH side door power window regulator switch OFF → UP |
Below 1 V → 11 to 14 V |
N2-15 (D) - N2-1 (E) |
Ignition switch ON, rear LH side door power window regulator switch OFF → DOWN |
for Rear RH Switch:
Tester Connection | Switch Condition | Specified Condition |
N2-10 (U) - N2-1 (E) |
Ignition switch ON, rear RH side door power window regulator switch OFF → UP |
Below 1 V → 11 to 14 V |
N2-16 (D) - N2-1 (E) |
Ignition switch ON, rear RH side door power window regulator switch OFF → DOWN |
If the result is not as specified, replace the power window regulator master switch assembly. |