Installation
1. REPAIR INSTRUCTION

2. INSTALL REAR DOOR LOWER OUTSIDE STRIPE
(a) Refer to the illustration to position the rear door lower outside stripe.
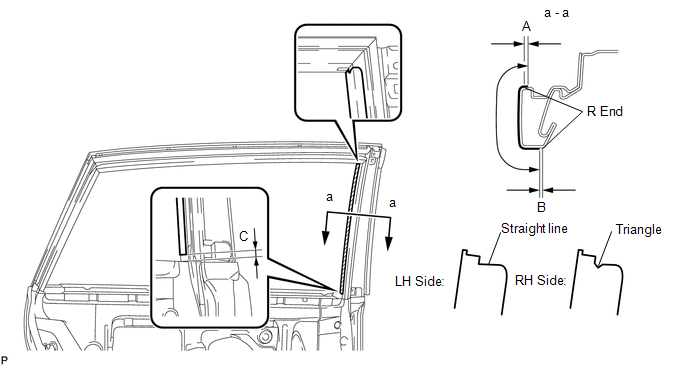 Standard Measurement
Dimension | Measurement |
|---|---|
A |
+1.5 mm (+0.0591 in.) |
B |
-1.0 mm (-0.0394 in.) |
C |
7.5 mm (0.295 in.) |
(b) Remove the release paper and apply the stripe.
3. INSTALL NO. 2 BLACK OUT TAPE
(a) Refer to the illustration to position the No. 2 black out tape.
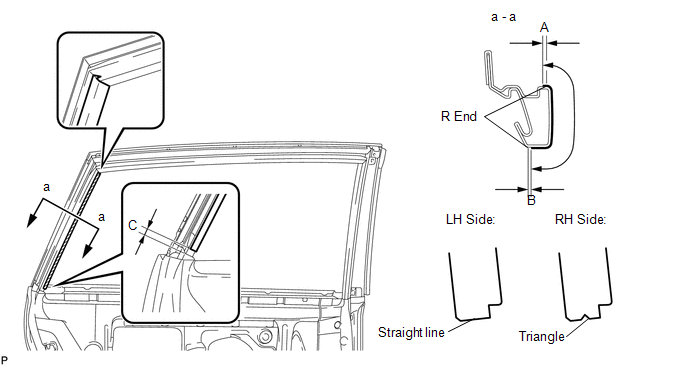 Standard Measurement
Dimension | Measurement |
|---|---|
A |
+1.5 mm (+0.0591 in.) |
B |
-1.0 mm (-0.0394 in.) |
C |
5.0 mm (0.197 in.) |
(b) Remove the release paper and apply the tape.
4. INSTALL REAR DOOR OUTSIDE STRIPE
(a) Refer to the illustration to position the rear door outside stripe.
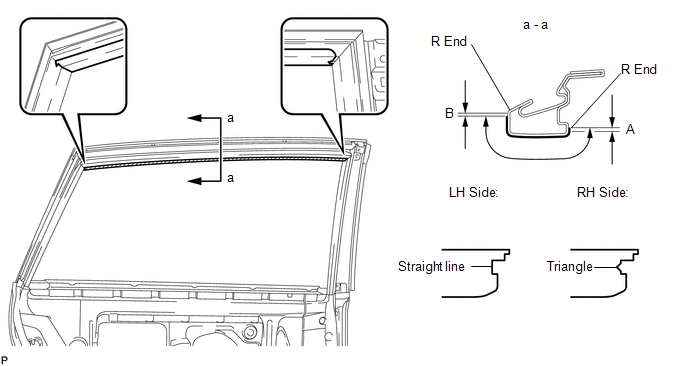 Standard Measurement
Dimension | Measurement |
|---|---|
A |
+1.5 mm (+0.0591 in.) |
B |
-1.0 mm (-0.0394 in.) |
(b) Remove the release paper and apply the stripe.
5. INSTALL REAR DOOR GLASS SUB-ASSEMBLY
6. INSTALL REAR DOOR WINDOW DIVISION BAR SUB-ASSEMBLY
7. INSTALL REAR DOOR GLASS RUN
8. INSTALL REAR DOOR WEATHERSTRIP
9. INSTALL REAR DOOR CHECK ASSEMBLY
10. INSTALL REAR DOOR SERVICE HOLE COVER
11. INSTALL REAR DOOR FRAME GARNISH
12. INSTALL REAR DOOR INSIDE HANDLE SUB-ASSEMBLY
13. INSTALL REAR DOOR TRIM BOARD SUB-ASSEMBLY
14. INSTALL REAR POWER WINDOW REGULATOR SWITCH ASSEMBLY WITH REAR DOOR ARMREST BASE PANEL
15. INSTALL REAR DOOR INSIDE HANDLE BEZEL PLUG
16. CONNECT CABLE TO NEGATIVE BATTERY TERMINAL
NOTICE:
When disconnecting the cable, some systems need to be initialized after the cable is reconnected (See page ).
17. INITIALIZE POWER WINDOW CONTROL SYSTEM
(See page )
Test yourself
A quick Toyota Venza quiz: every answer comes with an explanation and a link to the manual page.