Vsc Off Switch

Removal REMOVAL PROCEDURE
1. DISCONNECT CABLE FROM NEGATIVE BATTERY TERMINAL
NOTICE:
When disconnecting the cable, some systems need to be initialized after the cable is reconnected (See page  ).
2. REMOVE FRONT DOOR SCUFF PLATE LH
3. REMOVE COWL SIDE TRIM SUB-ASSEMBLY LH
4. REMOVE LOWER NO. 1 INSTRUMENT FINISH PANEL SUB-ASSEMBLY
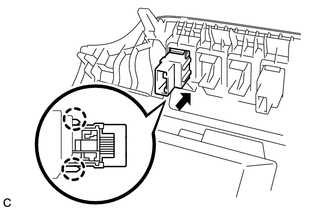
5. REMOVE VSC OFF SWITCH
(a) Disengage the 2 claws and remove the VSC OFF switch. |
 |
1. INSPECT VSC OFF SWITCH
(a) Disconnect the VSC OFF switch connector.
(b) Measure the resistance according to the value(s) in the table below. Standard Resistance:
If the value is not as specified, replace the VSC OFF switch. |
 |
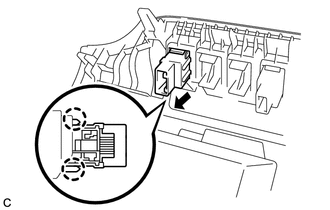
1. INSTALL VSC OFF SWITCH
(a) Engage the 2 claws and install the VSC OFF switch. |
 |
2. INSTALL LOWER NO. 1 INSTRUMENT FINISH PANEL SUB-ASSEMBLY

3. INSTALL COWL SIDE TRIM SUB-ASSEMBLY LH
4. INSTALL FRONT DOOR SCUFF PLATE LH
5. CONNECT CABLE TO NEGATIVE BATTERY TERMINAL
NOTICE:
When disconnecting the cable, some systems need to be initialized after the cable is reconnected (See page ).
6. CHECK FOR WARNING LIGHT AND INDICATOR LIGHT
HINT:
(See page ).
Test yourself
A quick Toyota Venza quiz: every answer comes with an explanation and a link to the manual page.