In this manual: Air conditioning system with refrigerant R134a
~26min read
The following table contains the various adapters that are necessary to connect the air conditioner service station to the refrigerant circuit for purposes of purging and to bridge the removed reservoir or collector and expansion valve (vehicle-specific). Using a filling hose with 5/8 -18 UNF connections (short version, e.g. charging hose -VAS 6338/31-), join both adapters, which were installed in place of the reservoir or receiver (included in adapter case VW/Audi passenger vehicle set -VAS 6338/1-). If a purged refrigerant circuit is not going to be reassembled straight after purging, leave the adapters on the connections and seal the connections at the adapters using the sealing caps -VAS 6338/30- (from adapter case VW/Audi passenger vehicle set -VAS 6338/1-). Depending on the type of air conditioner compressor and the period of production, different joining and sealing techniques have been applied in the refrigerant circuit → Heating, air conditioning.
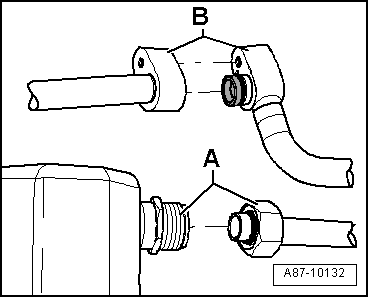
Block or threaded connections
Threaded connection -A-
Block connection -B-
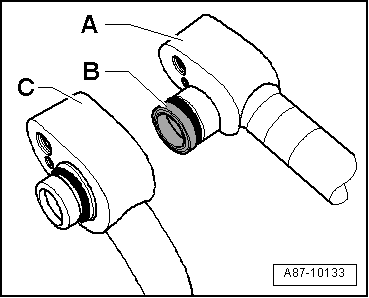
Block connections with various types of seals
Block connection with radial sealing connection -A- (with guide made from plastic or metal -B-)
Block connection with axial sealing connection -C-
Fox 2005
Vehicle
Adapters required for refrigerant pipes to air conditioner compressor
Adapters required for refrigerant pipes to receiver
Miscellaneous
Fox 2005 ►
Low-pressure side adapter -VAS 6338/12-
High-pressure side adapter -VAS 6338/2-
Remove dryer cartridge and seal receiver.
After flushing, install a new dryer cartridge.
Install adapter -VAS 6338/34- in place of expansion valve (or a drilled out expansion valve → Anchor)
After purging, install a new expansion valve.
Lupo 1999
Vehicle
Adapters required for refrigerant pipes to air conditioner compressor
Adapters required for refrigerant pipes to receiver
Miscellaneous
Lupo 1999 ► up to vehicle identification number 70000
Low-pressure side adapter -VAS 6338/12-
High-pressure side adapter -VAS 6338/2-
Remove receiver and bridge refrigerant pipes.
Adapter -VAS 6338/28-
Adapter -VAS 6338/29-
After flushing, install a new receiver.
Install adapter -VAS 6338/19- in place of expansion valve (or drilled out expansion valve e.g. 6N0 820 679 C → Anchor)
After purging, install a new expansion valve.
Lupo 1999 ► from vehicle identification number 70001
Low-pressure side adapter -VAS 6338/12-
High-pressure side adapter -VAS 6338/2- or
Adapter -VAS 6338/7-
Receiver
Can be flushed through.
After flushing, install a new receiver.
Install adapter -VAS 6338/19- in place of expansion valve (or drilled out expansion valve e.g. 6N0 820 679 C → Anchor)
After purging, install a new expansion valve.
up! 2012; e-up! 2014
Vehicle
Adapters required for refrigerant pipes to air conditioner compressor
Adapters required for refrigerant pipes to receiver
Miscellaneous
up! 2012 ►; e-up! 2014 ►
Low-pressure side adapter -VAS 6338/12-
High-pressure side adapter -VAS 6338/3-
Purging electrical air conditioner compressor, adapter -VAS 6338/40- and Adapter -VAS 6338/41-, Observe notes: → Chapter
Receiver
Can be flushed through.
After flushing, install a new receiver.
Replace expansion valve with adapter -VAS 6338/36- oradapter -VAS 6338/34- (or drilled-out expansion valve e.g. 1S0 820 078 → Anchor).
After purging, install a new expansion valve.
Polo 1995
Vehicle
Adapters required for refrigerant pipes to air conditioner compressor
Adapters required for refrigerant pipes to receiver
Miscellaneous
Polo 1995 ► up to vehicle identification number 50000
Adapter -VAS 6338/14-
Remove receiver and bridge refrigerant pipes.
Adapter -VAS 6338/28-
Adapter -VAS 6338/29-
After flushing, install a new receiver.
Install adapter -VAS 6338/19- in place of expansion valve (or drilled out expansion valve e.g. 6N0 820 679 C → Anchor)
After purging, install a new expansion valve.
Polo 1995 ► from vehicle identification number 50001
Low-pressure side adapter -VAS 6338/7-
High-pressure side adapter -VAS 6338/2-
Receiver
Can be flushed through.
After flushing, install a new receiver.
Install adapter -VAS 6338/19- in place of expansion valve (or drilled out expansion valve e.g. 6N0 820 679 C → Anchor)
After purging, install a new expansion valve.
Polo 2002
Vehicle
Adapters required for refrigerant pipes to air conditioner compressor
Adapters required for refrigerant pipes to receiver
Miscellaneous
Polo 2002 ►
Low-pressure side adapter -VAS 6338/12-
High-pressure side adapter -VAS 6338/2-
Remove dryer cartridge and seal receiver.
After flushing, install a new dryer cartridge.
Install adapter -VAS 6338/33- in place of expansion valve (or a drilled out expansion valve → Anchor)
After purging, install a new expansion valve.
Caddy 1996; Caddy 2004; Caddy 2011
Vehicle
Adapters required for refrigerant pipes to air conditioner compressor
Adapters required for refrigerant pipes to receiver
Miscellaneous
Caddy 1996 ►
Low-pressure side adapter -VAS 6338/4-
High-pressure side adapter -VAS 6338/2- or adapter -VAS 6338/14-
Remove receiver and bridge refrigerant pipes.
Adapter -VAS 6338/28-
Adapter -VAS 6338/29-
After flushing, install a new receiver.
Install adapter -VAS 6338/19- in place of expansion valve (or drilled out expansion valve e.g. 6N0 820 679 C → Anchor)
After purging, install a new expansion valve.
Caddy 2004 ►; Caddy 2011 ►
Sanden / Denso air conditioner compressor
Low-pressure side adapter -VAS 6338/12-
High-pressure side adapter -VAS 6338/3-
7H0 820 803 D air conditioner compressor
Low-pressure side adapter -VAS 6338/7-
High-pressure side adapter -VAS 6338/2-
Receiver
Can be flushed through.
After flushing, install a new receiver.
Install adapter -VAS 6338/18- in place of expansion valve (or a drilled out expansion valve → Anchor)
After purging, install a new expansion valve.
Polo 2010; Polo KH IN 2010; Polo KH IN 2015; Polo Lim IN 2011; Polo Lim In 2016; Polo Lim RUS 2011; Polo Lim RUS 2016; Polo KH MY 2014; Polo KH MY 2015; Polo Lim MY 2014; Polo Lim MY 2016; Polo 2014
Vehicle
Adapters required for refrigerant pipes to air conditioner compressor
Adapters required for refrigerant pipes to receiver
Miscellaneous
Polo 2010 ►; Polo KH IN 2010 ►; Polo KH IN 2015 ►; Polo Lim IN 2011 ►; Polo Lim IN 2016 ►; Polo Lim RUS 2011 ►; Polo Lim RUS 2016 ►; Polo KH MY 2014 ►; Polo KH MY 2015 ►; Polo Lim MY 2014 ►; Polo Lim MY 2016 ►; Polo 2014 ►
Low-pressure side adapter -VAS 6338/12-
High-pressure side adapter -VAS 6338/3-
For air conditioner compressors 6Q0 820 808 F and 6Q0 820 808 G on high pressure side adapter -VAS 6338/2-
Remove dryer cartridge and seal receiver.
After flushing, install a new dryer cartridge.
Install adapter -VAS 6338/34- in place of expansion valve (or a drilled out expansion valve → Anchor)
After purging, install a new expansion valve.
Golf 1992; Vento 1992; Passat 1994
Vehicle
Adapters required for refrigerant pipes to air conditioner compressor
Adapters required for refrigerant pipes to receiver
Miscellaneous
Golf 1992 ►, Vento 1992 ►, Passat 1994 ►
Adapter -VAS 6338/14-
Remove receiver and bridge refrigerant pipes.
Adapter -VAS 6338/28-
Adapter -VAS 6338/29-
After flushing, install a new receiver.
Install adapter -VAS 6338/19- in place of expansion valve (or drilled out expansion valve e.g. 6N0 820 679 C → Anchor)
Remove desiccant bag/cartridge and seal fluid receiver.
After purging, install a new desiccant bag/cartridge.
If a Showa condenser is fitted, leave the receiver fitted and purge the refrigerant circuit.
After flushing, install a new receiver.
Install adapter -VAS 6338/38- in place of expansion valve (or a drilled out expansion valve → Anchor)
After purging, install a new expansion valve.
Golf 1998; Golf Variant 1998; Vento 1999; New Beetle 1999; New Beetle Cabrio 2003; Bora 1999
Golf 1998 ►, Golf Variant 1998 ►, Vento 1999 ►, New Beetle 1999 ►, New Beetle Cabrio 2003 ►, Bora 1999 ►
Low-pressure side adapter -VAS 6338/7-
High-pressure side adapter -VAS 6338/2-
Remove receiver and bridge refrigerant pipes.
Connect two adapters -VAS 6338/2- with hose -VAS 6338/31- together.
After flushing, install a new receiver.
Install adapter -VAS 6338/19- in place of expansion valve (or a drilled out expansion valve → Anchor)
After purging, install a new expansion valve.
Phaeton 2003
Vehicle
Adapters required for refrigerant pipes to air conditioner compressor
Adapters required for refrigerant pipes to receiver/reservoir
Miscellaneous
Phaeton 2003 ►
Low-pressure side adapter -VAS 6338/12-
High-pressure side, 12, 8 and 6-cyl. petrol engines: adapter -VAS 6338/2-. High-pressure side, 10 and 6-cyl. diesel engines: adapter -VAS 6338/3-
Remove reservoir (dryer), and bridge refrigerant pipes.
Join two adapters -VAS 6338/6- and connect to hose -VAS 6338/31-.
After flushing, install a new reservoir.
Restrictor removed and refrigerant pipe reconnected.
After flushing, install a new restrictor.
Passat 1997
Vehicle
Adapters required for refrigerant pipes to air conditioner compressor
Adapters required for refrigerant pipes to receiver/reservoir
Miscellaneous
Passat 1997 ► up to September 2000
Adapter -V.A.G 1785/7-
Adapter -V.A.G 1785/8-
Low-pressure side adapter -VAS 6338/12-
High-pressure side adapter -VAS 6338/2-
There are two versions of the reservoir.
Remove reservoir and bridge refrigerant pipes.
Connect adapter -VAS 6338/9- and adapter -VAG 1785/8- or adapter -VAS 6338/10- to hose -VAS 6338/31-.
After flushing, install a new reservoir.
Restrictor removed and refrigerant line reconnected.
After flushing, install a new restrictor.
Passat 1997 ► from October 2000
Adapter -V.A.G 1785/7-
Adapter -V.A.G 1785/8-
Low-pressure side adapter -VAS 6338/12-
High-pressure side adapter -VAS 6338/2-
Remove reservoir and bridge refrigerant pipes.
Connect two adapters -VAS 6338/10- with hose -VAS 6338/31- together.
After flushing, install a new reservoir.
Restrictor removed and refrigerant line reconnected.
After flushing, install a new restrictor.
Passat 2006; Passat CC 2009; CC 2010; Passat 2011; CC FL
Vehicle
Adapters required for refrigerant pipes to air conditioner compressor
Adapters required for refrigerant pipes to receiver/reservoir
Miscellaneous
Passat 2006 ►, Passat CC 2009 ►, CC 2010 ►, Passat 2011 ►, CC FL ►
Low-pressure side adapter -VAS 6338/12-
High-pressure side adapter -VAS 6338/3-
Remove dryer cartridge and seal receiver.
After flushing, install a new dryer cartridge.
If a Showa condenser is fitted, leave the receiver fitted and purge the refrigerant circuit.
After flushing, install a new receiver.
Install adapter -VAS 6338/18- in place of expansion valve (or a drilled out expansion valve → Anchor)
After purging, install a new expansion valve.
Passat 2015; Passat Estate 2015
Note In the Passat 2015 and Passat Estate 2015 with BiTurbo engine, the refrigerant circuit is not flushed. In these vehicles, it would require too much effort to remove the expansion valve. If the air conditioner compressor is defective, check whether filings have entered the condenser or whether there are filings at the condenser outlet. If there are only filings on the inlet side but not on the outlet side, renew only the condenser and the air conditioner compressor.
Vehicle
Adapters required for refrigerant pipes to air conditioner compressor
Adapters required for refrigerant pipes to receiver
Miscellaneous
Passat 2015 ►; Passat Estate 2015 ►
Low-pressure side adapter -VAS 6338/12-
High-pressure side adapter -VAS 6338/3-
Remove desiccant bag/cartridge and seal fluid receiver.
After purging, install a new desiccant bag/cartridge.
Install adapter -VAS 6338/18- in place of expansion valve (or a drilled out expansion valve → Anchor)
After purging, install a new expansion valve.
Sharan 1996
Note On vehicles with a 2nd evaporator (Sharan), the front and rear refrigerant circuit must be rinsed separately. The front refrigerant circuit must be sealed with adapter -V.A.G 1785/1-, adapter -1785/3- and sealing caps -VAS 6338/30-.
Vehicle
Adapters required for refrigerant pipes to air conditioner compressor
Adapters required for refrigerant pipes to receiver and 2nd evaporator
Miscellaneous
Sharan 1996 ► up to May 2000
Low-pressure side adapter -VAS 6338/7-
High-pressure side adapter -VAS 6338/2-
or adapter -VAS 6338/14-
Remove receiver and connect refrigerant pipes to adapter -VAS 6338/37-.
After purging, install a new receiver (dryer).
Low-pressure line for second evaporator adapter -V.A.G 1785/7-
High-pressure line for second evaporator adapter -V.A.G 1785/5-
Adapter -V.A.G 1785/3- with sealing cap -VAS 6338/30- to seal front refrigerant circuit. Adapter -V.A.G 1785/1- with sealing cap -VAS 6338/30- to seal front refrigerant circuit.
Install adapter -VAS 6338/35- in place of front and rear expansion valves (or a drilled out expansion valve → Anchor)
After purging, install a new expansion valve.
Sharan 1996 ► from June 2000
Low-pressure side adapter -VAS 6338/7-
High-pressure side adapter -VAS 6338/2-
Remove dryer cartridge and seal receiver.
After flushing, install a new dryer cartridge.
Low-pressure line for second evaporator adapter -V.A.G 1785/7-
High-pressure line for second evaporator adapter -V.A.G 1785/5-
Adapter -V.A.G 1785/3- with sealing cap -VAS 6338/30- to seal front refrigerant circuit. Adapter -V.A.G 1785/1- with sealing cap -VAS 6338/30- to seal front refrigerant circuit.
Install adapter -VAS 6338/35- in place of front and rear expansion valves (or a drilled out expansion valve → Anchor)
After purging, install a new expansion valve.
Sharan 2011; Sharan 2016
Note On vehicles with a 2nd evaporator (Sharan), the front and rear refrigerant circuit must be rinsed separately. The front refrigerant circuit must be sealed with adapter -V.A.G 1785/1-, adapter -1785/3- and sealing caps -VAS 6338/30-.
Vehicle
Adapters required for refrigerant pipes to air conditioner compressor
Adapters required for refrigerant pipes to receiver and 2nd evaporator
Miscellaneous
Sharan 2011 ►; Sharan 2016 ►
Low-pressure side adapter -VAS 6338/12-
High-pressure side adapter -VAS 6338/3-
Remove dryer cartridge and seal receiver.
After flushing, install a new dryer cartridge.
Low-pressure line for second evaporator adapter -VAS 6338/3-
High-pressure line for 2nd evaporator adapter -VAS 6338/4-
The refrigerant lines to the second evaporator must be loosened sufficiently so that the adapter can be fitted without deforming the refrigerant lines.
Sealing adapter -VAS 6338/5- for front refrigerant circuit.
Sealing adapter -VAS 6338/11- for front refrigerant circuit.
Install adapter -VAS 6338/18- in place of front expansion valve (or a drilled out expansion valve → Anchor)
Install adapter -VAS 6338/33- in place of rear expansion valve (or a drilled out expansion valve → Anchor)
Note On vehicles with a second evaporator (Touareg), the front and rear refrigerant circuit must be purged separately. The front refrigerant circuit must be sealed with sealing adapter -VAS 6338/5- and sealing adapter -VAS 6338/11-.
Vehicle
Adapters required for refrigerant pipes to air conditioner compressor
Adapters required for refrigerant pipes to receiver and second evaporator
Miscellaneous
Touareg 2003 ► to vehicle identification number 50000
Low-pressure side adapter -VAS 6338/12-
High-pressure side adapter -VAS 6338/2-
Engine code BJN 6.0 l to vehicle identification number 20000 on high-pressure side adapter -VAS 6338/3-
Remove dryer cartridge and seal receiver.
After flushing, install a new dryer cartridge.
Low-pressure line for second evaporator adapter -VAS 6338/3-
High-pressure line for second evaporator adapter -VAS 6338/4-
Sealing adapter -VAS 6338/5- for front refrigerant circuit.
Sealing adapter -VAS 6338/11- for front refrigerant circuit.
Install adapter -VAS 6338/17- in place of front expansion valve (or a drilled out expansion valve → Anchor)
After purging, install a new expansion valve.
Drill out expansion valve at second evaporator → Anchor.
After purging, install a new expansion valve.
Touareg 2003 ► as of vehicle identification number 50001; Touareg 2010 ►; Touareg 2015; Touareg Hybrid 2010 ►
Low-pressure side adapter -VAS 6338/12-
High-pressure side adapter -VAS 6338/2- or adapter -VAS 6338/3-
Electrical air conditioner compressor, adapter -VAS 6338/40- and adapter -VAS 6338/41-
Remove dryer cartridge and seal receiver.
After flushing, install a new dryer cartridge.
Low-pressure line for second evaporator adapter -VAS 6338/3-
High-pressure line for second evaporator adapter -VAS 6338/4-
Sealing adapter -VAS 6338/5- for front refrigerant circuit.
Sealing adapter -VAS 6338/11- for front refrigerant circuit.
Install adapter -VAS 6338/17- or adapter -VAS 6338/33- in place of front and rear expansion valves (or a drilled out expansion valve → Anchor)
After purging, install new expansion valves.
Transporter 1991
Note On vehicles with a second evaporator, the front and rear refrigerant circuit must be purged separately. The front refrigerant circuit must be sealed with sealing adapter -VAS 6338/5- and sealing adapter -VAS 6338/11-.
Vehicle
Adapters required for refrigerant pipes to air conditioner compressor
Adapters required for refrigerant pipes to receiver and second evaporator
Miscellaneous
Transporter 1991 ► to 12.1995
Air conditioner compressor 2D0 820 805 B and 701 820 805 Q adapter -VAS 6338/54- Vehicle with a additional evaporator on the roof, use adapter -VAS 6338/51- and adapter -VAS 6338/52-.
If the receiver is attached beneath the condenser, it can be purged.
For other versions, remove reservoir.
Adapter -VAS 6338/20- for receiver.
Adapter -VAS 6338/29- for receiver.
Adapter -VAS 6338/26- with sealing cap -VAS 6338/30- to seal front refrigerant circuit. Adapter -VAS 6338/27- with sealing cap -VAS 6338/30- to seal front refrigerant circuit.
Adapter -VAS 6338/57- for refrigerant line of second evaporator.
Adapter -VAS 6338/58- for refrigerant line of second evaporator.
After flushing, install a new receiver.
Install adapter -VAS 6338/55- in place of front and rear expansion valves (or a drilled out expansion valve → Anchor)
After purging, install a new expansion valve.
Transporter 1991 ► from Jan. 1996
Air conditioner compressor 7D0 820 805 E adapter -VAS 6338/53-
Air conditioner compressor 7D0 820 805 H low-pressure side adapter -VAS 6338/7-
High-pressure side adapter -VAS 6338/2-
Vehicle with a additional evaporator on the roof, use adapter -VAS 6338/51- and adapter -VAS 6338/52-.
If the receiver is attached beneath the condenser, it can be purged.
For other versions, remove reservoir.
Adapter -VAS 6338/20- for receiver.
Adapter -VAS 6338/29- for receiver.
Adapter -VAS 6338/26- with sealing cap -VAS 6338/30- to seal front refrigerant circuit. Adapter -VAS 6338/27- with sealing cap -VAS 6338/30- to seal front refrigerant circuit.
Adapter -VAS 6338/57- for refrigerant line of second evaporator.
Adapter -VAS 6338/58- for refrigerant line of second evaporator.
After flushing, install a new receiver.
Install adapter -VAS 6338/55- in place of front and rear expansion valves (or a drilled out expansion valve → Anchor)
After purging, install a new expansion valve.
Transporter 2004
Note On vehicles with a second evaporator, the front and rear refrigerant circuit must be purged separately. The front refrigerant circuit must be sealed with sealing adapter -VAS 6338/5- and sealing adapter -VAS 6338/11-.
Vehicle
Adapters required for refrigerant pipes to air conditioner compressor
Adapters required for refrigerant pipes to receiver and second evaporator
Miscellaneous
Transporter 7H 2004 ►
Air conditioner compressor 7H0 820 805 E low-pressure side adapter -VAS 6338/12-, high-pressure side adapter -VAS 6338/3- Air conditioner compressor 7H0 820 803 C low-pressure side adapter -VAS 6338/7-, high-pressure side adapter -VAS 6338/2-
Remove dryer cartridge and seal receiver.
After flushing, install a new dryer cartridge.
Sealing adapter -VAS 6338/5- for front refrigerant circuit.
Sealing adapter -VAS 6338/11- for front refrigerant circuit.
Low-pressure line for second evaporator adapter -VAS 6338/3-
High-pressure line for second evaporator adapter -VAS 6338/4-
To vehicle identification number 20000, drill out expansion valve → Anchor
From vehicle identification number 20001, install adapter -VAS 6338/56- in place of front expansion valve
After purging, install a new expansion valve.
Install adapter -VAS 6338/33- in place of expansion valve on second evaporator
After purging, install a new expansion valve.
Transporter 7J 2004 ►
Air conditioner compressor 7H0 820 805 E low-pressure side adapter -VAS 6338/12-, high-pressure side adapter -VAS 6338/3- Air conditioner compressor 7H0 820 803 C low-pressure side adapter -VAS 6338/7-, high-pressure side adapter -VAS 6338/2- Air conditioner compressor 7H0 820 805 D low-pressure side adapter -VAS 6338/52-, high-pressure side adapter -VAS 6338/51-
Remove dryer cartridge and seal receiver.
After flushing, install a new dryer cartridge.
Sealing adapter -VAS 6338/5- for front refrigerant circuit.
Sealing adapter -VAS 6338/11- for front refrigerant circuit.
Low-pressure line for second evaporator adapter -VAS 6338/3-
High-pressure line for second evaporator adapter -VAS 6338/4-
To vehicle identification number 5000, drill out expansion valve → Anchor
From vehicle identification number 5001, install adapter -VAS 6338/56- in place of front expansion valve
After purging, install a new expansion valve.
Install adapter -VAS 6338/56- in place of expansion valve on second evaporator
After purging, install a new expansion valve.
Transporter 2010; Multivan 2010; California 2010; Caravelle 2010;
Note On vehicles with a 2nd evaporator, the front and rear refrigerant circuit must be rinsed separately. The front refrigerant circuit must be sealed with sealing adapter -VAS 6338/5- and sealing adapter -VAS 6338/11-.
Vehicle
Adapters required for refrigerant pipes to air conditioner compressor
Adapters required for refrigerant pipes to receiver and 2nd evaporator
Sealing adapter -VAS 6338/5- for front refrigerant circuit.
Sealing adapter -VAS 6338/11- for front refrigerant circuit.
Low-pressure line for second evaporator adapter -VAS 6338/3-
High-pressure line for second evaporator adapter -VAS 6338/4-
Install adapter -VAS 6338/56- in place of expansion valve (or a drilled out expansion valve → Anchor)
Remove and drill open expansion valve for rear evaporator → Anchor.
After purging, install a new expansion valve.
Crafter 2006; LT 2 as of 1997
Note On vehicles with a 2nd evaporator, the front and rear refrigerant circuit must be rinsed separately. The front refrigerant circuit must be sealed with sealing adapter -VAS 6338/5- and sealing adapter -VAS 6338/11-.
Vehicle
Adapters required for refrigerant pipes to air conditioner compressor
Adapters required for refrigerant pipes to receiver and 2nd evaporator
Miscellaneous
Crafter 2006 ►
Air conditioner compressor 2E0 820 803 A low-pressure side adapter -VAS 6338/12-, high-pressure side adapter -VAS 6338/3- Air conditioner compressor 2E0 820 805 low-pressure side adapter -VAS 6338/7-, high-pressure side adapter -VAS 6338/3-
Receiver
Can be flushed through.
After flushing, install a new receiver.
Sealing adapter -VAS 6338/5- for front refrigerant circuit.
Sealing adapter -VAS 6338/11- for front refrigerant circuit.
Low-pressure line for second evaporator adapter -VAS 6338/3-
High-pressure line for second evaporator adapter -VAS 6338/4-
Drill out expansion valve → Anchor
After purging, install a new expansion valve.
LT 2 1997 ►
Low-pressure side adapter -VAS 6338/7-
High-pressure side adapter -VAS 6338/2-
Adapter -VAS 6338/20-
Remove receiver and bridge refrigerant pipes.
Connect two adapters -VAS 6338/29- with hose -VAS 6338/31- together.
After flushing, install a new receiver.
Install adapter -VAS 6338/56- in place of expansion valve (or a drilled out expansion valve → Anchor)
After purging, install a new expansion valve.
Amarok 2011
Vehicle
Adapters required for refrigerant pipes to air conditioner compressor
Adapters required for refrigerant pipes to receiver
Miscellaneous
Amarok 2011 ►
Low-pressure side adapter -VAS 6338/12-
High-pressure side adapter -VAS 6338/3-
Remove dryer cartridge and seal receiver.
After flushing, install a new dryer cartridge.
,
Install adapter -VAS 6338/33- in place of expansion valve (or a drilled out expansion valve → Anchor)
Golf 2009 blue e-Motion
Vehicle
Adapters required for refrigerant pipes to air conditioner compressor and for air conditioner compressor itself
Adapters required for refrigerant pipes to receiver
Miscellaneous
Golf 2009 blue e-Motion ►
Low-pressure side adapter -VAS 6338/12-
High-pressure side adapter -VAS 6338/3-
Purging electrical air conditioner compressor, adapter -VAS 6338/40- and Adapter -VAS 6338/41-, Observe notes: → Chapter
Remove dryer cartridge and seal receiver.
After flushing, install a new dryer cartridge.
Shut-off tap -VAS 6338/42-
Install adapter -VAS 6338/34- in place of expansion valve (or a drilled out expansion valve → Anchor)
After purging, install a new expansion valve.
Remove refrigerant shut-off valve for high-voltage battery heat exchanger -N542- and install shut-off tap -VAS 6338/42-.
Remove refrigerant shut-off valve for heater and air conditioner unit -N541- and install shut-off tap -VAS 6338/42-. Comply with notes → Anchor.
If no shut-off tap -VAS 6338/42- is available, a voltage of 12 V may be applied to shut-off valves -N541- and -N542- as an alternative.
e-Golf 2014 and e-Golf 2014 with heat pump
Vehicle
Adapters required for refrigerant pipes to air conditioner compressor and for air conditioner compressor itself
Adapters required for refrigerant pipes to receiver
Miscellaneous
e-Golf 2014 ►
Low-pressure side adapter -VAS 6338/12-
High-pressure side adapter -VAS 6338/3-
Purging electrical air conditioner compressor, adapter -VAS 6338/40- and Adapter -VAS 6338/41-, Observe notes: → Chapter
Remove dryer cartridge and seal receiver.
After flushing, install a new dryer cartridge.
Install adapter -VAS 6338/34- in place of expansion valve (or a drilled out expansion valve → Anchor)
After purging, install a new expansion valve.
e-Golf 2014 ► with heat pump
Low-pressure side adapter -VAS 6338/12-
High-pressure side adapter -VAS 6338/3-
Purging electrical air conditioner compressor, adapter -VAS 6338/40- and Adapter -VAS 6338/41-, Observe notes: → Chapter
Remove reservoir (dryer), and bridge refrigerant pipes.
Join two adapters -VAS 6338/6- and connect to hose -VAS 6338/31-.
After flushing, install a new reservoir.
Start “Basic setting” in → Vehicle diagnostic tester, and start the function “Charge refrigerant circuit”.
This will open the electrical valves in the refrigerant circuit.
Leave vehicle diagnostic tester connected to keep the valves open.
Golf Hybrid 2014
Vehicle
Adapters required for refrigerant pipes to air conditioner compressor and for air conditioner compressor itself
Adapters required for refrigerant pipes to receiver
Miscellaneous
Golf Hybrid 2014 ►
Low-pressure side adapter -VAS 6338/12-
High-pressure side adapter -VAS 6338/3-
Purging electrical air conditioner compressor, adapter -VAS 6338/40- and Adapter -VAS 6338/41-, Observe notes: → Chapter
There are two versions of the fluid receiver: See vehicle specific repair manual.
Fluid receiver with permanently fitted dryer
Can be flushed through.
After flushing, install a new receiver.
Receiver with desiccant bag or cartridge
Remove desiccant bag/cartridge and seal fluid receiver.
After purging, install a new desiccant bag/cartridge.
Install adapter -VAS 6338/38- in place of expansion valve (or a drilled out expansion valve → Anchor) Replace shut-off valves -N541- and -N542- with two shut-off taps -VAS 6338/42-. Comply with notes → Anchor. Remove restrictor in refrigerant line to heat exchanger for high-voltage battery, and drill it out (see notes below) → Anchor.
Note In the Golf Hybrid 2014, the refrigerant circuit is flushed in 2 cycles. For the first cycle, the adapter for the shut-off valve -N541- is open, and the adapter for shut-off valve -N542- is closed. This will cause the refrigerant circuit with the evaporator in the heater and air conditioning unit to be flushed. For the second cycle, the adapter for the shut-off valve -N541- is closed, and the adapter for shut-off valve -N542- is open. This will cause the refrigerant circuit with the evaporator in the heat exchanger for high-voltage battery to be flushed ⇒ Heating, air conditioning; Rep. Gr. 87; Refrigerant circuit; System overview - refrigerant circuit (repair manual for the specific vehicle). Note
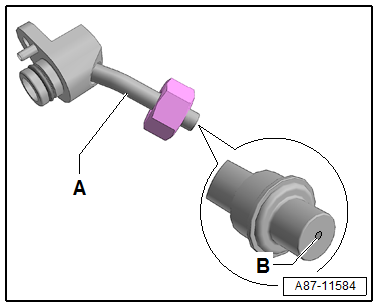
The illustration shows a refrigerant line -A- with a permanently installed restrictor -B- (without strainer). This refrigerant line must be drilled open with a suitable 5 mm drill bit (remove the restrictor if it is removable), and it must be cleaned before it is installed in the purging circuit. Renew the refrigerant line which has been drilled open after purging has been completed → Electronic Parts Catalogue. The diameter of the shown restrictor hole -B- is approx. 0.7 mm. Depending on the refrigerant line version, this restrictor is permanently installed or it can be removed. For the removable version a strainer may be fitted to prevent the restrictor hole from being blocked by suspended particles.
?
Test yourself
A quick Volkswagen Golf quiz: every answer comes with an explanation and a link to the manual page.
 Note In the Passat 2015 and Passat Estate 2015 with BiTurbo engine, the refrigerant circuit is not flushed. In these vehicles, it would require too much effort to remove the expansion valve. If the air conditioner compressor is defective, check whether filings have entered the condenser or whether there are filings at the condenser outlet. If there are only filings on the inlet side but not on the outlet side, renew only the condenser and the air conditioner compressor.