General body repairs, interior
Assembly overview - front door trim
In this manual: General body repairs, interior
~1min read
 Note
The assembly overview is shown for the front door trim on driver side. The assembly overview for the front passenger side is analogous. The assembly overview is shown for 4-door models. The assembly overview for 2-door models is analogous.
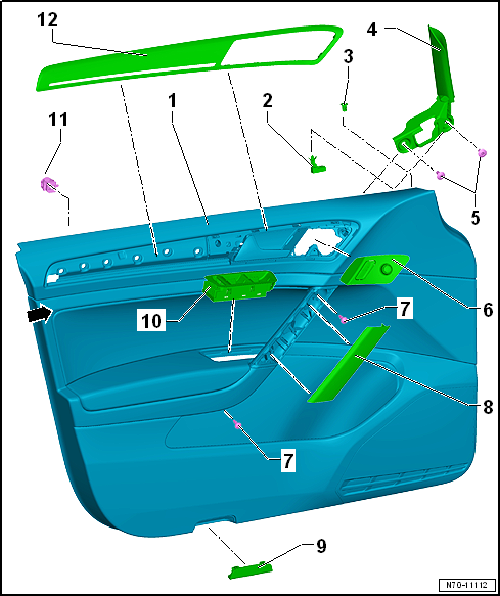
| 1 - | Door trim |
- Removing and installing → Chapter
| 2 - | Warning lamp for SAFE function of central locking -K133- |
- Driver door only
- Overview of fitting locations → Electrical system; Rep. gr.96
| 3 - | Sleeve |
- For central locking deadlock function warning lamp -SAFE- -K133-
- Driver door only
| 4 - | Mirror cover trim |
- Removing and installing → Chapter
| 5 - | Clip |
- Qty. 2
- Renew any damaged or deformed clips
| 6 - | Exterior mirror adjuster -EX11- |
- With driver side interior locking button for central locking system -E308
- Overview of fitting locations → Electrical system; Rep. gr.96
| 7 - | Bolt |
- Qty. 2
- 4,5 N·m
| 8 - | Upper part of handle recess |
| 9 - | Reflector |
- Overview of fitting locations → Electrical system; Rep. gr.96
| 10 - | Operating unit for window regulator in driver door -E512- |
- Overview of fitting locations → Electrical system; Rep. gr.96
| 11 - | Clip |
- 2-door model: qty 7
- 4-door model and estate: qty 6 (one crash clip on top left -arrow-)
- Insert into trim
- Renew any damaged or deformed clips
| 12 - | Trim panel |
- Allocation → Electronic Parts Catalogue
- Removing and installing → Chapter
Test yourself
A quick Volkswagen Golf quiz: every answer comes with an explanation and a link to the manual page.
Was this page helpful?