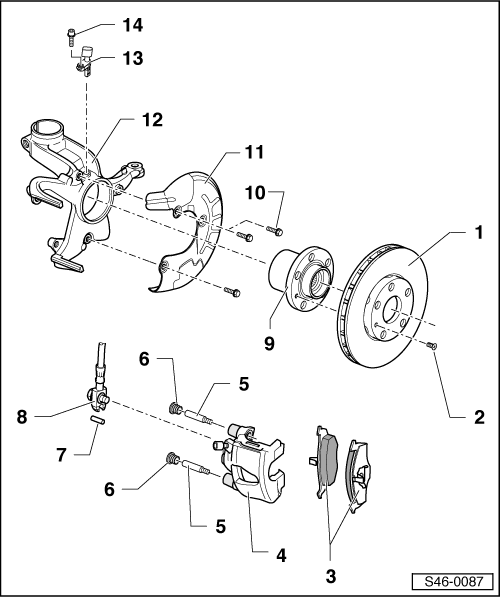
Note After every brake pad change, depress brake pedal firmly several times with vehicle stationary, so that brake pads are properly seated in their normal operating position. Use the brake filling and bleeding equipment -VAS 5234- to draw off brake fluid from the brake fluid reservoir. Before removing a brake caliper or disconnecting a brake hose, fit brake pedal depressor -V.A.G 1869/2- (when doing this, release pressure in system).
1 -
Brake disc
Internally ventilated
Wear limits → Chapter
Always renew on both sides of an axle.
Unscrew brake caliper prior to removing.
Never remove brake discs from wheel hub by force. If necessary use penetrating fluid, because otherwise brake discs can be damaged.
2 -
Torx bolt
8 N·m
3 -
Brake pads
Thickness: 12 mm not including backplate.
Wear limit: 2 mm not including backplate.
Checking thickness → Booklet.
Always renew on both sides of an axle.
Removing and installing → Chapter
4 -
Brake caliper
Do not disconnect brake hose when changing pads.
Removing and installing → Chapter
Repairing → Chapter.
5 -
Guide pin
30 N·m
6 -
Cover cap
Remove
7 -
Spring pin
8 -
Brake hose with banjo union and banjo bolt
35 N·m
9 -
Wheel hub with wheel bearing
Removing and installing → Running gear, axles, steering; Rep. gr.40
 Note After every brake pad change, depress brake pedal firmly several times with vehicle stationary, so that brake pads are properly seated in their normal operating position. Use the brake filling and bleeding equipment -VAS 5234- to draw off brake fluid from the brake fluid reservoir. Before removing a brake caliper or disconnecting a brake hose, fit brake pedal depressor -V.A.G 1869/2- (when doing this, release pressure in system).