Note There are different designs and makes of heater. The individual components of the various heaters are similar but not identical. The combined fitting of different makes of component is therefore not permissible → Electronic Parts Catalogue. The following illustrations show a “Valeo” heater unit. For information on distinguishing features with respect to other makes refer to → Chapter.
The figures show a left-hand drive vehicle. The procedure is analogous.
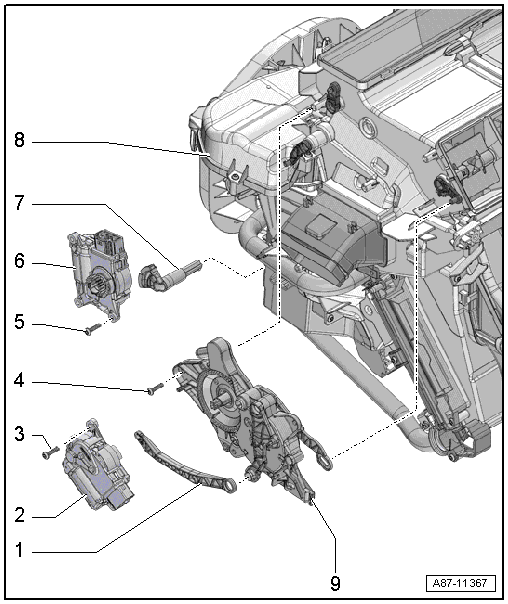
Heater, flap control
1 -
Actuating lever
For actuation of defroster and air distributor flap
2 -
Air distribution flap control motor -V428-
With potentiometer for air distribution flap control motor -G645-.
Checking: Use vehicle diagnostic tester in “Guided fault finding” mode and → Current flow diagrams, Electrical fault finding and Fitting locations
Removing and installing → Chapter
3 -
Bolt
Qty. 2.
1 N·m
4 -
Bolt
Qty. 3.
1 N·m
5 -
Bolt
Qty. 2.
1 N·m
6 -
Temperature flap control motor -V68-
With potentiometer for temperature flap control motor -G92-.
Checking: Use vehicle diagnostic tester in “Guided fault finding” mode and → Current flow diagrams, Electrical fault finding and Fitting locations
Removing and installing → Chapter
7 -
Actuating lever
For actuation of heated air flap.
8 -
Heater unit
Different versions → Chapter.
The combined fitting of different makes of component is not permissible.
The following illustrations show the heater unit from “Valeo”.
The design is largely identical to that of the heater and air conditioning unit. Following components are not fitted: expansion valve, condensation drain, evaporator etc. Instead of the evaporator a flow rate limiter is fitted (only on vehicles without air conditioning system). There is no opening for the expansion valve in the plenum chamber back wall seal or this is closed off by a foam pad
Removing and installing → Chapter
9 -
Defroster and air distribution flap actuation unit
Removing and installing → Chapter
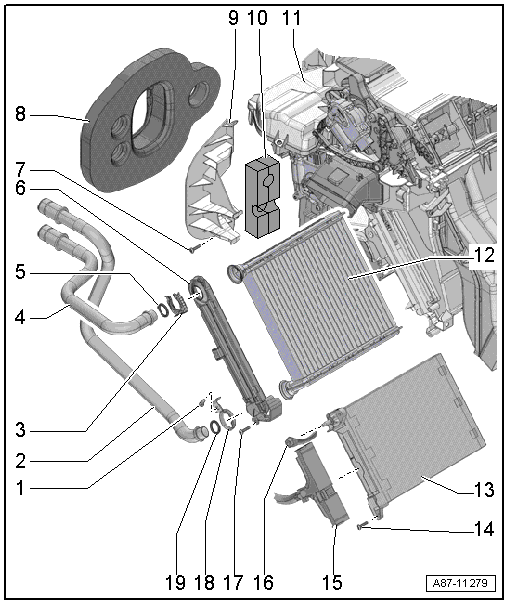
Heater, heat exchanger, auxiliary air heater element
1 -
Bolt
2 N·m
2 -
Coolant pipe with heat exchanger
Different versions. Refer to → Electronic Parts Catalogue.
Coolant supply from the engine
Removing and installing → Chapter
3 -
Clip
4 -
Coolant pipe with heat exchanger
Different versions. Refer to → Electronic Parts Catalogue.
Coolant return to the engine
Removing and installing → Chapter
5 -
Sealing ring
Different versions. Refer to → Electronic Parts Catalogue.
Renew.
6 -
Cover
For heat exchanger.
7 -
Bolt
1 N·m
8 -
Foam spacer
For sealing and insulation.
No opening for expansion valve on vehicles with no air conditioning system → Electronic Parts Catalogue.
Note fitting position.
9 -
Bracket
For coolant pipes.
10 -
Foam
For insulation
Note fitting position.
11 -
Heater unit
On vehicles without auxiliary air heater element -Z35- with auxiliary air heater control unit -J604- the opening for the auxiliary heater is closed.
Removing and installing → Chapter
12 -
Heat exchanger
Different versions. Refer to → Electronic Parts Catalogue.
Removing and installing → Chapter
13 -
Auxiliary air heater element -Z35- with auxiliary air heater control unit -J604-
Checking → Chapter
Removing and installing → Chapter
14 -
Bolt
Qty. 2.
2 N·m
15 -
Electrical wiring
For auxiliary air heater element -Z35- with auxiliary air heater control unit -J604-.
16 -
Earth cable for auxiliary air heater element -Z35- with auxiliary air heater control unit -J604-.
For auxiliary heater.
Nut 9 ± 1 N·m
17 -
Bolt
Qty. 3.
2 N·m
18 -
Clamping piece
19 -
Sealing ring
Different versions. Refer to → Electronic Parts Catalogue.
Renew.
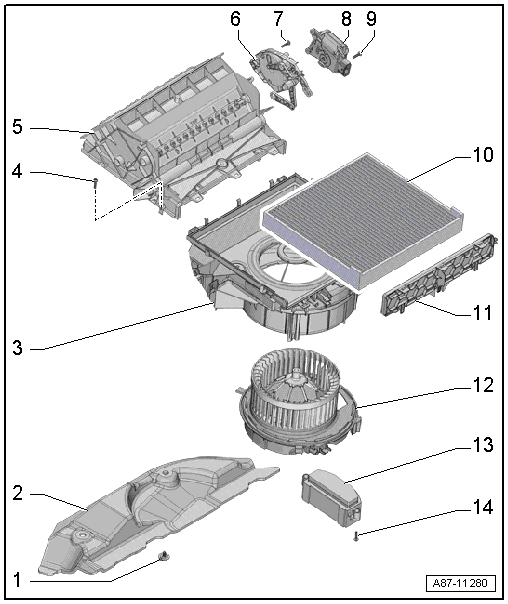
Air intake housing, dust and pollen filter, fresh air blower, flap control
1 -
Plastic bolt or plug depending on version
Qty. 2.
0,3 N·m
2 -
Baffle plate
Removing and installing → Chapter
3 -
Housing for fresh air blower and dust and pollen filter
4 -
Bolt
Qty. 2.
1 N·m
5 -
Air intake duct
Do not dismantle.
With fresh air and air recirculation flap
Different versions. Refer to → Electronic Parts Catalogue.
Removing and installing → Chapter
6 -
Not fitted
Only on vehicles with Climatronic.
7 -
Not fitted
Only on vehicles with Climatronic.
8 -
Air recirculation flap control motor -V113-
Without potentiometer with limit switches at end stops → Current flow diagrams, Electrical fault finding and Fitting locations. Checking: Use vehicle diagnostic tester in “Guided fault finding” mode and → Current flow diagrams, Electrical fault finding and Fitting locations
Removing and installing → Chapter.
9 -
Bolt
Qty. 2.
1 N·m
10 -
Dust and pollen filter
Different versions. Refer to → Electronic Parts Catalogue.
Change interval: → Maintenance tables.
Removing and installing → Chapter.
11 -
Cover
For dust and pollen filter.
12 -
Fresh air blower -V2-
Checking: Use vehicle diagnostic tester in “Guided fault finding” mode and → Current flow diagrams, Electrical fault finding and Fitting locations
Removing and installing → Chapter
13 -
Fresh air blower control unit -J126-
Checking: Use vehicle diagnostic tester in “Guided fault finding” mode and → Current flow diagrams, Electrical fault finding and Fitting locations
Removing and installing → Chapter.
14 -
Bolt
Qty. 2.
1 N·m
Removing and installing fresh air blower -V2-
Removal and installation are identical with procedure for vehicles with air conditioning system → Chapter.
Removing and installing fresh air blower control unit -J126-
Removal and installation are identical with procedure for vehicles with air conditioning system → Chapter.
Removing and installing dust and pollen filter
Removal and installation are identical with procedure for vehicles with air conditioning system → Chapter.
Removing and installing heater unit
It is not necessary to extract the refrigerant and to remove the expansion valve. Further removal and installation are identical with procedure for vehicles with air conditioning system → Chapter.
?
Test yourself
A quick Volkswagen Golf quiz: every answer comes with an explanation and a link to the manual page.
 Note There are different designs and makes of heater. The individual components of the various heaters are similar but not identical. The combined fitting of different makes of component is therefore not permissible → Electronic Parts Catalogue. The following illustrations show a “Valeo” heater unit. For information on distinguishing features with respect to other makes refer to → Chapter.