Suspension, Wheels, Steering
Drive Axle with Triple Roller Joint AAR3300i
In this manual: Suspension, Wheels, Steering
22steps
~132min
4/5difficulty
Done 0 of 22
Overview - Drive Axle with Triple Roller Joint AAR3300i
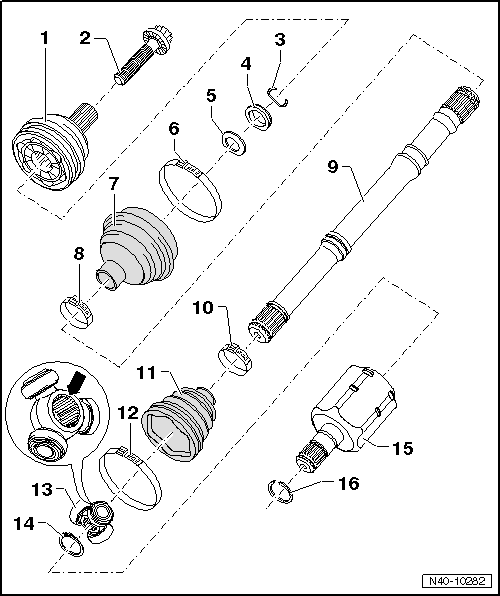
- Outer CV Joint
- Replace only as a complete unit.
- Removing.
- Installing: Drive onto shaft with plastic hammer until compressed circlip seats.
- Checking.
- Bolt
- There are different versions.
- Allocation. Refer to the Parts Catalog.
WARNING
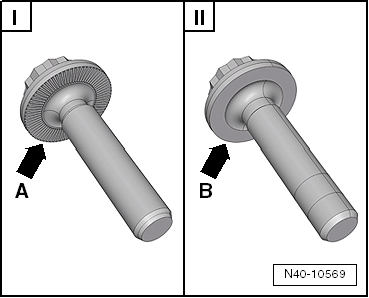
- There are two types of twelve-point bolts, with and without ribs. Distinguishing characteristics. Refer to → Fig. ""Difference between A Twelve-Point Bolt with Ribs and A Twelve-Point Bolt without Ribs""
- When installing a twelve-point bolt, always check what type of twelve-point bolt is to be used.
- Use the correct tightening specification for the specific bolt.
- The tightening specification for a twelve-point bolt "with" ribs is 70 N·m + 90º. Refer to → Chapter "Twelve-Point Bolt with Ribs, Loosening and Tightening, Drive Axle Threaded Connection" for loosening and tightening specifications.
- The tightening specification for a twelve-point bolt "without" ribs is 200 N·m + 180º. Refer to → Chapter "Twelve-Point Bolt without Ribs, Loosening and Tightening, Drive Axle Threaded Connection" for loosening and tightening specifications.
- Always replace if removed
- Circlip
- Always replace if removed
- Insert in shaft groove
- Thrust Ring
- Installation position.
- Plate Spring
- Installation position.
- Clamp
- Always replace if removed
- Tensioning.
- CV Boot for CV Joint
- Check for tears and scuffing
- Material: Hytrel polyelastomer
- Clamp
- Always replace if removed
- Tensioning.
- Driveshaft
- Clamp
- Always replace if removed
- Tensioning.
- CV Boot for Triple Roller Joint
- Check for tears and scuffing
- Clamp
- Always replace if removed
- Tensioning.
- Triple Roller Star with Rollers
The chamfer -arrow- faces the drive axle splines.
- Circlip
- Always replace if removed
- Insert in shaft groove
- Joint
- Circlip
- Always replace if removed
Difference between A Twelve-Point Bolt with Ribs and A Twelve-Point Bolt without Ribs
The contact surfaces -arrow A- and -arrow B- are different on the two-point bolts.
- Twelve-point bolt with ribs -arrow A-
- Twelve-point bolt without ribs -arrow B-
Drive Axle with Triple Roller Joint AAR3300i, Disassembling and Assembling
Special tools and workshop equipment required
- Press Plate -VW401-
- Press Plate -VW402-
- Press Piece - Rod -VW408A-
- Press Piece - Rod -VW411-
- Press Piece - 37mm -VW416B-
- Press Piece - Multiple Use -VW447H-
- Hose Clip Pliers -VAG1275A-
- Torque Wrench 1331 5-50Nm -VAG1331-
- Torque Wrench 1332 40-200Nm -VAG1332-
- Clamping Pliers -VAG1682A-
- Tripod Joint Tool -T10065-
- Slide Hammer Set -VW771-
- Puller - Driveshaft -T10382-
Removing the Outer CV Joint
- Clamp the drive axle with protective jaws in a vise clamp.
- Fold back boot.
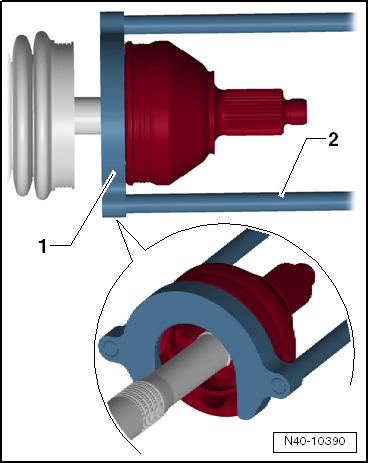
- Align the Puller - Driveshaft -T10382- so that the flat side of the Puller - Driveshaft - Removing Plate -T10382/1- faces the Puller - Driveshaft - Spindles -T10382/2-.
- Attach the Puller - Driveshaft -T10382- to the Slide Hammer Set -VW771-.
- Remove the CV joint from the drive axle using the Puller - Driveshaft -T10382- and Slide Hammer Set -VW771-.
- Puller - Driveshaft - Removing Plate -T10382/1-
- Puller - Driveshaft - Spindles -T10382/2-
Installing the Outer CV Joint
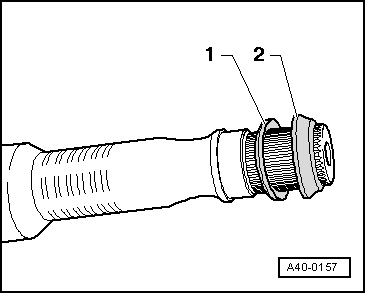
Installed Location: Spring Washer and Thrust Washer on Outer Joint
- Plate Spring
- Thrust Ring
- Install the new circlips.
- Slide the new CV boot onto the drive axle if necessary.
- Use a plastic hammer to install it on the shaft until the locking ring locks secure.
Disassembling
- Open both clamps at inner joint and slide back CV boot.
- Remove joint from drive axle.
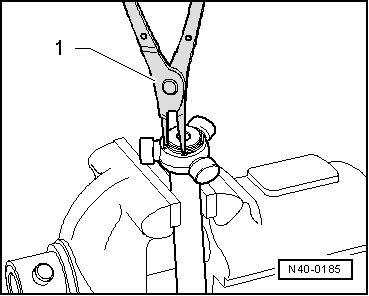
- Remove the circlip.
- Pliers (commercially available)
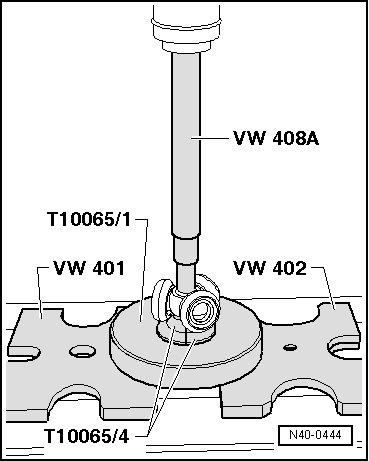
- Insert the drive axle into the press.
- Press the triple roller star off the axle shaft.
- Pull off CV boot from shaft.
- Clean the shaft, joint and groove for the seal.
Assembling
- Slide small clamp for joint protective boot onto shaft.
- Slide CV boot onto shaft.
- Slide joint piece onto shaft.
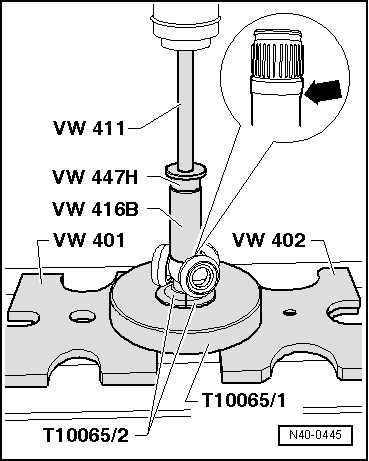
Triple Roller Star, Mounting
Conical Drive Axle Version
The chamfer on star faces toward shaft, this is used as an assembly aid.
- Connect triple roller star on shaft and press on up to stop.
- Make sure the pressure does not increase above 3.0 t.
- If necessary, coat the splines of the driveshaft and triple roller star with Lubricant -G 052 142 A2-.
- Insert the circlip while making sure it sits properly.
- Press half of the joint grease from the repair set into the triple roller joint.
- Slide joint piece over rollers and secure.
- Press the remaining half of the drive axle grease from the repair kit into the rear side of the triple roller joint.
- Install CV boot.
Triple Roller Star, Mounting
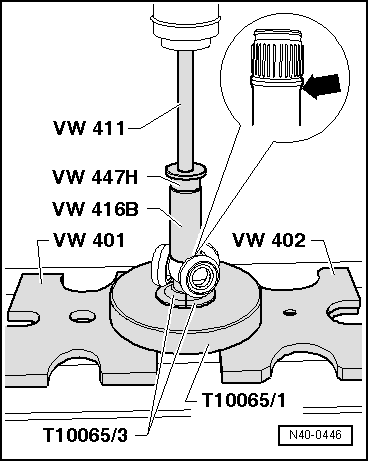
Cylindrical-Type Drive Axle
- Connect triple roller star on shaft and press on up to stop.
- Make sure the pressure does not increase above 3.0 t.
- If necessary, coat the splines of the drive axle and triple roller star with Lubricant -G 052 142 A2-.
- Insert the circlip while making sure it sits properly.
- Press half of the joint grease from the repair set into the triple roller joint.
- Slide joint piece over rollers and secure.
- Press the remaining half of the drive axle grease from the repair kit into the rear side of the triple roller joint.
- Install CV boot.
- Push the protective boot onto the joint and mount the clamp.
Test yourself
A quick Volkswagen Tiguan quiz: every answer comes with an explanation and a link to the manual page.
Was this page helpful?