Do it yourself
Replacing light bulbs in taillight in the rear hatch
In this manual: Do it yourself
9steps
~54min
2/5difficulty
Done 0 of 9
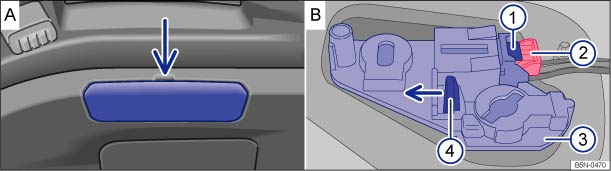
Fig. 205 In the rear lid: removing the cover and the bulb holder.
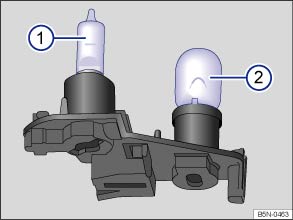
Fig. 206 Bulb holder with backup light bulb ②.
 Read and follow the introductory information and safety information first⇒
 Introduction to the subject
- Please review and follow the checklist ⇒ Information on light bulb replacement .
- Open the rear hatch ⇒ Rear hatch .
- Using the screwdriver from the vehicle tool kit ⇒ Vehicle tool kit , carefully pry the cover off with the flat blade of the screw driver inserted in the opening ⇒ Fig. 205 A.
- Remove the red locking mechanism ⇒ Fig. 205② B as illustrated and disconnect the electrical connector with the lever pressed down ⇒ Fig. 205① B.
- Press the locking tab ⇒ Fig. 205④ B in the direction of the arrow and remove the bulb holder ⇒ Fig. 205③ B.
- Replace burned out rear light bulbs ⇒ Fig. 206② with bulbs that are identical to the ones being replaced.
- Insert the bulb holder. You must hear the locking tab click into place.
- Insert the electrical connector into the bulb holder until it clicks into place. Press the red locking mechanism ⇒ Fig. 205② B back in.
- Insert the cover. The cover must lock into place and be secure.
Test yourself
A quick Volkswagen Tiguan quiz: every answer comes with an explanation and a link to the manual page.
Was this page helpful?