Removal, Inspection and Installation of Ball Joint
INSPECTION
CAUTION
Raising and placing the vehicle on stands is hazardous. Therefore, before performing this operation, read the subsection Jacking Up the Vehicle.PROCEDURE
1. Raise the front of the vehicle and support it on stands.
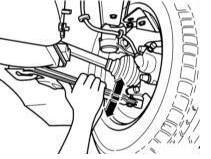
2. Forcefully pry the control arm up and pull it down. Watch the ball joint.
3. Press firmly on the wheel from below, outward and inward. Watch the ball joint.
4. In both checks, there must be no noticeable play in the ball joint. Take into account play in the wheel bearing or strut mount.
5. Check the rubber boot for damage. If damaged, replace the joint. REMOVAL
6. Remove the strut together with the wheel bearing housing. Refer to Strut and Wheel Bearing Housing Removal and Installation.
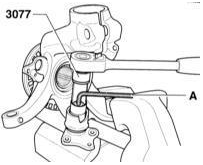
7. Loosen the ball joint retaining nut with a crowfoot wrench or tool AUDI–
3077. If the pin turns, hold it with an angle wrench (A), Torx T30.

8. Press the ball joint pin out of the wheel bearing housing using puller 1, e.g. Hazet 779. Take care not to damage the rubber boot. INSTALLATION
PROCEDURE
1. Secure the ball joint to the wheel bearing housing with a new self-locking nut. Tighten the nut to 45 N•m while holding the stub axle from turning with Torx T
30.
2. Install the strut and wheel bearing housing. Refer to Strut and Wheel Bearing Housing Removal and Installation.
Wheel Bearing
Signs of a faulty wheel bearing are noise on sharp turns and stiff wheel rotation with the brake released.
Wheel bearings have a very tight fit in the steering knuckle. They can only be installed using the appropriate special tool. This work must be carried out at a service center. To replace the wheel bearing, the wheel bearing housing must be removed. The bearing is destroyed during pressing out and must always be replaced.
Test yourself
A quick Audi A3 quiz: every answer comes with an explanation and a link to the manual page.