Strut and Wheel Bearing Housing Removal and Installation
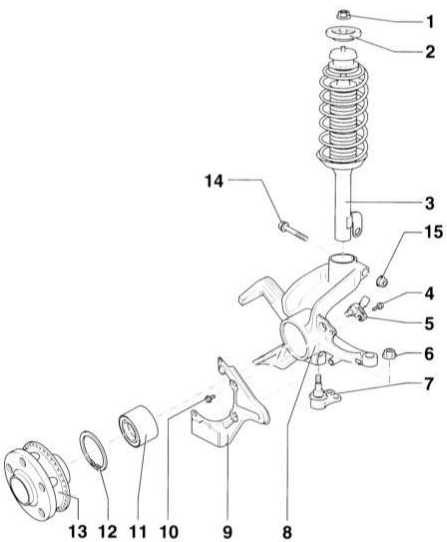 Strut and wheel bearing housing 1 – Self-locking flanged nut, 60 N·m. Always replace. 2 – Cup 3 – Strut. To replace the spring or shock absorber, remove and install as a complete assembly. 4 – Hex socket screw, 8 N·m 5 – ABS sensor 6 – Nut, 45 N·m. Self-locking, always replace. 7 – Ball joint 8 – Wheel bearing housing 9 – Cover 10 – Bolt, 7 N·m 11 – Wheel bearing 12 – Retaining ring. Remove with conventional snap ring pliers. Observe correct position when installing. 13 – Hub. With ABS sensor rotor 14 – Bolt. Always replace. 15 – Nut, 50 N·m + 90° (1/4 turn). Self-locking, always replace.
REMOVAL
PROCEDURE
1. Remove the wheel trim. On alloy wheels, remove the trim using the removal hooks from the onboard tool kit.
2. Loosen the twelve-point nut securing the drive shaft to the hub.
CAUTION
When loosening the bolt, the vehicle must be standing on its wheels. There is a risk of personal injury due to the high loosening torque!3. Mark the position of the front wheel relative to the hub with paint. This allows the balanced wheel to be reinstalled in its original position. Loosen the wheel bolts with the vehicle on the ground. Raise the front of the vehicle, support it on stands and remove the front wheel.
CAUTION
Raising and placing the vehicle on stands is hazardous. Therefore, before performing this operation, read the subsection Jacking Up the Vehicle.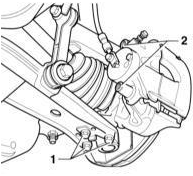
4. Mark the position of the ball joint mounting bolts – 1 – with a felt-tip pen or scribe. Otherwise, the front suspension must be measured and adjusted after installation. Remove bolts – 1 –.
5. Using a puller, separate the drive shaft from the hub.
CAUTION
Do not disconnect the brake hose from the brake caliper. Otherwise, air will have to be bled from the system after installation.6. Depending on the model, different front brake designs may be fitted. FS-III caliper: Remove covers – 2 – and detach the caliper. Hang the caliper housing from the chassis with wire. FN-3 caliper: Remove the ribbed bolts from the caliper housing. Always replace them with new bolts during installation. Remove the caliper. Refer to the subsection Removal and Installation of Brake Disc/Caliper.
7. Remove the Phillips screw and remove the brake disc.
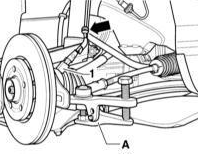
8. Screw the tie rod end mounting nut onto the end of the thread. It serves as a support for the puller.
9. Using a puller (A), for example Hazet 779, press the tie rod end stub from the control arm.
10. Disconnect the ABS wheel speed sensor connector – 1 –.
11. Release the ABS sensor wire from the holder (arrow).
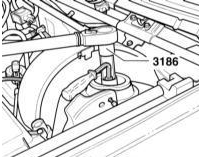
12. Loosen the strut mounting nut using AUDI 3186 while holding the strut piston rod against rotation with a 7 mm hex key. If the specified tool is not available, loosen the nut with a crowfoot wrench. Special tool Hazet No. 2593–
21.
13. Remove the strut and wheel bearing housing downward through the wheel arch.
14. Separate the wheel bearing housing from the strut. To do this, remove the bolt securing the strut to the wheel bearing housing.
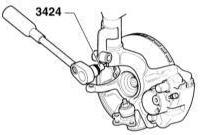
15. Pull the strut upward out of the wheel bearing housing. If it is difficult to remove, slightly widen the slot in the wheel bearing housing using AUDI-3424 or another suitable tool to ease removal. INSTALLATION
16. Slide the wheel bearing housing onto the strut so that the holes in the shock absorber tube and the bearing housing align.
17. Insert a new bolt into the bearing housing/strut. The bolt head on the installed strut must face forward in the direction of travel. Install a new self-locking nut and tighten to 50 N·m, then turn an additional 90° (1/4 turn) with a rigid wrench.
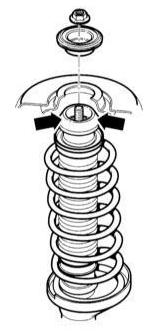
18. Before installing the strut, lubricate the strut mount with assembly grease "G 294 421 F1" (arrows in illustration).
19. Insert the strut and secure the top with a new nut, tightening to 60 N·m while holding the strut piston rod against rotation with a 7 mm hex key.
CAUTION
To install the torque wrench, the AUDI-3186 or HAZET 2593-21 with 2100-07 may be used as the tool to hold against rotation.20. Clean the drive shaft splines and thread and the hub of corrosion and other contamination with a wire brush.
21. Coat the twelve-point nut and the outer CV joint splines on the drive shaft with clean engine oil. Push the outer CV joint as far as possible into the hub splines.
22. Install the brake disc/caliper. Refer to the subsection Removal and Installation of Brake Disc/Caliper.
CAUTION
If the brake lines have been opened, bleed air from the brake system. Refer to the subsection Bleeding the Brake System.23. Connect the ABS wheel speed sensor connector and route the wire into the holder on the strut.
24. Secure the ball joint to the control arm. Install the mounting bolts in the oval holes so that the marks made earlier align. Tighten the bolts to 20 N·m, then turn an additional 90° (1/4 turn) with a rigid wrench.
CAUTION
When installing a new control arm, set the mounting bolts to the middle position and tighten. Finally, measure the camber. Refer to Section 15.25. Insert the tie rod end into the steering knuckle on the wheel bearing housing and tighten with a new self-locking nut to 45 N·m.
26. Install a new twelve-point nut securing the drive shaft to the hub and tighten to 50 N·m. Have an assistant apply the brake to prevent the hub from rotating.
27. Install the front wheel so that the marks made during removal align. Before installation, apply a thin layer of wheel bearing grease to the centering collar of the wheel disc on the hub. Do not lubricate the wheel bolts. Replace rusted bolts. Start the bolts. Lower the vehicle onto its wheels and tighten the bolts in a crisscross pattern to 120 N·m.
28. Lower the vehicle onto its wheels and secure the drive shaft to the hub. Refer to subsection Removing and Installing Drive Shafts.
Test yourself
A quick Audi A3 quiz: every answer comes with an explanation and a link to the manual page.