Center Console Rear Trim, Removing and Installing
Center Console Rear Trim, Removing and Installing
Special tools and workshop equipment required
- Wedge Set -T10383-
- Hook Tool -T40207-
Removing
 Note
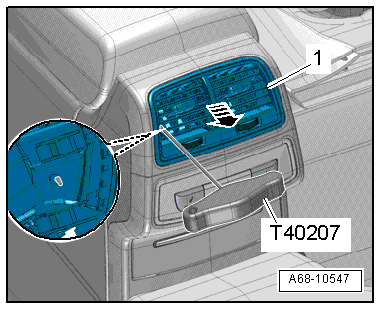
The vent has a hole on both sides for attaching the Hook Tool -T40207-.
- Carefully insert the Hook Tool -T40207- between the slats and hook it into the side of the vent.
- Alternating between the sides, carefully remove the vent -1- from the installation opening in direction of -arrow-.
- Disconnect the connector and remove vent.
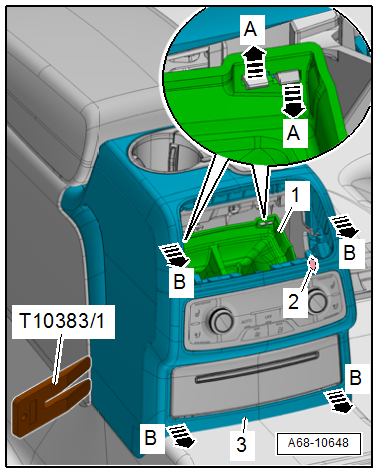
- Remove the bolts -1-.
- Carefully unclip the cover -2- at the sides starting at the top using the Wedge Set -T10383/1--arrows-.
- Remove the cover toward the rear from the center console.
- Disconnect the connectors.

Market-Specific
- Open the retainers in direction of -arrows A- and push the air duct -1- slightly down.
- Remove the left and right bolts -2-.
- Carefully unclip the cover -3- at the sides starting at the top using the Wedge Set -T10383/1- in direction of -arrows B-.
- Remove the cover toward the rear from the center console.
- Disconnect the connectors.
Switch/Regulator/Storage Compartment Trim, Removing and Installing
Special tools and workshop equipment required
- Wedge Set -T10383-
Removing
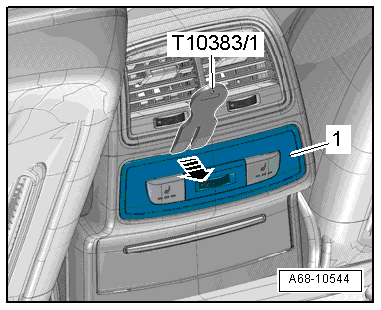
- Carefully unclip the cover -1- from the center console using the Wedge Set -T10383/1--arrow- and remove with the switch.
- Disconnect the connector for the switch/regulator.
Installing
Install in reverse order of removal. Note the following:
Installation notes, for example tightening specifications, replacing components. Refer to → Chapter "Overview - Center Console".
Center Console Cover, Removing and Installing
Removing
- Remove the center console. Refer to → Chapter "Center Console, Removing and Installing".
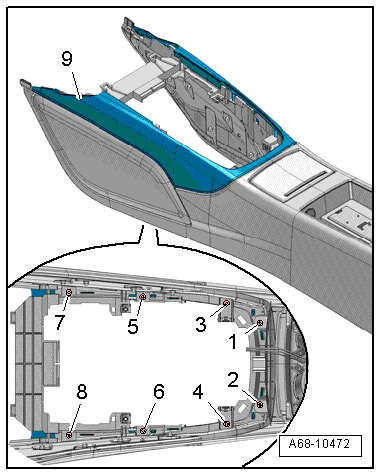
- Remove the bolts -1 through 8- and remove the center console cover -9-.
Installing
Install in reverse order of removal. Note the following:
- Tighten the bolts in a -1 through 8- sequence.
Installation notes, for example tightening specifications, replacing components. Refer to → Chapter "Overview - Center Console".