Replacing a bulb
General information
- Before replacing a bulb, check that its contacts are not oxidised;
- burnt-out bulbs must be replaced with bulbs of the same type and wattage;
- after replacing a headlight bulb, always check that the headlight aim is correct;
- if a bulb does not work, before replacing it, check that the corresponding fuse is intact: for fuse locations, refer to the "Replacing fuses" section in this chapter.
NOTE In cold or humid weather, or after heavy rain or washing, the surface of the headlights or rear lights may fog up and/or form condensation droplets on the inside.
This is a natural phenomenon caused by the difference in temperature and humidity between the inside and outside of the lens. It does not indicate a fault and does not affect the normal operation of the lighting devices. The fogging disappears quickly when the lights are switched on, starting from the centre of the lens and gradually spreading towards the edges.
| Bulbs | Type | Power |
| Low beam/High beam | H4 | 55W |
| Front position lights/Daytime running lights (D.R.L.) | P21/5W | 21W |
| Rear position lights | P21/5W | 5W |
| Front turn signals | PY21W | 21W |
| Side turn signals | W5W | 5W |
| Rear turn signals | PY21W | 21W |
| Stop | P21/5W | 21W |
| 3rd brake light | LED | - |
| Fog lights | H11 | 55W |
| Reverse lights | W16W | 16W |
| Rear fog lights | W16W | 16W |
| Number plate lights | C5W | 5W |
Front light units
(except Panda Cross versions)
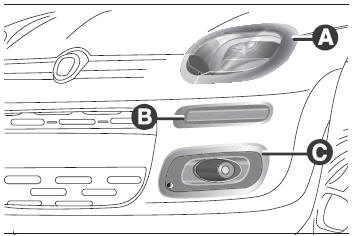
The bulb layout of the front light unit in fig. 96 is as follows:
A - Low beam/high beam headlights/turn signals;
B - Daytime running lights (D.R.L.);
C - Fog light.
Front light units
(Panda Cross versions)
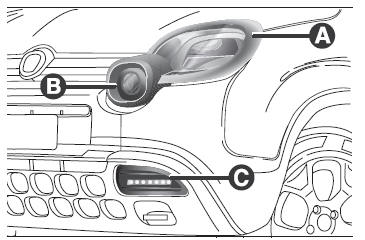
For Panda Cross versions, the bulb layout of the front light unit in fig. 97 is as follows:
A - Low beam/high beam headlights/turn signals;
B - Fog light;
C - Daytime running lights (D.R.L.).
Low beam / high beam headlights
To replace the bulb, proceed as follows:
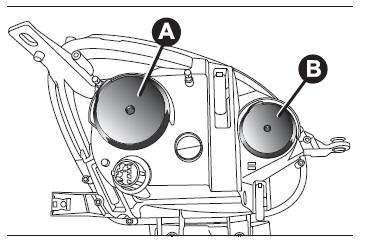
- remove cover A fig. 98;
- push the connector + bulb holder assembly B fig. 99 downwards;
- pull bulb C out of connector D and replace it;
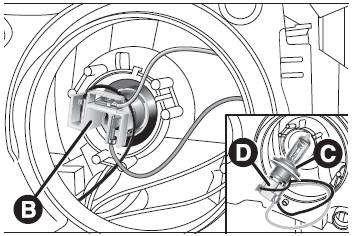
- fit the new bulb into the connector, making sure it is securely locked, then reinsert the connector + bulb holder assembly B into its seat;
- finally, refit cover A.
Turn indicators
Front
To replace the bulb, proceed as follows:
- remove cover B fig. 98;
- turn the bulb holder anticlockwise, pull out the bulb and replace it;
- fit the new bulb into the connector, making sure it is securely locked, then reinsert the connector into its seat by turning it clockwise.
Side
To replace the bulb, proceed as follows:
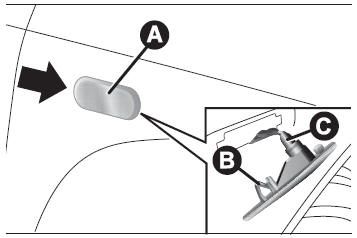
- press the lens A fig. 100 so as to compress clip B, then pull the unit outwards;
- turn the bulb holder C anticlockwise, pull out the bulb and replace it;
- refit bulb holder C into the lens by turning it clockwise;
- reassemble the unit, making sure the locking catch of the inner clip B engages.
Fog lights
(for versions/markets where provided - excluding Panda Cross versions)
To replace the bulb, proceed as follows:
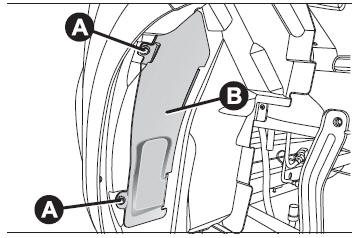
- turn the wheel fully inward, loosen the screws A fig. 101 and remove the cover B;
- press the clip C fig. 102 and disconnect the electrical connector D;
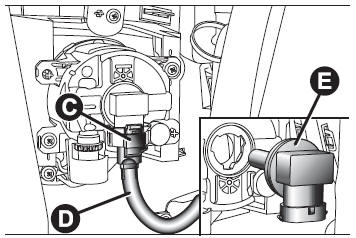
- turn and remove the bulb holder E, unhook and replace the bulb;
- refit the new bulb and carry out the reverse of the procedure described above.
Fog lights
(Panda Cross versions)
To replace a fog light bulb, proceed as follows:
- turn the wheels fully inward, unscrew the screws A fig. 103 and remove the cover B;
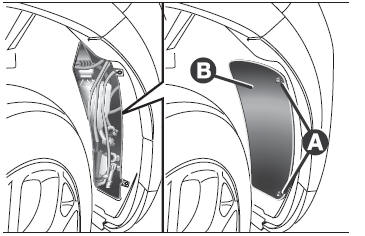
- locate the fog light unit, turn it anticlockwise by a quarter turn and pull it out;
- lift the lever A fig. 104 and disconnect the connector B from the lamp-holder assembly C;
- replace the lamp-holder assembly C;
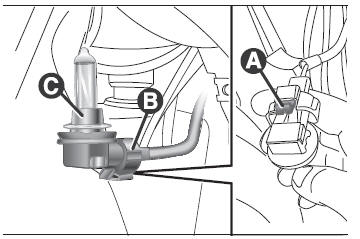
- reconnect the assembly to connector B, reposition the assembly C in its seat by turning it clockwise by a quarter turn until a "click" is heard confirming correct positioning;
- refit the cover B fig. 103, making sure the tabs are located in their seats, and tighten the fixing screws A.
Position lights / daytime running lights (D.R.L.)
(for versions/markets where provided - excluding Panda Cross versions)
To replace the bulb, proceed as follows:
- turn the wheel fully inward, loosen the screws A fig. 101 and remove the cover B;
- press the clip C fig. 105 and disconnect the electrical connector D;
- turn and remove the bulb holder E, unhook and replace the bulb;

- refit the new bulb and carry out the reverse of the procedure described above.
Daytime running lights (D.R.L.)
(Panda Cross versions)
WARNING For replacement of LED D.R.L. daytime running lights, contact the Fiat Service Network.
Rear light units
They contain the bulbs for the position lights, brake lights and turn indicators.
To replace a bulb, proceed as follows:
- unscrew the two screws A fig. 106 from their seats, gently pull the light unit towards you until the two retaining clips (sliding-mounted D fig. 107) are fully released, and disconnect the connector;


- unscrew the five screws B from their seats and remove the bulb holder C;
- remove the bulbs by pushing them slightly and turning them anticlockwise;
- refit the new bulb and carry out the reverse of the procedure described above.
Reversing light / rear fog light
The reversing and rear fog lights are located on the rear bumper.
To replace the bulb, proceed as follows:
- press the tabs A and remove the cover B fig. 108;

- press the clip C fig. 109 and disconnect the electrical connector D;
- turn and remove the bulb holder E, remove the bulb and replace it;

- refit the new bulb and carry out the reverse of the procedure described above.
High-mounted stop light
They are LED lights located on the tailgate. For replacement, contact the Fiat Service Network.
Number plate lights
To replace the bulbs, proceed as follows:
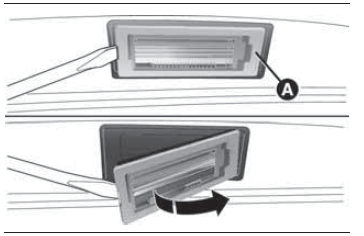
- remove the lens A fig. 110;
- replace the bulb A fig. 111, releasing it from the side contacts;
- fit the new bulb, making sure it is correctly secured between the contacts, then refit the lens A fig. 111.

134) Halogen bulbs contain pressurised gas; if broken, glass fragments may be ejected.
135) Before replacing a bulb, wait for the exhaust pipe to cool down: RISK OF BURNS. WARNING 50) Halogen bulbs must only be handled by the metal part. If the glass envelope is touched with bare fingers, the light output is reduced and bulb life may be shortened. If accidental contact occurs, wipe the glass envelope with a cloth dampened with alcohol and let it dry.51) If possible, have the bulbs replaced by the Fiat Service Network. Correct operation and aiming of the exterior lights are essential for driving safety and to avoid the penalties provided by law.
Test yourself
A quick Fiat Panda quiz: every answer comes with an explanation and a link to the manual page.