Wheel replacement
Jack
It is important to know that:
- the jack weighs 1.76 kg;
- the jack requires no adjustment;
- the jack cannot be repaired; if it fails it must be replaced with another original part;
- no tool other than the operating crank handle can be fitted to the jack.
Jack maintenance
- prevent dirt from building up on the "worm screw";
- keep the "worm screw" lubricated;
- never modify the jack for any reason.
Conditions in which the jack must not be used
- temperatures below -40°C
- on sandy or muddy ground
- on uneven ground
- on roads with a steep gradient
- in extreme weather conditions: thunderstorms, typhoons, cyclones, snowstorms, gales, etc.
- in direct contact with the engine or for repairs under the vehicle
- on boats.
Replacement procedure
Proceed as follows:
- stop the vehicle in a position that does not obstruct traffic and allows the wheel to be changed safely. The ground should be level and sufficiently firm, where possible;
- switch off the engine, apply the handbrake and engage 1st gear or reverse. Wear the reflective vest (mandatory by law) before getting out of the vehicle;
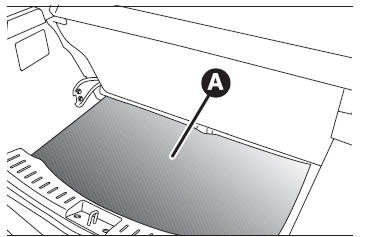
- open the boot and lift the floor covering A, fig. 114;
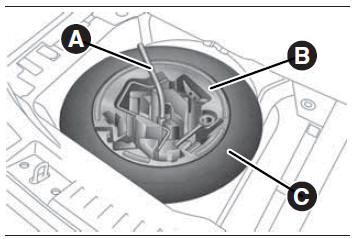
- using the key A, fig. 115, located in the tool container, unscrew the locking device, take tool container B and place it next to the wheel to be replaced.
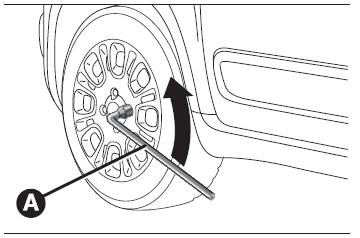
- take the wheel nut wrench A, fig. 116, and loosen the wheel bolts by about one turn;
- position the jack under the vehicle, close to the wheel to be replaced;
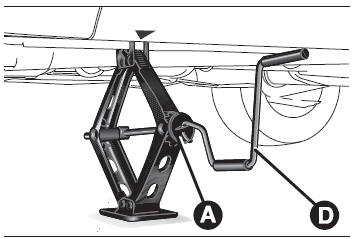
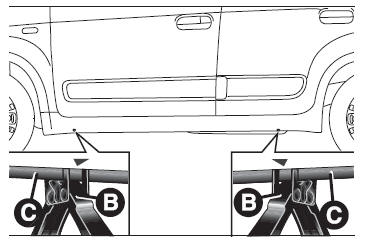
- operate device A, fig. 117, to extend the jack until the upper part B, fig. 118, engages correctly with side member C (at the mark
 shown on the side member itself);
- warn any people present that the vehicle is about to be raised; they must therefore move away from its immediate vicinity and, above all, must not touch it until it has been lowered again;
- insert crank handle D, fig. 117, into the socket on device A, operate the jack and raise the vehicle until the wheel is a few centimetres off the ground;
- remove the wheel trim after unscrewing the three bolts that secure it, then unscrew the fourth bolt and remove the wheel (only for versions fitted with wheel trims secured by bolts);
- make sure that the contact surfaces of the spare wheel with the hub are clean and free of debris that could later cause the fixing bolts to loosen;
- fit the spare wheel, inserting the first bolt, engaged by two threads, into the hole nearest the valve;
- take the wheel nut wrench A, fig. 116, and fully tighten the fixing bolts;
- operate crank handle D, fig. 117, to lower the vehicle.
Refitting the standard wheel
Following the procedure described above, raise the vehicle and remove the spare wheel.
Versions with steel wheels Proceed as follows:
- make sure that the contact surfaces of the standard wheel with the hub are clean and free of debris that could later cause the fixing bolts to loosen;
- fit the standard wheel, inserting the first bolt, engaged by 2 threads, into the hole nearest the valve;
- fit the wheel trim, aligning the D-shaped notch with the bolt already started, then insert the other bolts;
- using the supplied wrench, tighten the fixing bolts;
- lower the vehicle and remove the jack;
- using the supplied wrench, fully tighten the bolts, working alternately from one bolt to the diametrically opposite one.
Versions with alloy wheels
Proceed as follows:
- fit the wheel onto the hub and, using the supplied wrench, tighten the bolts;
- lower the vehicle and remove the jack;
- using the supplied wrench, fully tighten the bolts, working alternately from one bolt to the diametrically opposite one;
- refit the press-fitted hub cap, making sure the reference hole on the wheel lines up with the reference pin on the cap.
NOTE Incorrect fitting may cause the hub cap to come off while the vehicle is being driven.
When the operation is complete
- Place the spare wheel in its dedicated compartment in the luggage compartment;
- Place the jack and the other tools in their container;
- Place the container, complete with tools, on the spare wheel;
- Correctly reposition the luggage compartment floor covering.
The label must never be removed or covered. The label shows the following warning in four languages: "Warning! For temporary use only! 80 km/h max! Replace as soon as possible with a standard spare wheel. Do not cover this information". The wheel cover must never be fitted to the spare wheel.
143) Warn other road users that the vehicle is stopped, in accordance with the applicable regulations: hazard warning lights, warning triangle, etc.
It is advisable for the occupants to leave the vehicle, especially if it is heavily loaded, and wait outside the traffic danger zone while the wheel is changed. On slopes or uneven ground, place wedges or other suitable materials under the wheels to prevent the vehicle from moving.
144) The driving characteristics of the vehicle are altered when the spare wheel is fitted. Avoid sudden acceleration and braking, abrupt steering and high-speed cornering.
The total service life of the temporary-use spare wheel is approximately 3000 km. After this distance, the corresponding tyre must be replaced with one of the same type.
Never fit a conventional tyre on a rim intended for use as a temporary-use spare wheel.
Have the replaced wheel repaired and refitted as soon as possible. Do not use two or more temporary-use spare wheels at the same time. Do not grease the bolt threads before fitting them: they may loosen spontaneously.
145) The jack is designed and built solely for changing a wheel in the event of a puncture or tyre damage, on the vehicle it is supplied with or on vehicles of the same model. Any other use is strictly prohibited, for example lifting vehicles of other models or other objects. Never use it for maintenance or repair work under the vehicle, or for swapping summer and winter tyres or vice versa. Never position yourself under the raised vehicle. If it is necessary to work under the vehicle, contact the Fiat Service Network. Incorrect positioning of the jack may cause the raised vehicle to fall: use only at the indicated positions.
Do not use the jack for loads greater than the value shown on the label applied to it. Never start the engine with the vehicle raised. Raising the vehicle beyond what is necessary may make it less stable, up to the risk of the vehicle falling violently.
Then raise the vehicle only as far as necessary to allow access to the spare wheel.
146) Incorrect fitting of the wheel cover may cause it to detach while the vehicle is in motion. Never tamper with the inflation valve. Never insert tools of any kind between the rim and the tyre.
Regularly check the tyre pressure of the tyres and of the spare wheel, following the values given in the "Technical data" chapter. WARNING 53) When turning the crank handle, make sure it rotates freely without risk of abrading your hand against the ground. The moving parts of the jack ("worm screw" and joints) can also cause injury: avoid contact with them. If grease gets on your hands, clean them thoroughly.54) Contact the Fiat Service Network as soon as possible to have the correct tightening torque of the wheel bolts checked.
Test yourself
A quick Fiat Panda quiz: every answer comes with an explanation and a link to the manual page.