General Procedures - Plastic Repair
Materials
| Name | Specification |
|---|---|
| Plastic Adhesive TA-9 |
- |
Inspection
- Refer to: Body Repair, Health and Safety, and General Precautions (100-00 General Information, Description and Operation).
- Thermoplastics react to solvents. Types of thermoplastics include thermoplastic olefin (TPO), PVC, Sheet Molding Compound (SMC) and ABS (acrylonitrile butadiene styrene). Polyolefins have an oily or waxy appearance. Examples include some bumper covers, rock shields, fender liners and fan shrouds. Polyolefins require an adhesion promoter before performing any refinish repair procedure.
- To determine if a part is polyolefin, grind the damaged area out of sight. Grinding polyolefin will melt and smear the plastic and leave a torn edge. If the part is not polyolefin, the area will sand or grind smoothly, producing a powdery dust.
- Polyolefin plastic can also be identified by placing a small chip in a container of water. If the sample floats, it is polyolefin plastic. Non-polyolefin will sink when placed in a container of water.
- Generally, thermoset plastics are rigid or semi-rigid. Sheet molding compound (SMC) is reinforced with fiberglass and other fibers and is strong and rigid. Sheet molding compound (SMC) is used for large panels such as hoods, rear doors, fenders and quarter panels.
- A burn test can be a reliable method to determine whether the plastic is a thermoset plastic. Extreme caution must be used when using this method. Apply an open flame to a corner of the damaged component. If the material crystallizes and becomes hard, it is a thermoset plastic.
- When deciding whether to repair or install a new component, follow these guidelines.
- Is the replacement part readily available? Can the damaged part be economically returned to its original strength and appearance, or will the labor costs exceed the cost of a new component? Will the repair provide for the quickest and highest quality repair?
NOTICE: Never use solvents such as lacquer thinner or reducer at any stage of plastic repair. Solvents, cleaners and water are absorbed by many types of plastics and the glass fibers used for reinforcement. In this case, the plastic may swell in the repair area and cause the repair to fail. Remove cleaners and water quickly and use air and heat to accelerate drying.
NOTICE: When repairing many plastics, and especially polyolefin plastics, an adhesion promoter must be applied to the surface to allow repair materials and paint to bond properly. Reapplication is required when sanding or grinding through sealer or primer layers.
Panels to be repaired must be dry and at a temperature between 18 C (64.4 F) and 24 C (75.2 F) before performing any repair. Both sides of the panel must be thoroughly cleaned before sanding or grinding.
Repair
- Cover the tear in the sheet molded composite (SMC) (front and back) with masking tape. This protects the damaged area from absorbing the preparation cleaner and prevents the cleaner from seeping through the fibers into the sheet molded composite (SMC).
- Remove all waxes, silicones, dirt and road oil from the area around the damaged section on both sides with plastic wax and grease remover.
- Remove the tape and grind the back of the repair area with an angle grinder, dual action (D/A) sander, or by hand with 80-grit sandpaper. Remove all dust with a vacuum and a cloth.
- Make a reinforcement patch using a piece of scrap sheet molded composite (SMC) that fits well against the back of the damaged area, or form a patch from fiberglass cloth.
- Cut a piece of cloth large enough to cover the repair, plus the area around the repair. Cut a piece of plastic film backing approximately larger than the cloth. Lay the plastic on a smooth, flat surface where it will be used to create the pyramid patch.
- Follow the manufacturer's instructions and apply adhesive to the plastic film backing and spread it with a plastic spreader to the recommended thickness. Place the pre-cut fiberglass cloth on the adhesive-coated plastic film. Cover the cloth with a layer of repair adhesive and spread to the recommended thickness.
Material: plastic adhesive / TA-9 - Apply the prepared patch to the back of the panel and press. Follow the manufacturer's instructions for curing the adhesive. Remove the plastic film after the adhesive has cured and sand if necessary to remove roughness.
- Remove the masking tape from the front of the damaged area and grind down to the substrate. Use an angle grinder with a 30 to 40-grit disc. Create a gradual taper in this area; this prevents a "bull's eye" or pinhole through the finished repair. Sand the prepared area with a dual action (D/A) sander or by hand with 80-grit sandpaper.
- Build a pyramid patch using fiberglass cloth or equivalent and adhesive. Following the manufacturer's instructions, apply the patch over the damaged area.
Material: plastic adhesive / TA-9 - Rough grind the area to remove excess adhesive. Sand the repair with 80-grit sandpaper, making sure to cut slightly below the surface of the sheet molded composite (SMC) finish. This will allow the plastic repair filler layer to finish flush.
- Apply the final layer of plastic repair filler in accordance with the manufacturer's instructions.
- Final sand, prime and topcoat using Ford-approved paint systems.
Repair
- Select the correct repair method by identifying the type of plastic being repaired.
- Determine whether reinforcement is needed as a support for a large repair.
- Assemble the reinforcement from scrap of the same type of plastic being repaired and follow the manufacturer's label instructions for the type of system used.
- Thoroughly clean the damaged area with a wax and grease remover designed for use on plastics.
- Sand the repair area by hand with 80-grit sandpaper and remove any loose material with compressed air.
- Apply plastic adhesion promoter to the repair area in accordance with the label instructions.
- For minor repairs, a plastic adhesive filler may be applied to the damaged area. Follow the manufacturer's instructions and build up layers so that they form a mass over the damaged area. This will allow the area to be sanded smooth.
Material: plastic adhesive / TA-9 - To repair large holes or cracks, measure and cut a piece of fiberglass cloth or equivalent 25.4 mm (1 inch) larger than the crack or hole.
- Apply adhesive to the damaged area and immediately apply the fiberglass cloth onto the plastic adhesive for reinforcement. Apply additional plastic repair adhesive for strength and shape as needed.
Material: plastic adhesive / TA-9 - Contour and sand to shape the repair as needed. Avoid overgrinding the repair.
- Complete sanding of the area and perform all necessary painting operations using Ford-approved paint systems.
Repair
- Clean the broken tabs with a wax and grease remover for plastic.
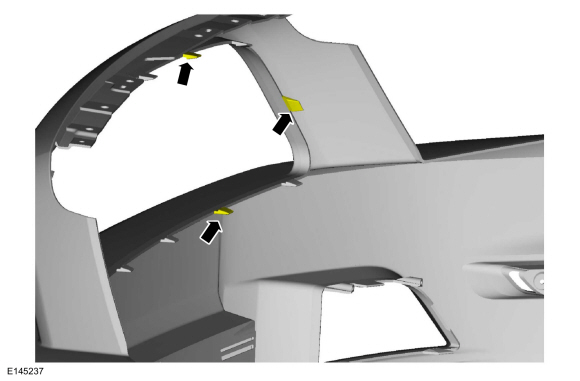
- Sand the repair area by hand with 80-grit sandpaper and remove any loose material with compressed air.
- Apply plastic adhesion promoter to the repair area in accordance with the label instructions.
- Measure and cut a piece of fiberglass cloth or equivalent large enough to form the front of the tab, then taper back in a wedge shape approximately 51 mm (2 inches) from the original tab.
- Prepare the repair adhesive cloth patch in accordance with the manufacturer's instructions and apply it to the damaged area.
- Immediately position a patch of plastic repair material so that it conforms to the shape of the tab.
- Allow adequate curing time and shape the repair tab using a small angle grinder. Use extreme care not to grind the outer surface.
Repair
- The first step in any repair or refinishing procedure is to identify the plastic type. Is it a thermoset or a thermoplastic, textured or smooth? This determines how it should be cleaned and prepared for finishing.
- It is very important to use the correct cleaning agent, depending on the paint system used, solvent-based or waterborne. Clean the component with warm water/mild detergent, then use a plastic cleaner to remove wax, silicone and other contaminants. Do not leave the components wet for an extended period. As a general rule, if water beads on the component, it requires additional cleaning, as all production release agents have not been removed.
- New components may require baking in a paint booth or heating with heat lamps to release trapped solvents or mold release agents used in the production process.
NOTICE: Textured components may only be lightly sanded using a grey pad. Failure to follow this instruction may result in smoothing of the texture.
After cleaning, lightly sand with 600-grit or finer sandpaper. Remove sanding residue with plastic cleaner and wipe dry.- Apply plastic adhesion promoter to any bare plastic part as recommended by the manufacturer. Throughout the repair procedure, each time bare plastic is exposed for any reason, it is important that adhesion promoter is reapplied to that area.
- Sealer may be required to prevent wrinkling and lifting of the topcoat before performing the painting procedure.
- Flexible and non-flexible components must be painted separately, as a flex additive may be required when refinishing flexible components (refer to the recommendation).
- It is recommended to refinish exterior components on the vehicle (after blending) to check color match and blending to adjacent panels.
- Interior trim components may be painted using any Ford-approved painting procedure. Steps may vary depending on paint manufacturer.
- Proceed with the painting process and follow the Ford-approved painting procedures. Steps may vary depending on paint manufacturer.
Test yourself
A quick Ford Explorer quiz: every answer comes with an explanation and a link to the manual page.