Body and Paint
Instrument Panel. Removal and Installation
In this manual: Body and Paint
21steps
~126min
5/5difficulty
Done 0 of 21
Special Service Tools / General Equipment
Clamps)
Removal
Vehicles with A/C
- Recover the refrigerant.
Refer to: Refrigerant System Recovery, Evacuation and Charging (A/C) (412-00 Climate Control System - General Information).
All vehicles
- Remove the hood panel grille.
Refer to Hood Panel Grille (501-02 Front End Body Panels, Removal and Installation). - Remove the bolt.
Torque: 18 lb-ft (25 N·m)
- Remove the evaporator tube stud, set the flange and tube aside.
Torque: 133 lb-in (15 N·m)
- Install the hose clamp pliers on the coolant hoses.
Use the general equipment: Hose clamp(s)
- Loosen the clamp and disconnect the coolant hose.
- Press the tab and disconnect the coolant hose.
- Remove the nut.
Torque: 9 lb-in (1 N·m)

- Install the hose clamp pliers on the coolant hoses.
Vehicles without air conditioning
-
- Install the hose clamp pliers on the coolant hoses.
Use the general equipment: Hose clamp(s)
- Loosen the clamp and disconnect the coolant hose.
- Press the tab and disconnect the coolant hose.
- Remove the nut.
Torque: 9 lb-in (1 N·m)
- Install the hose clamp pliers on the coolant hoses.
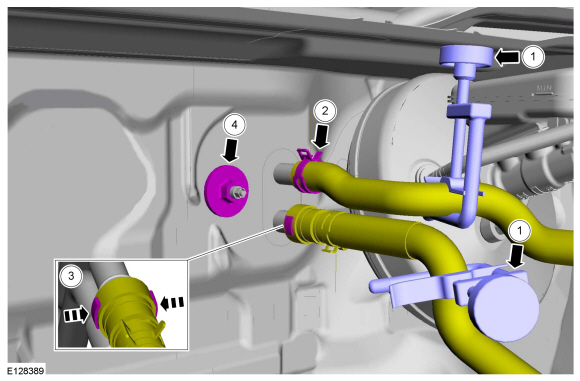 |
All vehicles
- Remove the driver side front door.
Refer to: Front Door (501-03 Body Closures, Removal and Installation). - Remove the driver seat.
Refer to: Front Seat (501-10 Seats, Removal and Installation).
Vehicles with automatic transmission
- Remove the selector lever assembly.
Refer to: Selector Lever Assembly (307-05 Automatic Transmission, External Controls - 6-Speed PowerShift Transmission - DPS6/6DCT250, Removal and Installation).
Vehicles with manual transmission
- Remove the gear shift lever.
Also refer to: Gear Shift Lever (308-06 External Controls - 5-Speed Manual Transmission - B5/IB5/6-Speed Manual Transmission - B6, Removal and Installation).
All vehicles
- Remove the clips and the RH insulation panel.

- Release the clips and remove the glove box.

- Disconnect the electrical connectors.

- Both sides, remove the front pillar trim panel.
Refer to: Front Pillar Trim Panel (501-05 Interior Trim and Ornamentation, Removal and Installation). - Both sides.
Move the front door weatherstrip aside, release the retainers and remove the instrument panel trim panel.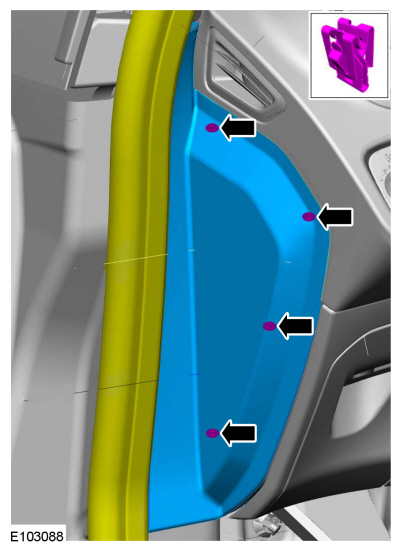
- Both sides.
Move the front door weatherstrip aside, remove the buttons, sill trim and lower hood trim panel.
- Disconnect the electrical connector.

- Disconnect the electrical connector.

NOTICE: Do not allow the steering wheel to rotate while the steering column shaft is disconnected or the clockspring may be damaged. If there are signs that the shaft has rotated, remove and center the clockspring. For additional information, refer to Section 501-20B.
- Remove the bolt and disconnect the steering column shaft.
Torque: 21 lb-ft (28 N·m)
- Disconnect the electrical connector and move the wiring harness aside.
- Release the retainers and move the hood release handle aside.

- Remove the bolt and disconnect the steering column shaft.
- Remove the bolts, disconnect the wiring harness retainers and remove the instrument panel center brace.
Torque: 18 lb-ft (25 N·m)
- Disconnect the electrical connectors, remove the wiring retainers and set the wiring harness aside.

- Remove the bolts, disconnect the wiring harness retainers and remove the instrument panel center brace.
- Remove the A-pillar to cowl cross-member bolt and the cover.
Torque: 18 lb-ft (25 N·m)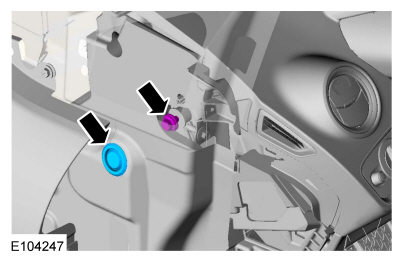
- Mark the instrument panel position with an index mark to aid installation, remove the instrument panel mounting bolts and the instrument panel.
Torque: 18 lb-ft (25 N·m)
Installation
- To install, reverse the removal procedure.
- Fill and bleed the cooling system.
Refer to: Engine Cooling System Draining, Vacuum Filling and Bleeding (303-03B Engine Cooling - 1.6 L EcoBoost (132 kW/180 L PS) - Sigma, General Procedures).
Refer to: Engine Cooling System Draining, Vacuum Filling and Bleeding (303-03A Engine Cooling - 1.6 L Duratec-16V Ti-VCT (88 kW/120 L PS) - Sigma, General Procedures).
Test yourself
A quick Ford Fiesta quiz: every answer comes with an explanation and a link to the manual page.
Was this page helpful?