Symbols Glossary. Description and Operation
Symbols are used within graphics and in the text area to improve the presentation of information.
Motion Symbols
Motion symbols provide detailed information about the movement of the required component. These component movements may be rotational or 1-3 dimensional movements.
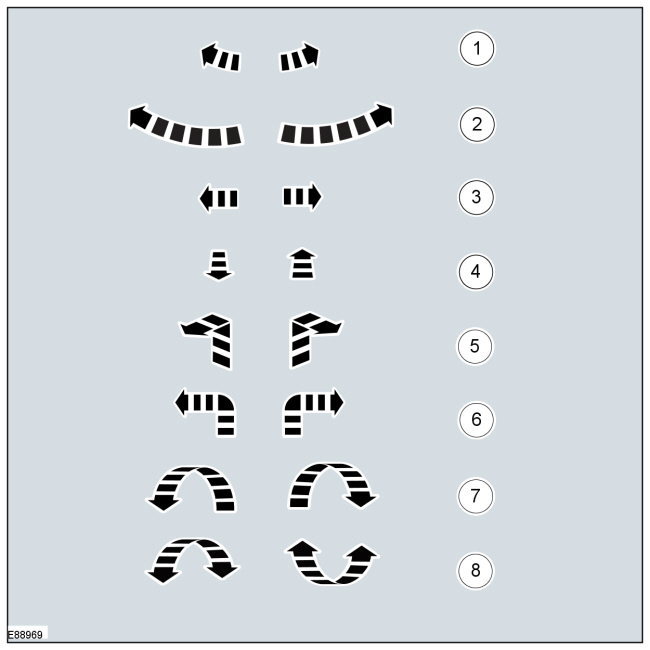
| Item | Part Number | Description |
|---|---|---|
| 1 | — | Secondary component clockwise/counterclockwise movement |
| 2 | — | Primary component clockwise/counterclockwise movement |
| 3 | — | Component left/right/up/down movement |
| 4 | — | Component toward/away from you movement |
| 5 | — | Three-dimensional component movement |
| 6 | — | Two-dimensional component movement |
| 7 | — | Three-dimensional component rotation |
| 8 | — | Three-dimensional component cycling |
Turn Symbols
Turn symbols are used to provide additional information about the direction or angle of rotation of a component.
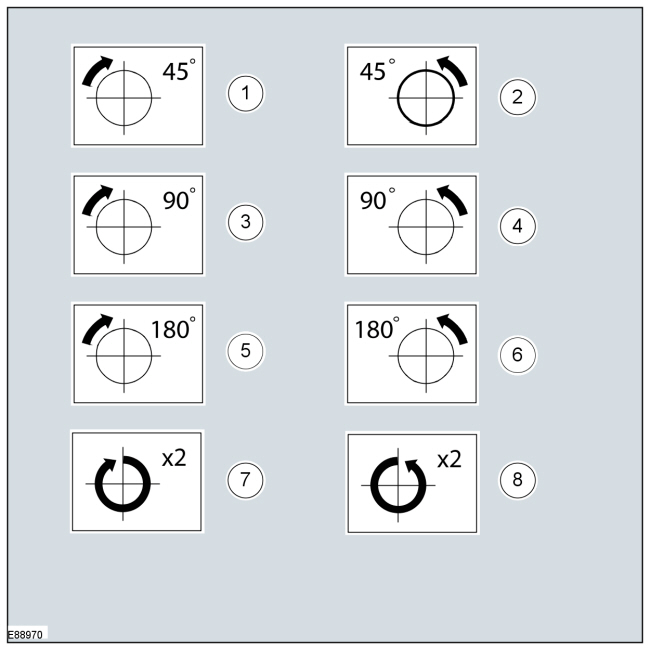
| Item | Part Number | Description |
|---|---|---|
| 1 | — | Turn the component clockwise 45°. |
| 2 | — | Turn the component counterclockwise 45°. |
| 3 | — | Turn the component clockwise 90°. |
| 4 | — | Turn the component counterclockwise 90°. |
| 5 | — | Turn the component clockwise 180°. |
| 6 | — | Turn the component counterclockwise 180°. |
| 7 | — | Turn the component clockwise 2 full turns. |
| 8 | — | Turn the component counterclockwise 2 full turns. |
Steering Wheel Symbols
Steering wheel symbols are used to provide additional information on the required steering wheel position or the steering column lock status.
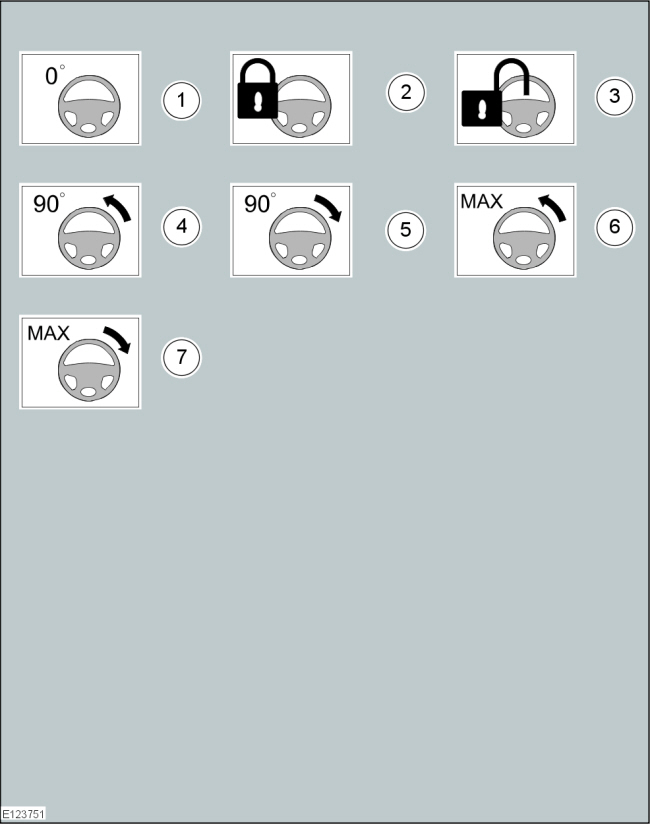
| Item | Part Number | Description |
|---|---|---|
| 1 | — | Steering wheel in the straight-ahead position |
| 2 | — | Steering column lock is locked |
| 3 | — | Steering column lock is unlocked |
| 4 | — | Turn the steering wheel 90° to the left |
| 5 | — | Turn the steering wheel 90° to the right |
| 6 | — | Turn the steering wheel to the full left position |
| 7 | — | Turn the steering wheel to the full right position |
Body Types
Body type symbols are used to identify different body configurations.
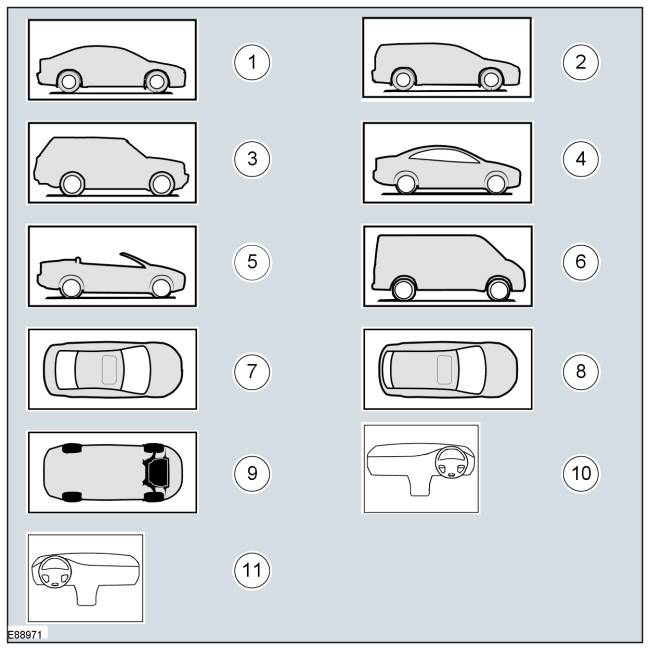
| Item | Part Number | Description |
|---|---|---|
| 1 | — | 3-door, 4-door, 5-door body |
| 2 | — | Station wagon body type |
| 3 | — | Sport utility vehicle body type |
| 4 | — | Coupe body |
| 5 | — | Convertible body |
| 6 | — | Van body |
| 7 | — | 3-door, 4-door, 5-door body - top view |
| 8 | — | Station wagon body - top view |
| 9 | — | Overview |
| 10 | — | Right-hand drive (RHD) vehicle |
| 11 | — | Left-hand drive (LHD) vehicle |
Shift Lever and Selector Lever Position Symbols
Transmission shift lever and selector lever position symbols are used to indicate the lever position that must be selected to perform a procedure step.
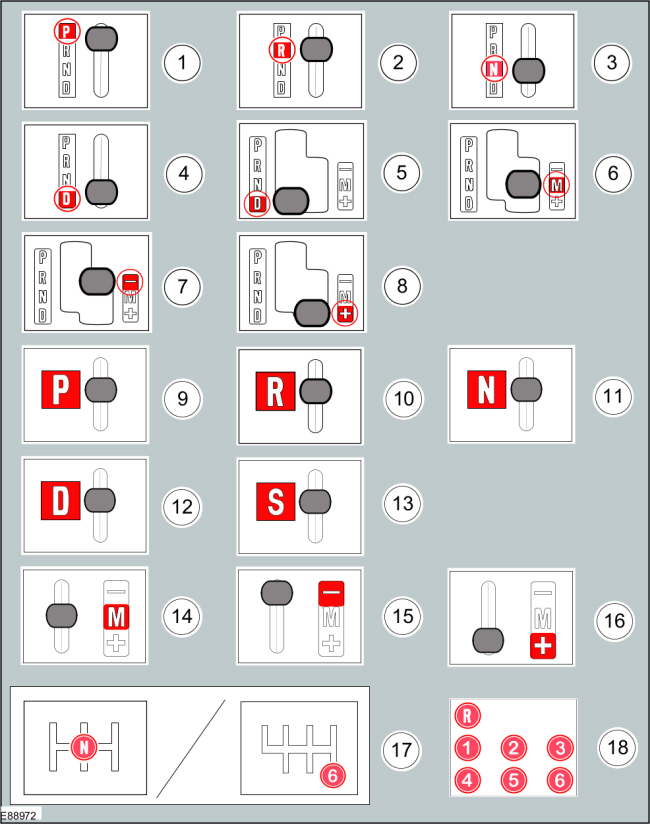
| Item | Part Number | Description |
|---|---|---|
| 1 | — | Replaced by symbol 9 |
| 2 | — | Replaced by symbol 10 |
| 3 | — | Replaced by symbol 11 |
| 4 | — | Replaced by symbol 12 |
| 5 | — | Replaced by symbol 12 |
| 6 | — | Replaced by symbol 14 |
| 7 | — | Replaced by symbol 15 |
| 8 | — | Replaced by symbol 16 |
| 9 | — | Place the selector lever in the Park (P) position. |
| 10 | — | Place the selector lever in the Reverse (R) position. |
| 11 | — | Place the selector lever in the Neutral (N) position. |
| 12 | — | Place the selector lever in the Drive (D) position. |
| 13 | — | Place the selector lever in the Sport (S) position. |
| 14 | — | Place the selector lever in the Manual (M) position. |
| 15 | — | Place the selector lever in the Manual (-) position. |
| 16 | — | Place the selector lever in the Manual (+) position. |
| 17 | — | Place the shift lever in the Neutral (N) position. |
| 18 | — | Other shift lever positions that may be shown in illustrations |
Screwdriver Symbols
Screwdriver symbols are used to show which screwdriver bit is recommended for performing a procedure step.
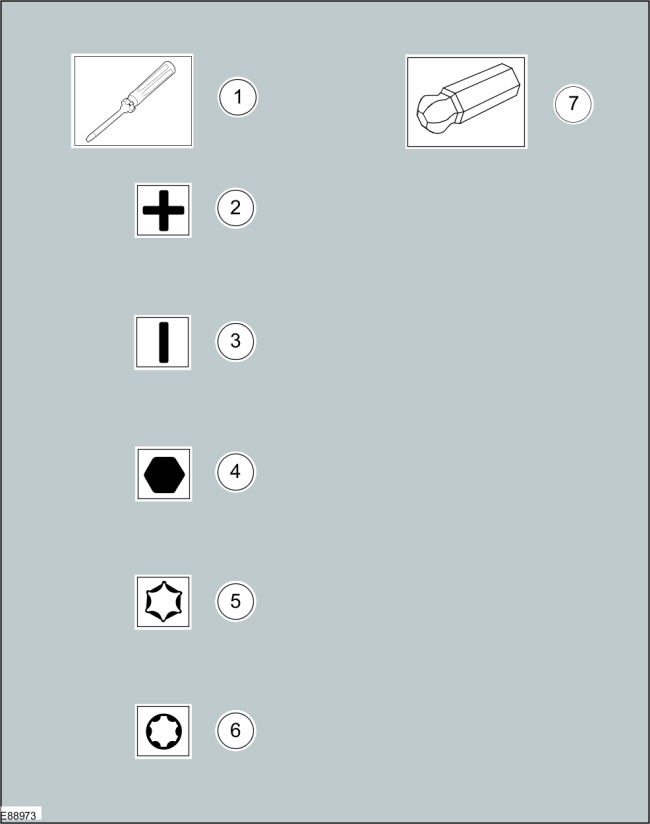
| Item | Part Number | Description |
|---|---|---|
| 1 | — | Screwdriver |
| 2 | — | Phillips screwdriver / Phillips bit |
| 3 | — | Flat-blade screwdriver / flat-blade bit |
| 4 | — | Hex screwdriver / hex bit |
| 5 | — | TORX screwdriver / TORX socket |
| 6 | — | Polydrive screwdriver / Polydrive bit |
| 7 | — | Ball hex key |
Pliers Symbols
Pliers symbols indicate which pliers are recommended for performing the procedure step.
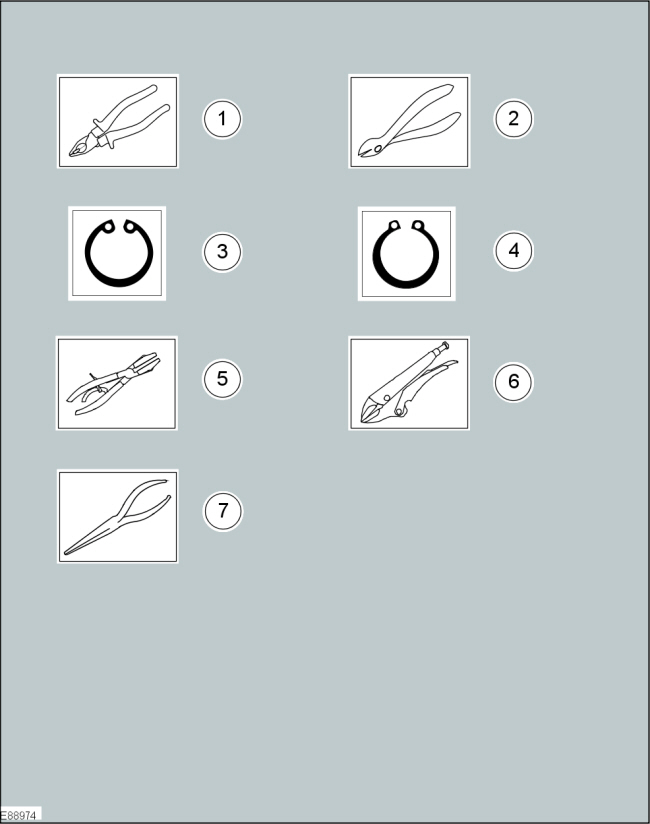
| Item | Part Number | Description |
|---|---|---|
| 1 | — | Combination pliers |
| 2 | — | Diagonal cutters |
| 3 | — | Snap ring pliers - internal |
| 4 | — | Snap ring pliers - external |
| 5 | — | Hose clamp pliers |
| 6 | — | Locking Pliers |
| 7 | — | Long nose pliers |
Drill Symbols
Drill symbols indicate which type and size of drill bit is recommended for performing the procedure step.
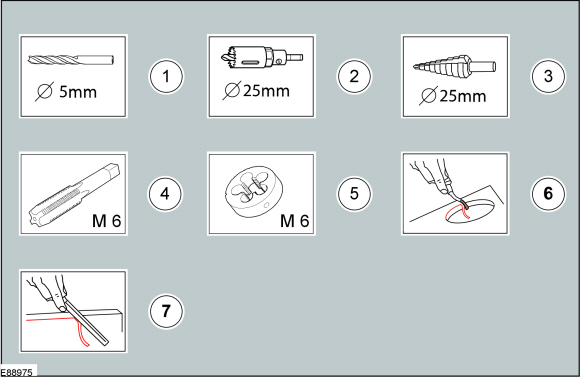
| Item | Part Number | Description |
|---|---|---|
| 1 | — | Drill bit of specified diameter |
| 2 | — | Hole saw of specified diameter |
| 3 | — | Step drill bit of specified diameter |
| 4 | — | Tap of specified diameter |
| 5 | — | Die of specified diameter |
| 6 | — | Round hole reamer |
| 7 | — | Straight edge scraper |
Cutting Tool Symbols
Cutting tool symbols indicate which type of cutting tool is recommended for performing the procedure step.
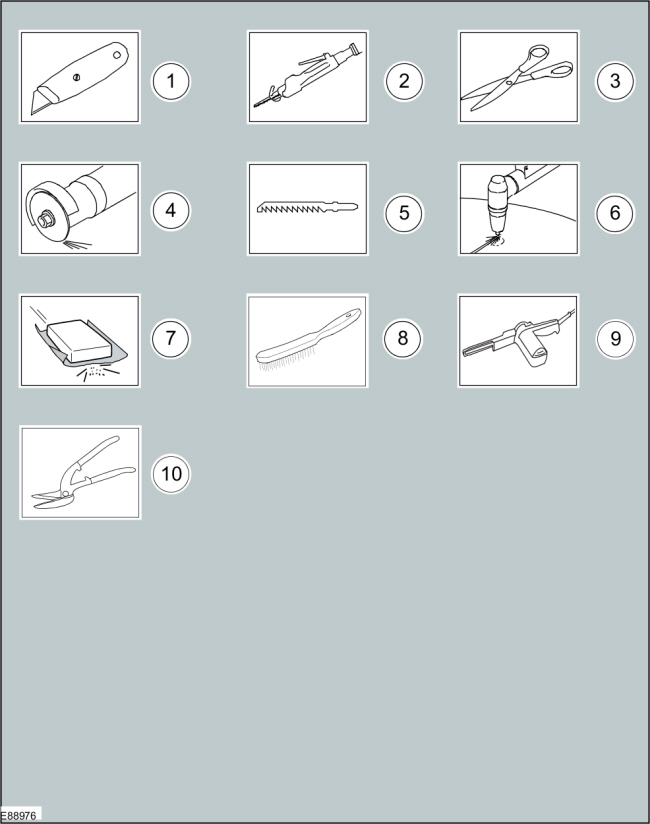
| Item | Part Number | Description |
|---|---|---|
| 1 | — | Cutting knife |
| 2 | — | Air Saw |
| 3 | — | Scissors |
| 4 | — | Grinder |
| 5 | — | Hacksaw |
| 6 | — | Plasma Cutter |
| 7 | — | Sandpaper |
| 8 | — | Wire brush |
| 9 | — | Grinder |
| 10 | — | Tin snips |
Chemical or Lubricant Application Symbols
Chemical or lubricant application symbols indicate where to apply the type of chemical or lubricant for performing the procedure step.
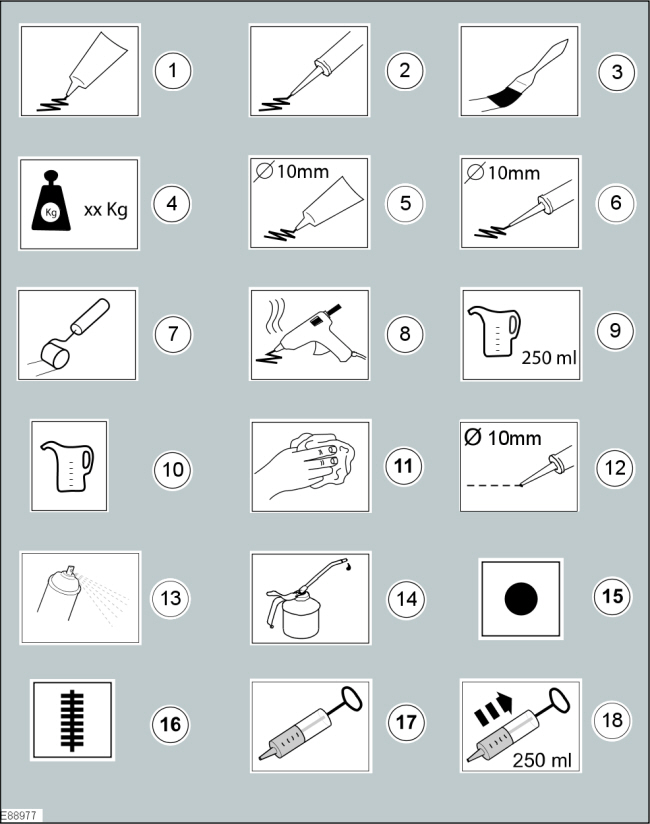
| Item | Part Number | Description |
|---|---|---|
| 1 | — | Apply specified substance from specified tube |
| 2 | — | Apply specified substance from specified cartridge |
| 3 | — | Apply specified chemical with brush |
| 4 | — | Apply specified load to specified component |
| 5 | — | Apply bead of specified diameter from specified tube |
| 6 | — | Apply bead of specified diameter from specified cartridge. |
| 7 | — | Apply specified chemical with roller |
| 8 | — | Apply hot melt adhesive to specified component |
| 9 | — | Apply specified amount of liquid from liquid bottle. |
| 10 | — | Apply liquid from spray bottle |
| 11 | — | Clean specified component with specified material |
| 12 | — | Apply sealer bead from specified tube |
| 13 | — | Apply specified chemical from aerosol can |
| 14 | — | Apply specified grease to specified component |
| 15 | — | Apply spot welds to specified component |
| 16 | — | Apply continuous weld to specified component |
| 17 | — | Syringe Fluid Handling |
| 18 | — | Draw specified amount of fluid with syringe |
Measurement Symbols
Measurement symbols indicate where to measure and which type of measurement to perform for the procedure step.
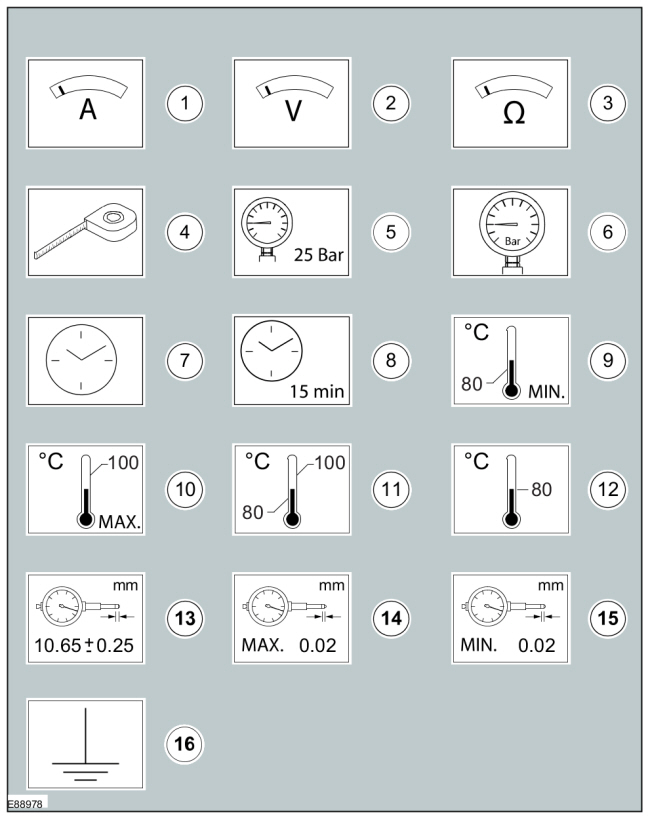
| Item | Part Number | Description |
|---|---|---|
| 1 | — | Measure current with digital multimeter |
| 2 | — | Measure voltage with digital multimeter |
| 3 | — | Measure resistance with digital multimeter |
| 4 | — | Measure length/distance |
| 5 | — | Check for specified pressure using suitable pressure gauge. |
| 6 | — | Measure pressure at specified port using suitable pressure gauge. |
| 7 | — | Measure time with suitable stopwatch. |
| 8 | — | Wait for specified period of time |
| 9 | — | Specified minimum temperature is required for specified task |
| 10 | — | Specified task requires that specified maximum temperature is not exceeded |
| 11 | — | Specified temperature range is required for specified task |
| 12 | — | Specified temperature is required for specified task |
| 13 | — | Measure and check specified value with dial indicator. |
| 14 | — | Measure and check specified MAX value with dial indicator. |
| 15 | — | Measure and check specified MIN value with dial indicator. |
| 16 | — | Electrical ground |
General Equipment Symbols
General equipment symbols indicate where to use which type of general equipment for performing the procedure step.
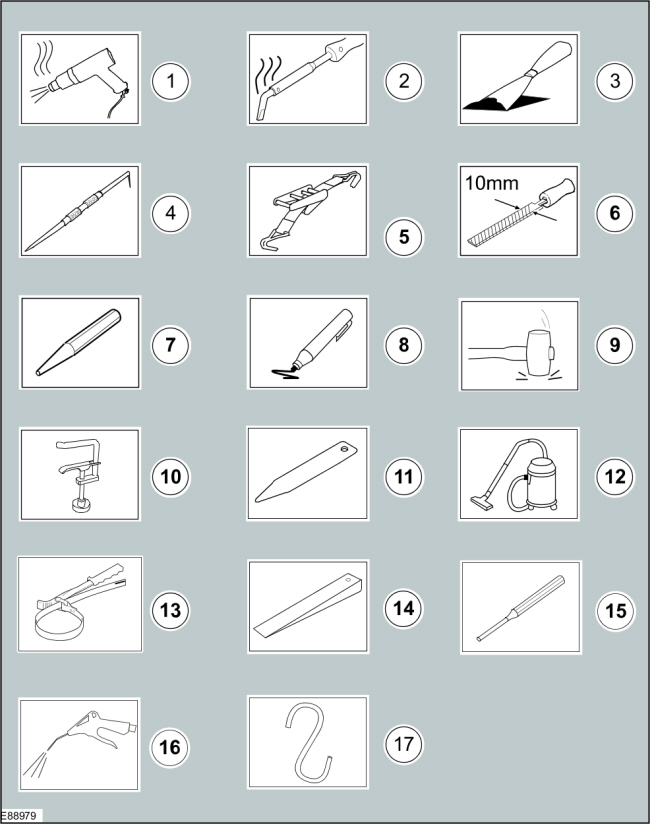
| Item | Part Number | Description |
|---|---|---|
| 1 | — | Heat gun |
| 2 | — | Soldering iron |
| 3 | — | Scraper |
| 4 | — | Scriber |
| 5 | — | Seat belt |
| 6 | — | File of specified size |
| 7 | — | Center punch |
| 8 | — | Marker |
| 9 | — | Hammer |
| 10 | — | Hose clamp |
| 11 | — | Interior trim removal tool |
| 12 | — | Vacuum cleaner |
| 13 | — | Strap wrench |
| 14 | — | Wedge |
| 15 | — | Slide hammer |
| 16 | — | Air gun |
| 17 | — | Component removal and support |
| 18 | — | C-clamp |
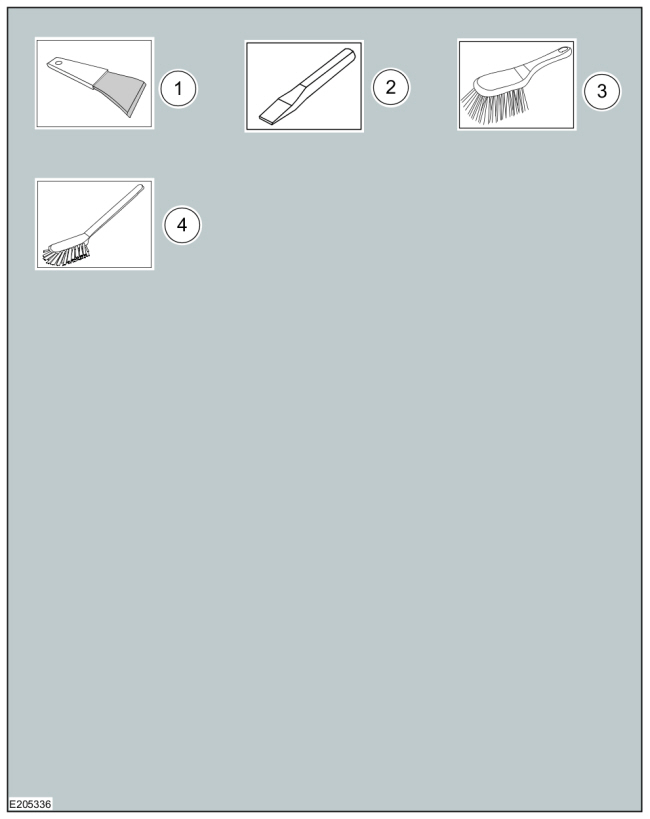
| Item | Part Number | Description |
|---|---|---|
| 1 | — | Plastic Scraper |
| 2 | — | Chisel |
| 3 | — | Hand brush |
| 4 | — | Nylon brush |
Welding symbols
These symbols indicate the type of welding to be used.
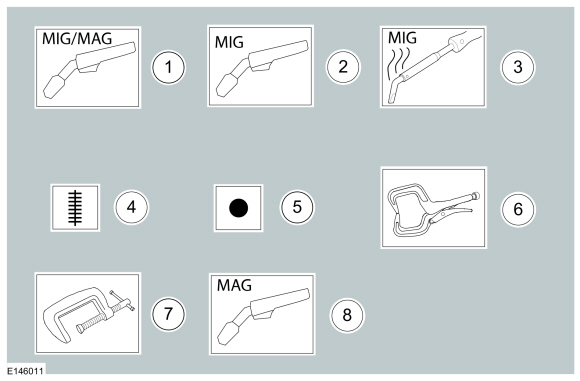
| Item | Part Number | Description |
|---|---|---|
| 1 | — | Metal Inert Gas (MIG) / Metal Active Gas (MAG) welding equipment |
| 2 | — | Metal Inert Gas (MIG) welding equipment |
| 3 | — | Metal Inert Gas (MIG) brazing equipment |
| 4 | — | Apply continuous weld to specified component |
| 5 | — | Apply spot welds to specified component |
| 6 | — | C-clamp / welding |
| 7 | — | C-clamp |
| 8 | — | Metal Active Gas (MAG) welding equipment |
Drilling and grinding symbols
These symbols indicate the type of drilling or grinding to be used.
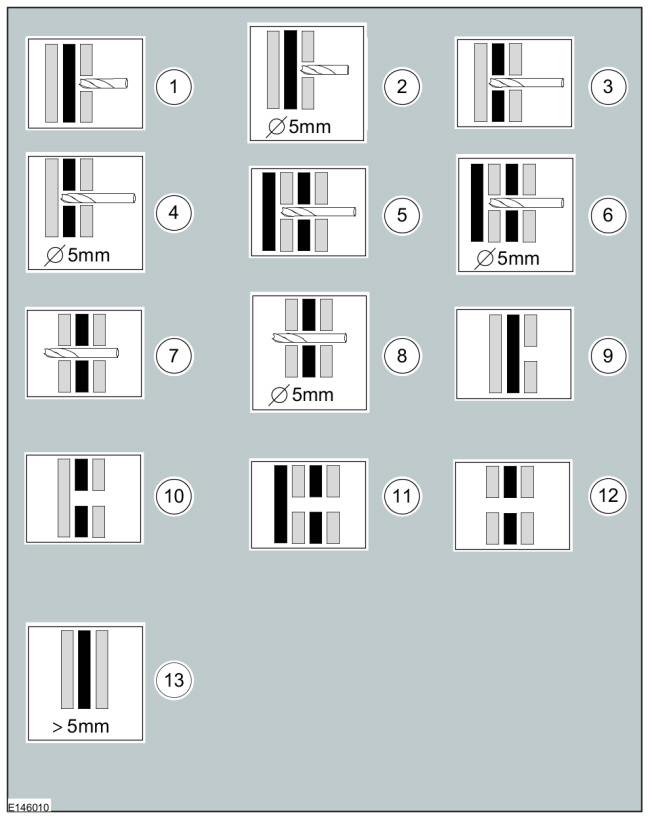
| Item | Part Number | Description |
|---|---|---|
| 1 | — | Drill the first layer of the body with a suitable diameter. |
| 2 | — | Drill the first layer of the body with the specified diameter. |
| 3 | — | Drill the specified number of body layers with a suitable diameter. |
| 4 | — | Drill the specified number of body layers with the specified diameter. |
| 5 | — | Drill the specified number of body layers with a suitable diameter. |
| 6 | — | Drill the specified number of body layers with the specified diameter. |
| 7 | — | Drill all body layers with a suitable diameter. |
| 8 | — | Drill all body layers with the specified diameter. |
| 9 | — | Grind one layer. |
| 10 | — | Grind two layers. |
| 11 | — | Grind down to the last layer. |
| 12 | — | Grind all layers. |
| 13 | — | Material thickness > X mm |
Material symbols
Material symbols are used to show where to use each type of material when performing a procedure step.
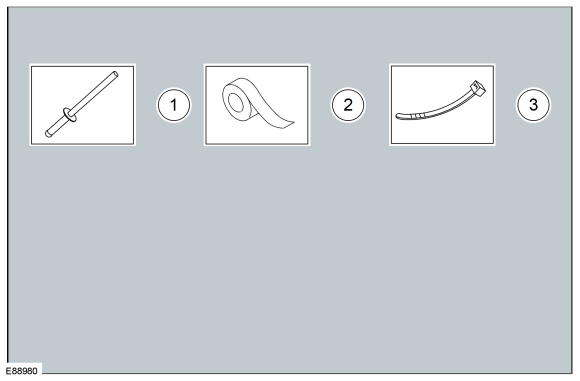
| Item | Part Number | Description |
|---|---|---|
| 1 | — | Remove/install the specified blind rivet |
| 2 | — | Apply tape to the specified component/area |
| 3 | — | Remove/install the specified cable tie |
Miscellaneous symbols
These symbols provide additional information required to perform a procedure step.
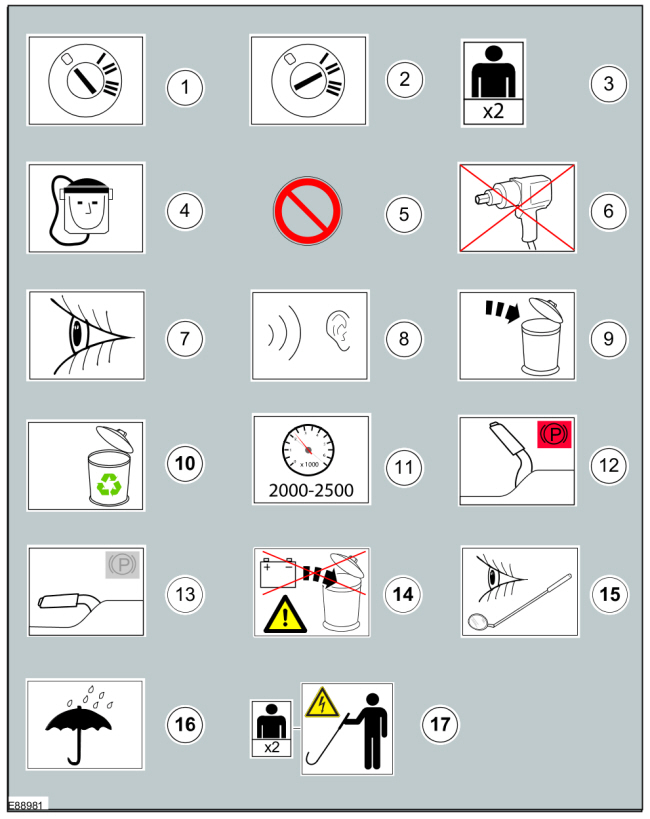
| Item | Part Number | Description |
|---|---|---|
| 1 | — | Turn the ignition key to the 0 position. |
| 2 | — | Turn the ignition key to the II position. |
| 3 | — | This procedure step requires the assistance of the specified number of technicians. |
| 4 | — | Self-contained breathing apparatus |
| 5 | — | General prohibition, used in combination with another symbol |
| 6 | — | Do not use power tools. |
| 7 | — | Visual inspection |
| 8 | — | Noise check |
| 9 | — | Dispose of the specified component. |
| 10 | — | Replaced by item 9 (Dispose of the specified component) |
| 11 | — | Set the engine speed to the specified value. |
| 12 | — | Fully apply the parking brake lever. |
| 13 | — | Fully release the parking brake lever. |
| 14 | — | Do not dispose of batteries in household waste. |
| 15 | — | Visual inspection using a mirror |
| 16 | — | Area/part must be dry. |
| 17 | — | Protective barrier (qualified high-voltage technician) |
Mandatory protective equipment - health and safety symbols
Protective equipment symbols advise the use of mandatory protective equipment to avoid, or at least reduce, possible health and safety risks.
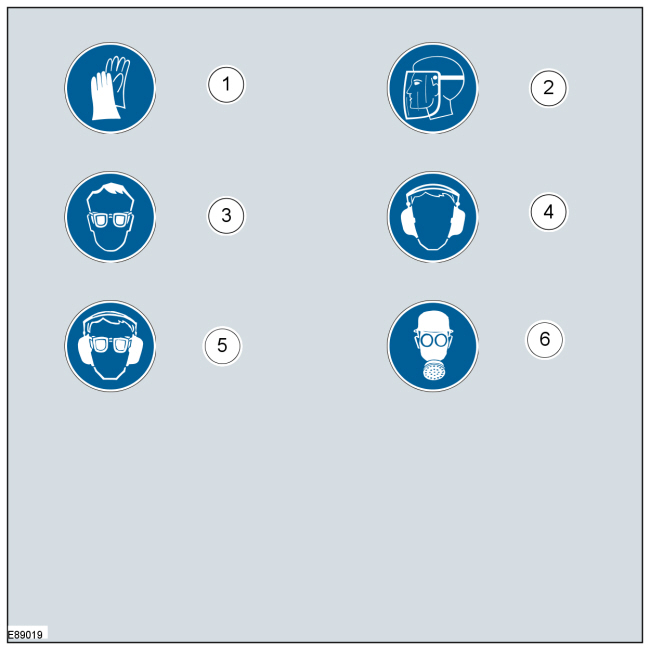
| Item | Part Number | Description |
|---|---|---|
| 1 | — | Wear protective gloves. |
| 2 | — | Wear a protective mask. |
| 3 | — | Wear protective goggles. |
| 4 | — | Wear protective ear protection. |
| 5 | — | Wear protective goggles and ear protection. |
| 6 | — | Wear a respirator. |
Prohibition - health and safety symbols and component damage
Prohibition symbols are used to prohibit the specified actions to avoid, or at least reduce, possible component damage and health and safety risks.
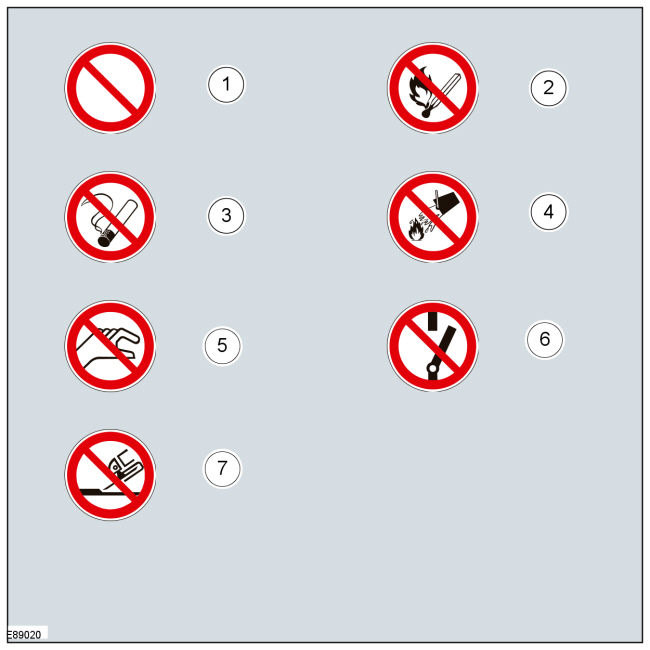
| Item | Part Number | Description |
|---|---|---|
| 1 | — | General prohibition symbol |
| 2 | — | No open flame |
| 3 | — | No smoking |
| 4 | — | No water |
| 5 | — | Do not touch |
| 6 | — | Do not switch |
| 7 | — | No grinding |
Warning symbols - health and safety and component damage
Warning symbols are used to indicate hazardous conditions to be avoided, or at least reduced, to prevent possible component damage and health and safety risks.
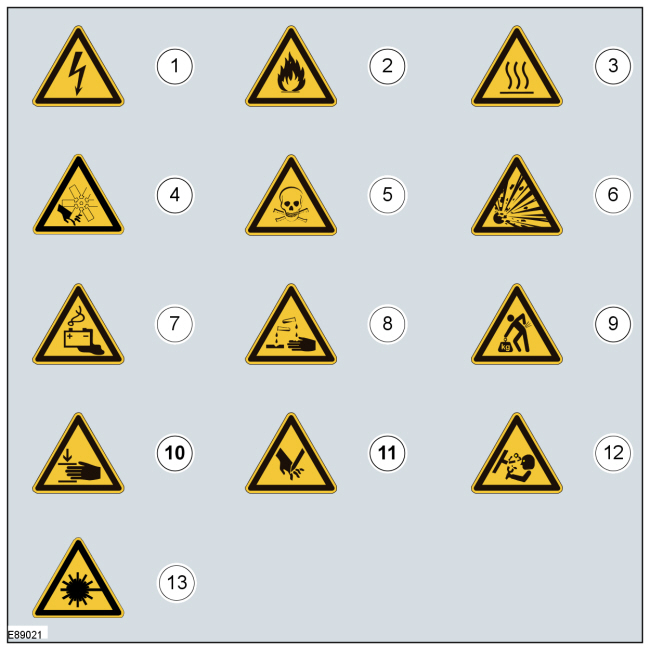
| Item | Part Number | Description |
|---|---|---|
| 1 | — | Dangerous voltage / Electric shock / Risk of electrocution |
| 2 | — | Fire hazard / Highly flammable |
| 3 | — | Burn hazard / Hot surface |
| 4 | — | Automatic start |
| 5 | — | Toxic |
| 6 | — | Explosive |
| 7 | — | Battery hazard |
| 8 | — | Corrosive material |
| 9 | — | Lifting hazard |
| 10 | — | Crushing hands/downward force |
| 11 | — | Cutting of fingers or hand |
| 12 | — | Pressure hazard |
| 13 | — | Invisible laser radiation. Do not look directly through optical instruments (magnifiers). Class 1M laser product |
Control Diagram Symbols - Description and Operation
These symbols provide additional information about the connection type, flow direction or data bus type of the system.
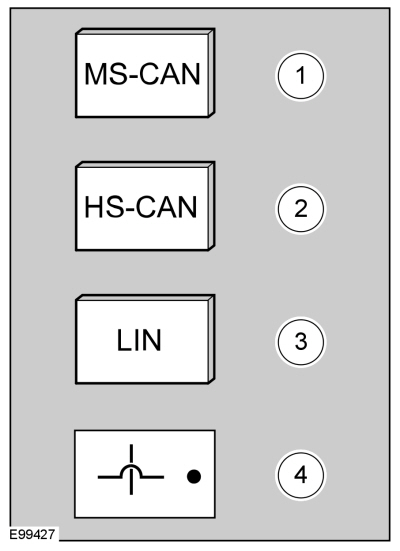
| Item | Part Number | Description |
|---|---|---|
| 1 | — | Controller Area Network, medium speed (CAN) |
| 2 | — | High-speed Controller Area Network (CAN) |
| 3 | — | Local Interconnect Network (LIN) |
| 4 | — | Crossed wires not connected |
Test yourself
A quick Ford Fiesta quiz: every answer comes with an explanation and a link to the manual page.