Body Electrical System
Power Window Motor Repair Procedures
In this manual: Body Electrical System
9steps
~54min
2/5difficulty
Done 0 of 9
Inspection
|

- Disconnect the negative (-) battery terminal.
- Remove the front door trim panel. (Refer to Body - "Front Door Trim")
- Disconnect the connector (A) from the motor.
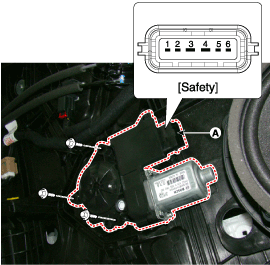
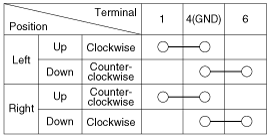
- Connect terminals No. 2 and No. 3 to battery voltage (12V) and check that the motor operates smoothly when connecting the terminals below.
- Disconnect the negative (-) battery terminal.
- Remove the rear door trim panel. (Refer to Body - "Rear Door Trim")
- Disconnect the connector (A) from the motor.
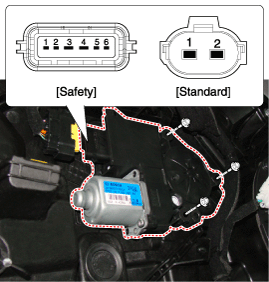
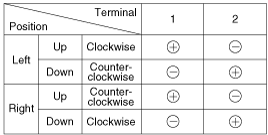
- Connect the motor terminals No. 2 and No. 3 directly to battery voltage (12 V) and check that the motor operates smoothly. If the operation is abnormal, replace the motor. [Safety]
- Connect the motor terminals directly to battery voltage (12 V) and check that the motor operates smoothly. Then reverse the polarity and check that the motor operates smoothly in the opposite direction. If the operation is abnormal, replace the motor. [Standard]
Test yourself
A quick Hyundai Genesis DH quiz: every answer comes with an explanation and a link to the manual page.
Was this page helpful?