Rear Combination Light Bulb Replacement
Enter

(1) Rear/stop light
(2) Turn signal light
(3) Back-up light
(4) Back-up light
(5) Side marker light
Rear Combination Light, Turn Signal Light and Side Marker Light
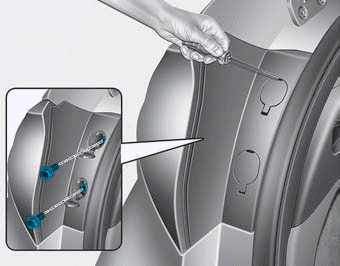
1. Open the tailgate.
2. Open the screw caps securing the lamp assembly.
3. Loosen the lamp assembly mounting screws using a Phillips screwdriver.
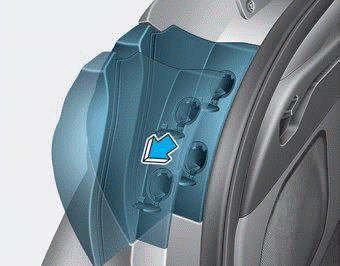
4. Remove the rear combination light from the vehicle body.

5. Remove the socket from the assembly by turning the socket counterclockwise until the protrusions on the socket align with the slots in the assembly.
6. Remove the bulb from the socket by pushing it in and turning it counterclockwise until the tabs on the bulb align with the slots in the socket. Pull the bulb out of the socket.
7. Install the new bulb by inserting it into the socket and turning it until it locks in place.
8. Install the socket into the assembly by aligning the tabs on the socket with the grooves in the assembly. Insert the socket into the assembly and turn it clockwise.
9. Install the rear combination lamp assembly on the vehicle body.
Back-Up Light and Rear Light

1. Open the tailgate.
2. Remove the service cover using a flat-blade screwdriver.

3. Remove the socket from the assembly by turning the socket counterclockwise until the protrusions on the socket align with the slots in the assembly.
4. Remove the bulb from the socket.
5. Insert a new bulb into the socket.
6. Install the socket into the assembly by aligning the tabs on the socket with the grooves in the assembly and turning the socket clockwise.
7. Install the service cover.
Type B

(1) Rear light
(2) Stop light, rear light and turn signal light
(3) Rear light
(4) Back-up light
(5) Side marker light
Stop Light, Rear Light, Turn Signal Light and Side Marker Light
Your vehicle is equipped with LED lights. LED lights are not replaceable. If an LED light does not work, have the vehicle inspected at an authorized HYUNDAI dealer.
Back-up Lamp
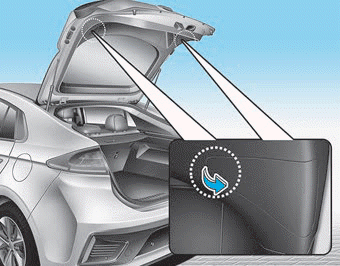
1. Open the tailgate.
2. Remove the service cover using a flat-blade screwdriver.

3. Remove the socket from the assembly by turning the socket counterclockwise until the protrusions on the socket align with the slots in the assembly.
4. Remove the bulb by pulling it straight out.
5. Insert a new bulb by pushing it into the socket and turning it until it locks into place.
6. Install the socket into the assembly by aligning the tabs on the socket with the grooves in the assembly. Insert the socket into the assembly and turn it clockwise.
7. Install the service cover.
Test yourself
A quick Hyundai Ioniq quiz: every answer comes with an explanation and a link to the manual page.