Tire Replacement
WARNING
The vehicle may slip or roll off the jack, causing serious injury or death to you or bystanders. Observe the following precautions:
- Never place any part of your body under a vehicle that is supported by a jack.
- NEVER attempt to change a tire in a traffic lane. ALWAYS move the vehicle completely off the road onto level, solid ground away from traffic before attempting to change a tire. If you cannot find a level, solid place away from the road, call a tow truck for assistance.
- Always use the jack supplied with the vehicle.
- ALWAYS place the jack at the designated jacking points on the vehicle and NEVER use the bumper or any other part of the vehicle to support the jack.
- Do not start or run the engine while the vehicle is on the jack.
- Do not allow anyone to remain in the vehicle while it is on the jack.
- Keep children away from the road and the vehicle.
Perform the following steps to change a vehicle tire:
1. Park on a level, firm surface.
2. Move the Shift lever to P (Park), apply the parking brake, and turn the ignition key to the OFF position.
3. Press the hazard warning flasher button.
4. Remove the wheel nut wrench, jack, jack handle, wheel cover removal tool (for large covers only), and spare tire from the vehicle.
5. Chock the front and rear tire diagonally opposite the tire you are replacing.
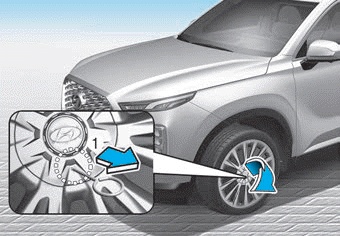
6. Insert the tool (1, if equipped) into the opening and pull off the wheel cover.
NOTICE
When removing the wheel cover, if you use any tool other than the tool (1) provided, the wheel cover may be damaged.
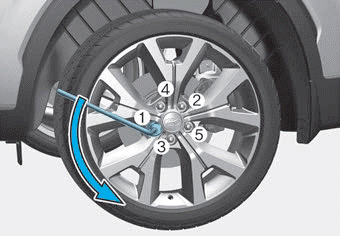
7. Loosen the wheel nuts counterclockwise by one turn each, in the order shown above, but do not remove all the wheel nuts until the tire has been raised off the ground.
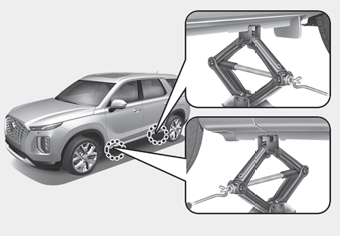
8. Install the jack at the jack-up point under the frame closest to the tire you are replacing. The jack-up point plates welded to the frame have two notches. Never jack up at any other location or part of the vehicle. This may damage the side seal molding or other vehicle components.
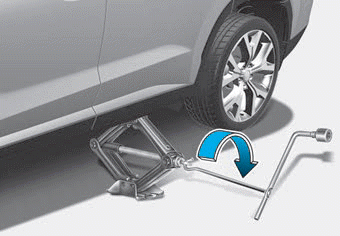
9. Insert the jack handle into the jack and turn it clockwise, raising the vehicle until the tire clears the ground. Make sure the vehicle is stable on the jack.
10. Loosen the clamp nuts with the wheel nut wrench and remove them by hand. Remove the wheel from the stud and place it on the ground, out of the way. Remove any dirt or debris from the studs, mounting surface, and wheel.
11. Install the spare tire onto the hub studs.
12. Tighten the clamp nuts by hand onto the studs, with the smaller end of the nut closest to the wheel.
13. Lower the vehicle to the ground by turning the jack handle counterclockwise.
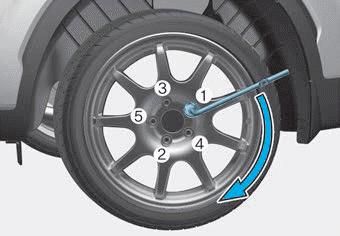
14. Using the wheel nut wrench, tighten the wheel nuts in the order shown. Check each wheel nut twice until they are fully tightened. After replacing the tire, have an authorized HYUNDAI dealer tighten the wheel nuts to the proper torque as soon as possible. Wheel nut torque must be 79~94 lbf·ft (11~13 kgf·m).
If you have a tire pressure gauge, check the tire pressure (see "Tires and Wheels" in Chapter 8 for tire pressure instructions). If the pressure is lower or higher than recommended, drive slowly to the nearest service station and adjust it to the recommended pressure. Always reinstall the valve cap after checking or adjusting tire pressure. If the cap is not installed, air may leak from the tire. If you lose the valve cap, buy a new one and install it as soon as possible. After changing the tire, secure the flat tire and return the jack and tools to their proper storage location. If it is difficult to secure the flat tire, place it in the luggage compartment.
NOTICE
- Check the tire pressure as soon as possible after installing the spare tire. Adjust it to the recommended pressure.
- Check and retighten the wheel nuts after driving more than 30 miles (50 km) following a tire replacement. Recheck the wheel nuts after driving more than 600 miles (1000 km).
CAUTION
Your vehicle has metric thread studs and nuts. When replacing tires, make sure the same nuts that were removed are reinstalled. If you need to replace the nuts, make sure they have metric threads to avoid damaging the studs, and make sure the wheel is properly secured to the hub. Consult an authorized HYUNDAI dealer for assistance.
If any equipment, such as the jack, wheel nuts, studs, or other equipment is damaged or in poor condition, do not attempt to change the tire and call for assistance.
Using the Compact Spare Tire
The compact spare tire is designed for temporary use only. Drive carefully with the compact spare tire and always observe the precautions.
WARNING
To prevent compact spare tire failure and loss of vehicle control, which could result in an accident:
- Use the compact spare tire only in an emergency.
- NEVER drive the vehicle faster than 50 mph (80 km/h).
- Do not exceed the maximum load capacity or the load rating indicated on the sidewall of the compact spare tire.
- Do not use the compact spare tire continuously. Repair or replace the original tire as soon as possible to avoid compact spare tire failure.
When driving with the compact spare tire installed on your vehicle:
- Check the tire pressure after installing the compact spare tire. The compact spare tire must be inflated to 60 psi (420 kPa).
- Do not drive this vehicle through an automatic car wash while the compact spare tire is installed.
- Do not use the compact spare tire on any other vehicle, because this tire was designed specifically for your vehicle.
- The tread life of the compact spare tire is shorter than that of a regular tire. Inspect your compact spare tire regularly and replace a worn compact spare tire with a tire of the same size and design, installed on the same wheel.
- Do not use more than one compact spare tire at a time.
- Do not tow a trailer while the compact spare tire is installed.
NOTICE
When the original tires and wheels are repaired and reinstalled on the vehicle, the wheel nut tightening torque must be set correctly. The correct wheel nut tightening torque is 79~94 lbf·ft (11~13 kgf·m).
CAUTION
To avoid damaging the compact spare tire and your vehicle:
- Drive slowly enough for road conditions to avoid all hazards, such as potholes or debris.
- Avoid driving over obstacles. The compact spare tire diameter is smaller than a conventional tire diameter and reduces ground clearance by approximately 1 in (25 mm).
- Do not use snow chains on the compact spare tire. Because of its smaller size, the snow chain will not fit properly.
- Do not use the compact spare tire on any other wheels. Also, standard tires, snow tires, wheel covers, or trim rings must not be used with the compact spare tire.
Jack Label
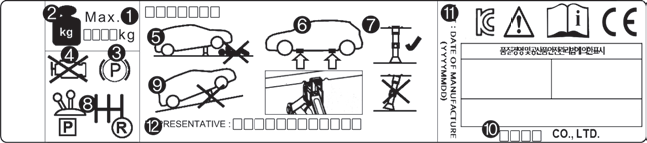
■ Example
The actual jack label on your vehicle may differ from the illustration. For more detailed specifications, refer to the label attached to the jack.
1. Model name
2. Maximum load capacity
3. When using the jack, apply the parking brake.
4. When using the jack, stop the engine.
5. Do not get under the vehicle while it is supported by the jack.
6. Designated jacking points on the frame
7. When supporting the vehicle, the jack base must be vertical under the lifting point.
8. On vehicles with a manual transmission, engage reverse gear; on vehicles with an automatic transmission, move the shift lever to the P (Park) position.
9. Use the jack on firm, level ground.
10. Jack manufacturer
11. Date of manufacture
12. Company representative and address
Test yourself
A quick Hyundai Palisade quiz: every answer comes with an explanation and a link to the manual page.