Body Electrical System
Audio unit
In this manual: Body Electrical System
8steps
~48min
3/5difficulty
Done 0 of 8
Components and Component Location
COMPONENTS
[RADIO/CD/MP3]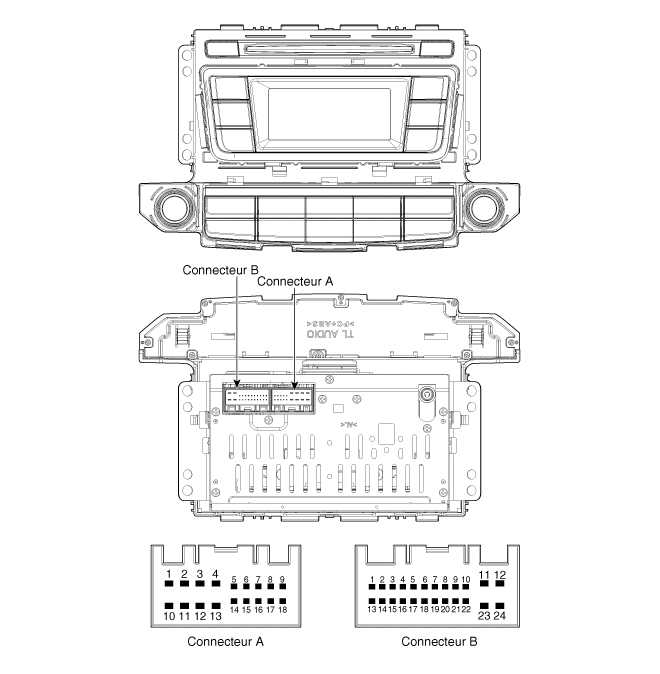
| No. | CONNECTOR A | CONNECTOR B |
| 1 | Rear Left Speaker (-) | - |
| 2 | Front Left Speaker (-) | - |
| 3 | Front Right Speaker (+) | - |
| 4 | Rear Right Speaker (-) | Steering Wheel Remote Control |
| 5 | - | - |
| 6 | - | USB D (-) |
| 7 | - | USB-VDD |
| 8 | ILLUMINATION (-) | AUX Right Input |
| 9 | RELAY | GROUND |
| 10 | Rear Left Speaker (-) | Microphone (-) (Bluetooth) |
| 11 | Front Left Speaker (-) | SOUND |
| 12 | Front Right Speaker (+) | B. |
| 13 | Rear Right Speaker (-) | - |
| 14 | - | - |
| 15 | - | - |
| 16 | - | Vehicle speed |
| 17 | ILLUMINATION (-) | Steering wheel remote control GROUND |
| 18 | REMOTE/ANTENNA | USB D (-) |
| 19 | USB GROUND | |
| 20 | AUX Detection | |
| 21 | AUX Left Input | |
| 22 | Microphone (-) (Bluetooth) | |
| 23 | - | |
| 24 | MASS |
Repair Procedures
DEPOSIT
- Disconnect the negative (-) battery terminal.
- Remove the center air duct cover. (Refer to Body - "Lower Instrument Panel")
- Remove the audio unit (A) after loosening the screws.

- Remove the head unit after disconnecting the connectors and cable (A).

REMEDY
- Connect the audio unit connectors and cable.
- Install the audio unit.
- Install the center ventilation cover.
- Connect the negative (-) battery terminal.
Test yourself
A quick Hyundai Tucson quiz: every answer comes with an explanation and a link to the manual page.
Was this page helpful?