Heating, Ventilation, and Air Conditioning
Refrigerant Flow Direction Control Valve Repair Procedures
In this manual: Heating, Ventilation, and Air Conditioning
12steps
~72min
4/5difficulty
Done 0 of 12
Inspection

| 1. IG | 2. Ground |
Check the voltage between terminals 6 and 7.
- Using a tester, check the resistance between terminals 1 and 2.
Temperature Resistance [kΩ] °C °F -30 -22 8,7~9,5 -25 -13 8,92~9,74 -20 -4 9,14~9,98 -15 5 9,37~10,23 -10 14 9,59~10,47 -5 23 9,81~10,71 0 32 10.03~10.95 5 41 10.25~11.19 10 50 10.47~11.43 15 59 10,69~11,67 20 68 10,90~11,90 25 77 11.12~12.14 30 86 11.34~12.38 35 95 11,55~12,61 40 104 11,77~12,85
Replacement
[THREE-WAY SOLENOID VALVE]- Charge the refrigerant using the refrigerant recovery/recycling/charging station.
- Disconnect the negative (-) battery terminal.
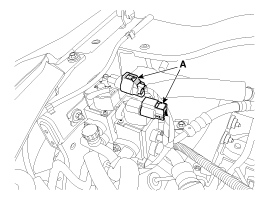
- Disconnect the three-way solenoid valve connector (A).
- Remove the refrigerant line after loosening the mounting nuts (A).


- Remove the three-way solenoid valve assembly (A) after loosening the mounting bolt and nut.

- Install in the reverse order of removal.
- Charge the refrigerant using the refrigerant recovery/recycling/charging station.
- Disconnect the negative (-) battery terminal.
- Disconnect the two-way solenoid valve connector (A).

- Remove the refrigerant line after loosening the mounting nuts (A).


- Remove the three-way solenoid valve assembly (A) after loosening the mounting bolt and nut.

- Install in the reverse order of removal.
Test yourself
A quick Kia Soul EV Owner's Manual quiz: every answer comes with an explanation and a link to the manual page.
Was this page helpful?