Body Electrical System
Speaker Repair Procedures
In this manual: Body Electrical System
25steps
~150min
4/5difficulty
Done 0 of 25
Inspection
- Speaker Troubleshooting
- Basic Speaker Inspection: Check the speaker sound with the speaker mounting screws removed and the wiring connector connected, to eliminate vibration transmitted from the body trim and surrounding parts.

- Troubleshooting
No. Symptom Inspection/Remedy 1 Rattling Noise - Before replacing the speaker, make sure the mounting screw is installed properly.
- After reinstalling the speaker, make sure there is no rattling noise.
- If the rattling noise occurs again, replace the speaker with a new one.
2 Noise - Check whether the wiring connector is connected properly. If not, connect the wiring connector.
- In case of radio interference, check for noise from the CD player.
- If noise is heard when the radio and CD are turned on, replace the speaker with a new one.
If only radio interference occurs, it is caused by poor radio reception. Therefore, the speaker does not need to be repaired or replaced.
3 Poor Performance Check the wiring connection between the battery and the speaker - Before replacing the speaker, check the wiring and connections in the speaker circuit.
- Check the power supply to the speaker and the resistance, then check the sound quality.
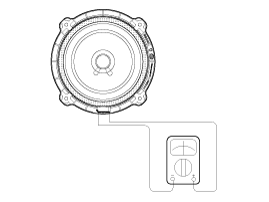
- If the speaker performs poorly, replace it with a new one.
When handling the speaker:
- Dropping or rough handling of the speaker may damage it.
- Be careful not to spill water or oil on the speaker.
- Be careful when handling the speaker, as the diaphragm is made of paper and can be easily torn by impact or external force.
- Improper handling of electrical speakers is not covered by the manufacturer's warranty.
- Basic Speaker Inspection: Check the speaker sound with the speaker mounting screws removed and the wiring connector connected, to eliminate vibration transmitted from the body trim and surrounding parts.
Removal
|
|
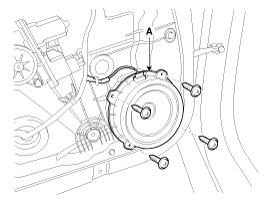
- Remove the front door trim panel. (Refer to Body - "Front Door Trim")
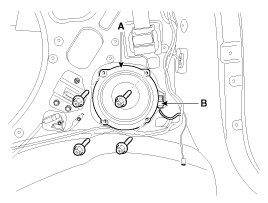
- Remove the front speaker (A) after loosening the screws.
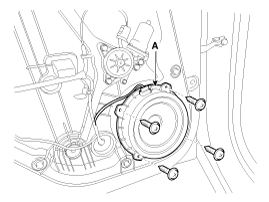
- Remove the rear door trim panel. (Refer to Body - "Rear Door Trim")
- Remove the rear speaker (A) after loosening the screws.
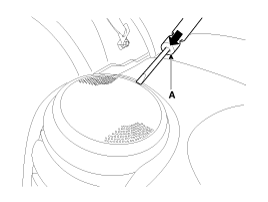
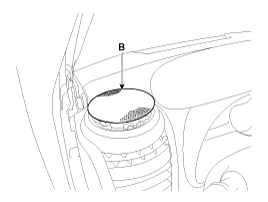
- Using a screwdriver or remover (A), remove the speaker grille (B) from the side vent.
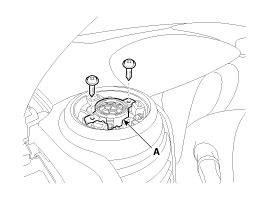
- Separate the tweeter (A) after loosening the mounting screws.
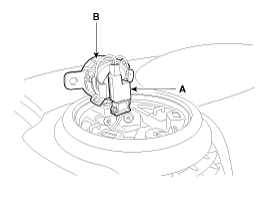
- Remove the tweeter (B) after disconnecting the connector (A).
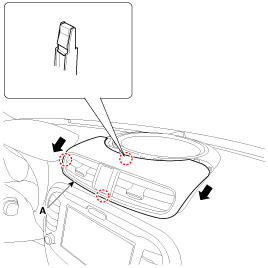
- Using a screwdriver or a remover, remove the center ventilation outlet assembly (A).
- Disconnect the hazard warning switch connector (A) from the center ventilation outlet assembly.
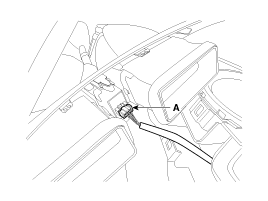
- Remove the center speaker grille (A) from the airbag.
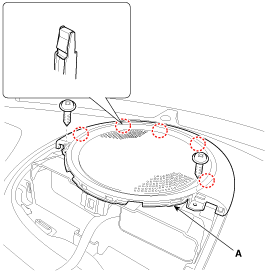
- Remove the center speaker (A) from the airbag after loosening the mounting screws.
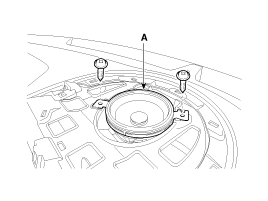
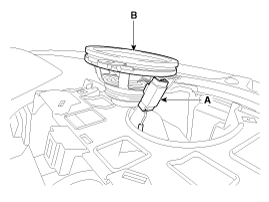
- Remove the center speaker (B) after disconnecting the speaker connector (A).
- Remove the luggage compartment side trim panel (RH). (Refer to Body - "Luggage Compartment Trim")
- Remove the subwoofer speaker (A) after disconnecting the connector (B) and bolts.
Installation
Front Speaker- Install the front speaker.
- Install the front door trim panel.
- Install the rear speaker.
- Install the rear door trim panel.
- Connect the connector.
- Install the tweeter and the tweeter grille.
- Connect the connector.
- Install the center speaker.
- Install the center speaker grille and center ventilation duct assembly.
- Install the subwoofer speaker and connect the connector.
- Install the luggage compartment side trim panel (RH).
Test yourself
A quick Kia Soul EV Owner's Manual quiz: every answer comes with an explanation and a link to the manual page.
Was this page helpful?