Body Electrical System
Audio Unit Repair Procedures
In this manual: Body Electrical System
8steps
~48min
2/5difficulty
Done 0 of 8
Removal
|

|
- Disconnect the negative (-) battery terminal.
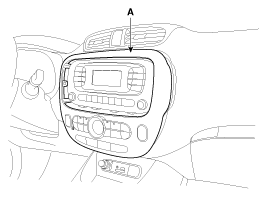
- Remove the center instrument panel (A) from the airbag.
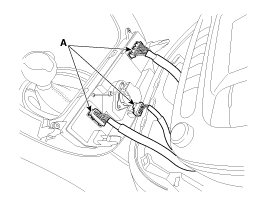
- Disconnect the connectors (A) from the center panel.
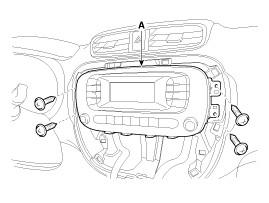
- Remove the head unit (A) after loosening the mounting screws.
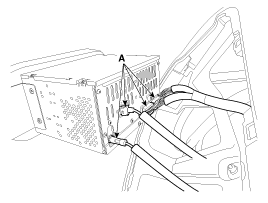
- Disconnect the connectors and cable (A) from the head unit.
Installation
- Connect the connectors and cable.
- Install the head unit and center panel.
- Connect the negative (-) battery terminal.

- Check if the connector is connected incorrectly.
- Check the audio system.
Inspection
- Check the specified value of the AVN head unit connectors under the specified condition. Connector A
No. Name Terminal Description Condition Specified condition A1 Rear Left Speaker (+) Rear left speaker+ Vehicle communication required Analog output A2 Front Left Speaker (+) Front left speaker+ Vehicle communication required Analog output A3 Front Right Speaker (+) Front right speaker+ Vehicle communication required Analog output A4 Rear Right Speaker (+) Rear right speaker+ Vehicle communication required Analog output A5 - - ? ? A6 - - ? ? A7 - - ? ? A8 Illumination (+) Vehicle dimmer + Vehicle communication required ? A9 Latch Latch Vehicle communication required ? A10 Rear Left Speaker (-) Rear left speaker- Vehicle communication required Analog output A11 Front Left Speaker (-) Front left speaker- Vehicle communication required Analog output A12 Front Right Speaker (-) Front right speaker- Vehicle communication required Analog output A13 Rear Right Speaker (-) Rear right speaker- Vehicle communication required Analog output A14 - - ? ? A15 - - ? ? A16 - - ? ? A17 Illumination (-) Vehicle dimmer - Vehicle communication required ? A18 External Antenna Remote power supply for antenna Battery on 9 V ~ 18 V
Connector BNo. Name Terminal Description Condition Specified condition B1 - - ? ? B2 - - ? ? B3 - - ? ? B4 Steering Wheel Remote Control Steering Wheel Remote Control Steering wheel switch pressed 0.5 V ~ 3 V B5 - - ? ? B6 USB D (+) USB D+ USB device inserted 3.2 V ~ 3.45 V B7 USB/iPod VDD USB/iPod power USB/iPod device inserted 4.9 V ~ 5.1 V B8 AUX R Input AUX right audio signal Audio playback on external auxiliary device (when using Aux connector) Signal synchronized with audio is output. B9 Auxiliary Ground AUX reference ground Always Below 1 ohm B10 Microphone (+) (Bluetooth) Bluetooth microphone + Input voice signal through microphone Waveform synchronized with voice data through microphone B11 ACC Accessory Engine switch on (ACC) 11 V ~ 14 V B12 Battery (+) Battery Always 11 V ~ 14 V B13 - - ? ? B14 - - ? ? B15 - - ? ? B16 Vehicle Speed Vehicle speed sensor signal Engine switch on (IGN), vehicle moving slowly Approx. 5 V level pulse generation B17 Remote control ground Steering wheel remote control Gnd Always Below 1 ohm B18 USB D (-) USB D- USB device inserted 3.2 V ~ 3.45 V B19 USB/iPod Ground iPod detection line iPod device inserted GROUND B20 AUX Detection AUX input signal detection Auxiliary device inserted 0 V (low) > 5 V (high) B21 AUX Left Input AUX left audio signal Audio playback on external auxiliary device (when using Aux connector) Signal synchronized with audio is output. B22 Microphone (-) (Bluetooth) Bluetooth microphone- Input voice signal through microphone Waveform synchronized with voice data through microphone B23 - - ? ? B24 Power Ground Ground Always Below 1 ohm
Test yourself
A quick Kia Soul EV Owner's Manual quiz: every answer comes with an explanation and a link to the manual page.
Was this page helpful?