Body Electrical System
Troubleshooting
In this manual: Body Electrical System
34steps
~204min
4/5difficulty
Done 0 of 34
Troubleshooting
Troubleshooting (Step Type)
| Symptom | Suspected Area | Repair |
| POWER (turns on, turns off by itself, freezes) | Check the connection | P-1 |
| Audio H/U | P-2 | |
| FREEZES | Bluetooth Problem | R-3 |
| Check RESET | R-4 | |
| NO DISPLAY | Check the connection | P-2 |
| Lines/spots | LCD MODULE | R-5 |
| No backlight | LCD MODULE | R-5 |
| Touch the INOP | LCD MODULE | R-5 |
| BLUETOOTH DOES NOT PAIR/STREAM | Check BT compatibility (Check phone type) | R-6 |
| WEAK CONNECTION | BT module | R-6 |
| BLUETOOTH VOICE RECOGNITION | Check BT compatibility (Check phone type) | R-7 |
| Microphone module | R-7 | |
| Rear view camera functional | Rear view camera module | R-8 |
| Check the vehicle wiring | R-8 | |
| USB INTERFACE ERROR | Check USB compatibility (Check USB) | R-9 |
| IPOD I/F ERROR | Check the multimedia terminal connection | R-9 |
| No sound (ALL/CH.) | Check the AUDIO H/U setting. | R-10 |
| Check the wiring connection | R-10 | |
| AUDIO H/U | R-10 | |
| Check the speaker wiring and Audio H/U (EXT. AMP) | R-10 | |
| Noise occurs (static noise) | NOISE SOURCE identification | R-11 |
| Check the wiring connection | R-10 | |
| AUDIO H/U | R-10 | |
| Check the speaker wiring and Audio H/U (EXT. AMP) | R-10 | |
| BUTTON (does not work, stuck) | Front panel | R-12 |
| AUDIO H/U | R-12 | |
| FM/AM reception/Noise | Check the vehicle wiring | R-13 |
| Check the radio antenna | R-13 | |
| AUDIO H/U | R-13 | |
| SIRIUS reception, antenna error | Check the vehicle wiring | R-14 |
| Check the SIRIUS subscription | R-14 | |
| Loading error, antenna error | SIRIUS module | R-14 |
R-1 : Check the connection
- Remove and reinstall the audio fuse.
GOOD ? If the sound operates normally, the system is OK.
NG ? Check the Audio H/U power connector. (R-2) - Check the Audio H/U power connector.
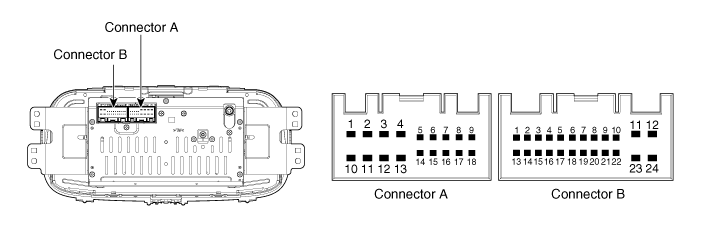
GOOD ? Repeat the check after inspecting the wiring harness or connector.
Tester connection Condition Specified condition CON-B11-GROUND Always 9 - 16 V CON-B12-GROUND Always 9 - 16 V CON-B24-GROUND Always Below 1?
NG ? Check again after replacing the Audio H/U. Then, if the audio operates normally, replace the Audio H/U. - Check whether the problem occurs when connecting Bluetooth.
- Check again after disconnecting the Bluetooth connection.
GOOD ? The sound operates normally. (Phone compatibility)
NG ? If the same problem recurs, refer to R-4. - Remove and reinstall the audio fuse.
GOOD ? The sound operates normally.
NG ? Replace the Audio H/U. - Check the connection between the front and main cable.
GOOD ? If the sound operates normally, reconnect the cable.
NG ? Go to step 2 - Front panel replacement (Lines/Spot/No illumination)
GOOD ? Replace the LCD module or the front panel.
NG ? Go to step 3 - Replace the Audio H/U.
- Check the type of phone used by the customer. (Compare with the compatibility list)
GOOD ? Pairing cannot be made with a model that is not on the compatibility list.
NG ? Go to step 2 - Try pairing with a different phone.
GOOD ? If Bluetooth operates normally, it is a phone compatibility problem.
NG ? Go to step 3 - Replace the Audio H/U.
- Check the same problem again after replacing the MIC module.
GOOD ? If Bluetooth operates normally, replace the microphone module.
NG ? Go to step 2 - Check the circuit continuity between terminals. (Open/short to ground)

GOOD ? If Bluetooth operates normally, check the cable and connection.
NG ? Go to step 3 - Replace the Audio H/U.
- Replace the rear view camera.
GOOD ? If the rear view camera operates normally, replace the rear view camera.
NG ? Go to step 2 - Check the wiring harness or connection.
GOOD ? If the rear view camera operates normally, check the cable and connection.
NG ? Go to step 3 - Replace the Audio H/U.
GOOD ? If the rear view camera operates normally, replace the Audio H/U.
NG ? Check the vehicle wiring. - Check the USB type and iPod.
GOOD ? Pairing cannot be made with a model that is not on the compatibility list.
NG ? Go to step 2 - Replace the multimedia terminal.
GOOD ? If USB and iPod operate normally, replace the multimedia terminal.
NG ? Go to step 3 - Check the vehicle wiring.
GOOD ? Check the connection, etc.
NG ? Go to step 4 - Replace the Audio H/U.
- Check the sound settings for the Audio H/U. (Fader/Balance)
- Check the speaker wiring harness or connection. (Open/short)
GOOD ? Check again after repairing or replacing the wiring harness or connector.
NG ? Go to step 3 - Replace the Audio H/U.
GOOD ? If the sound operates normally, replace the Audio H/U.
NG ? Go to step 4 - Check the wiring between the speaker and Audio H/U.
- Noise source description
Conditions under which noise occurs Noise type Depressing the accelerator pedal increases the noise, and stopping the engine immediately stops the noise. Alternator noise When the air conditioner or heater is operating Fan motor noise - When accelerating sharply on an unpaved road
- When the ignition switch is ON (IG)
Fuel pump noise - When the horn switch is pressed and released
- When the horn switch is pressed and held
Horn noise Engine running causes a faint noise, and the noise stops immediately when the engine is stopped. Ignition noise Noise occurs in synchronization with turn signal flashing Flashing noise Noise occurs while the windshield washer is operating Washer motor noise Engine running causes noise, but stopping the engine does not eliminate the noise Engine coolant temperature sensor noise When the windshield wiper is operating Wiper blade noise When the brake pedal is depressed Stop lamp switch noise Other Static electricity in the vehicle
GOOD ? Check the noise source.
NG ? Refer to R-12 - Check the front connector cable and check again after replacing the front panel.
NG ? Connect the cable and replace the front panel.
GOOD ? Replace the audio H/U. Then, if the audio operates normally, replace the audio H/U. - Check the antenna connector socket.
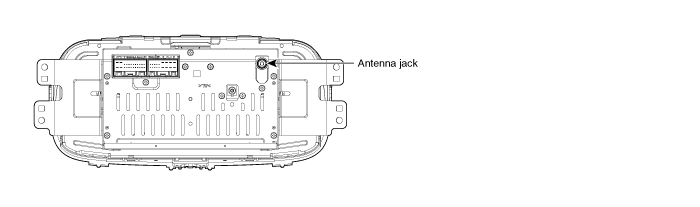
GOOD ? Check again after reconnecting the antenna connector. Poor connection.
NG ? Go to step 2 - Check the antenna feeder cable connection and replace the antenna.
GOOD ? Check again after repairing or replacing the wiring or replacing the antenna.
NG ? Replace the Audio H/U. - Preparing SIRIUS Radio...: When the power source is changed, check communication with the SIRIUS module...
- SIRIUS startup error: No communication with the SIRIUS module
- Antenna error: Poor antenna connection or short to GND
- No signal: Antenna is connected but there is no signal
- Weak: Normal condition, but poor reception due to weak satellite signal.
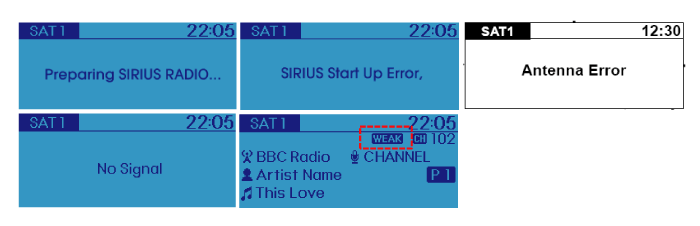
- Antenna error, SIRIUS startup error: Check the SIRIUS antenna connector connection.
GOOD ? Check again after reconnecting the antenna connector. Poor connection. (ground, short circuit)
NG<
- Antenna error, SIRIUS startup error: Check the SIRIUS antenna connector connection.
Test yourself
A quick Kia Soul EV Owner's Manual quiz: every answer comes with an explanation and a link to the manual page.
Was this page helpful?