Flat Tire Replacement (with Spare Tire)
NOTE
If the following symptoms are felt while driving, it may indicate a flat tire.
- The steering becomes heavy
- The vehicle vibrates excessively.
- The vehicle pulls to one side
If you have a flat tire, drive the vehicle slowly to a level place as far away from traffic as possible to change the wheel.
Stopping on the shoulder or on a road with traffic is dangerous.
WARNING
Be sure to follow these instructions for changing a tire:
Changing a wheel is dangerous. The vehicle may slip off the jack and cause injury.
Never place any part of your body under a vehicle that is supported by a jack.
Never let anyone remain in a vehicle supported by the jack:
Allowing someone to remain in a vehicle supported by the jack is dangerous. The occupant may cause the vehicle to fall, resulting in serious injury.
NOTE
Make sure the jack is properly lubricated before using it.
- Park the vehicle on a level surface, away from traffic, and firmly apply the parking brake.
- With an automatic transmission, shift to P. With a manual transmission, shift into reverse (R) or 1st gear. Then turn off the engine.
- Turn on the hazard warning lights.
- Have the passengers get out of the vehicle and wait in a place away from the vehicle and traffic.
- Take out the jack, tool kit and spare tire (page 7-3).
- Chock the wheel diagonally opposite the wheel to be changed. To chock a wheel, place wheel chocks in front of and behind the wheel.
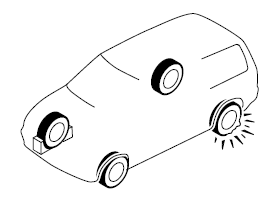
NOTE
To chock a wheel, use a stone or a piece of wood large enough to block the wheel if possible.
Removing a Flat Tire
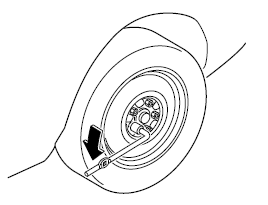
- Loosen each wheel nut by turning it one turn counterclockwise, but do not remove them until the wheel is lifted off the ground.
- Never place the jack on the ground.
- Turn the jack screw in the direction shown in the illustration and adjust the jack head so that it is close to the lifting point.
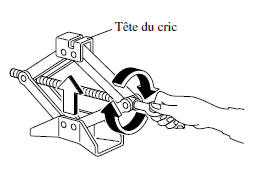
- Insert the jack under the lifting point closest to the wheel to be changed and insert the jack head directly into the lifting point.
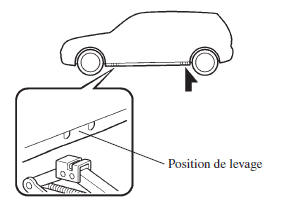
- Continue raising the jack head by turning the screw with your hand until the jack head is inserted into the lift position.
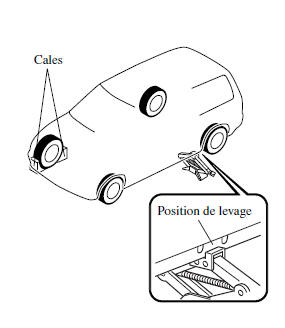
WARNING
Only use the front and rear lift positions recommended in this manual:
Attempting to lift the vehicle using lift positions other than those recommended in this manual is dangerous. The vehicle may slip off the jack and cause serious injury or even death. Only use the front and rear lift positions recommended in this manual.
Do not lift the vehicle at any position other than the designated lift position, and do not place any object on or under the jack:
Lifting the vehicle at any position other than the designated lift position, or placing objects on or under the jack, is dangerous, as it could deform the vehicle body, or the vehicle could slip off the jack and cause an accident.
Only use the jack supplied with this Mazda vehicle:
Using a jack not designed for this Mazda vehicle is dangerous. The vehicle may slip off the jack and cause serious injury.
Never place objects under the jack:
Lifting the vehicle with an object placed under the jack is dangerous.
The jack may slip, and someone may be seriously injured by the jack or the vehicle when it falls.
- Insert the jack handle and fit the wheel nut wrench onto the jack.
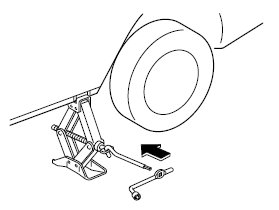
- Turn the jack handle clockwise to raise the vehicle just enough to install the spare tire. Before removing the wheel nuts, make sure the vehicle is stable and cannot slip or move.
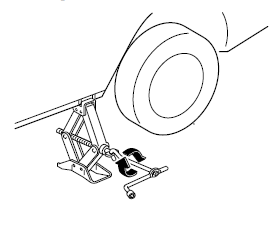
WARNING
Do not raise the vehicle higher than necessary:
Raising the vehicle higher than necessary is dangerous, as it could make the vehicle unstable and cause an accident.
Do not start the engine or rock the vehicle while it is raised:
Starting the engine or rocking the vehicle is dangerous, as it could cause the vehicle to come off the jack and cause an accident.
Never go under the vehicle while it is raised:
Going under the vehicle while it is raised is dangerous, as serious or fatal injury could result if the vehicle came off the jack.
- Remove the wheel nuts by turning them counterclockwise, then remove the wheel and the center cap.
Theft-deterrent wheel nut
If the vehicle is equipped with optional theft-deterrent wheel nuts, one is fitted to each wheel and a special key is required to remove them. This key is attached to the wheel nut wrench and can be stored with the spare tire. Register them with the manufacturer by filling in the card provided in the glove box and mailing it in the envelope provided. If you lose this key, contact an authorized Mazda dealer or use the manufacturer's order form, which is kept with the registration card.
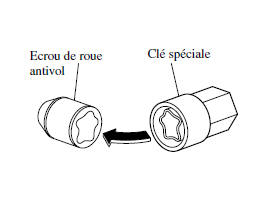
To remove the theft-deterrent nut
- Obtain the theft-deterrent wheel nut key
- Place the key on the nut and hold it squarely perpendicular to the nut.
If the key is held at an angle, the key and the nut may be damaged.
Do not use an air impact wrench.
To install the nut
- Place the key on the nut and hold it squarely perpendicular to the nut.
If the key is held at an angle, the key and the nut may be damaged.
Do not use an air impact wrench.Installing the spare tire
- Remove any dirt from the mounting surfaces of the wheel and hub, and from the wheel nuts, using a cloth.

WARNING
Make sure the mounting surfaces of the wheel and hub, and the wheel nuts are clean before changing or replacing wheels:
When changing or replacing a wheel, failing to remove dirt from the mounting surfaces of the wheel and hub, and from the wheel nuts, is dangerous. The wheel nuts may loosen while driving and the wheel may come off the hub, causing an accident.
- Position the spare tire.
- Install the wheel nuts with the tapered side facing inward, and tighten them by hand.
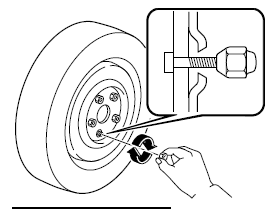
WARNING
Do not apply oil or grease to the wheel nut bolts, and do not tighten the wheel nuts to a torque exceeding the specified value:
Applying oil or grease to the wheel nut bolts is dangerous. The wheel nuts may loosen while driving and the wheel may come off the hub, causing an accident. In addition, the wheel nuts may be damaged if overtightened.
- Turn the wheel nut wrench counterclockwise and lower the vehicle. Use the wheel nut wrench to tighten the wheel nuts in the order shown.
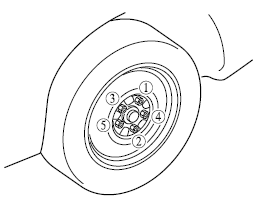
If you are not sure the wheel nuts are tightened correctly, have them checked by an authorized Mazda dealer.
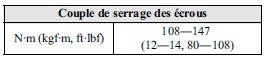
WARNING
Always tighten the wheel nuts correctly:
Wheel nuts that are incorrectly tightened or loosened are dangerous.
The wheel may not rotate straight or may come off. This may cause loss of vehicle control and a serious accident.
Make sure to install the nuts that were removed, or replace them with identical metric-thread nuts:
The wheel bolts and nuts on this Mazda vehicle are metric thread. Using a non-metric nut on a metric bolt is dangerous. A non-metric nut fitted to a metric bolt will not secure the wheel and will damage the bolt, which may cause the wheel to come off and cause an accident.
- Open the cargo area floor mat.
- Remove the flat tire retaining strap.
- Place the flat tire in the cargo area on the left side, toward the rear.
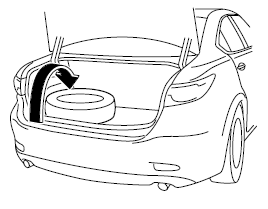
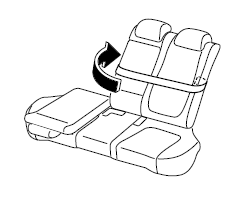
- Fold the seatback forward on the right side of the rear seat.
- Thread the strap through the rear seat, as shown in the illustration.
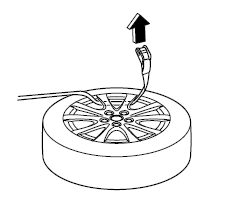
- Pass the loop through the wheel as shown in the illustration, and secure it so that the loop does not contact the wheel.
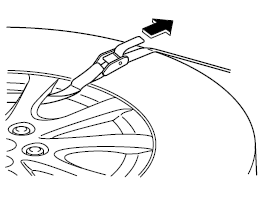
- Pass the strap through the loop, then pull the end of the strap to lock the flat tire.
- Return the right side of the rear seatback to its original position.
- Remove the wheel chocks and stow the tools and the jack.
- Check the tire inflation pressure. Refer to Tires on page 9-7.
- Repair the flat tire or replace the spare tire as soon as possible.
NOTE
Do not press the tire pressure monitoring system switch after installing the spare tire. Press the switch only after the repaired tire or the regular tire has been installed (page 4-24).
WARNING
Do not drive with a tire inflated to an incorrect pressure:
Driving with tires inflated to an incorrect pressure is dangerous. Tires inflated to an incorrect pressure can affect handling and cause an accident.
When checking the inflation pressure of the regular tires, also check the inflation pressure of the spare tire.
NOTE
To prevent the jack and tool kit from rattling, store them properly.
Test yourself
A quick Mazda 6 quiz: every answer comes with an explanation and a link to the manual page.