Front Washer Nozzle and Tube
Exploded View
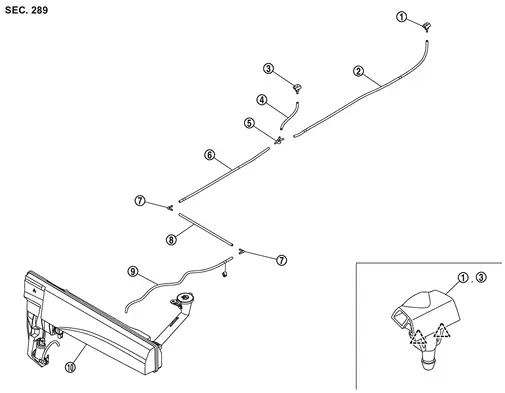
 |
Front washer nozzle LH |  |
Front washer nozzle tube LH |  |
Front washer nozzle RH |
 |
Front washer nozzle tube RH |  |
Check valve |  |
Front washer tube C |
 |
Connector |  |
Front washer tube B |  |
Front washer tube A |
 |
Washer tank assembly | ||||
 |
: Pawl | ||||
Hydraulic Layout
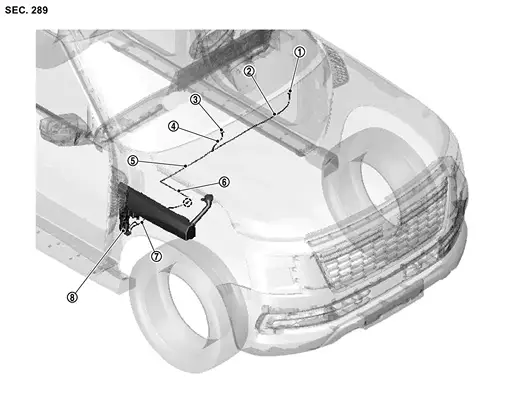
|
Front washer nozzle LH | |
Front washer nozzle tube LH | |
Front washer nozzle RH |
|
Front washer nozzle tube RH | |
Front washer tube C | |
Front washer tube B |
|
Front washer tube A | |
Washer tank assembly | ||
 |
: Clip | ||||
Front Washer Nozzle
Removal and Installation
REMOVAL
Remove cowl top cover. Refer to Removal and Installation.
Remove front washer nozzle tube LH and RH from check valve.
While pushing front washer nozzle fixing pawls  , remove front washer nozzle with front washer nozzle tube in the direction of the arrow in the figure.
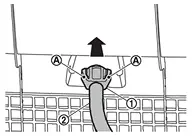
Remove front washer nozzle tube from front washer nozzle.
INSTALLATION
Note the following items, and then install in the reverse order of removal.
Inspection and Adjustment
FRONT WASHER NOZZLE SPRAY POSITION
Inspection

|
Center |  |
Black printed frame line | ||
 |
: Spray area |
Unit: mm (in)
 |
 |
 |
 |
 |
 |
 |
 |
|
X (from center) |
493.7 (19.44) |
387.7 (15.26) |
146.1 (5.75) |
43.6 (1.72) |
46.5 (1.83) |
177.0 (6.97) |
417.7 (16.44) |
570.8 (22.47) |
Y (from black printed frame line) |
530.2 (20.87) |
140.2 (5.52) |
138.1 (5.44) |
547.0 (21.54) |
519.6 (20.46) |
146.5 (5.77) |
122.9 (4.84) |
512.3 (20.17) |
Adjustment
Front Washer Tube
Removal and Installation
REMOVAL
Front Washer Tube A
Remove washer tank assembly. Refer to Removal and Installation.
Remove front fender drip cover RH. Refer to Removal and Installation.
Disconnect front washer tube A form connector.
Remove front washer tube A fixing clip, and then remove front washer tube A.
Front Washer Tube B
Remove front fender drip cover RH. Refer to Removal and Installation.
Disconnect front washer tube B form connectors, and then remove front washer tube B.
Front Washer Tube C
Remove cowl top cover. Refer to Removal and Installation.
Disconnect front washer tube C from check valve.
Remove washer tube C from cowl top cover.
Remove connector from front washer tube C.
INSTALLATION
Note the following items, and then install in the reverse order of removal.
Inspection
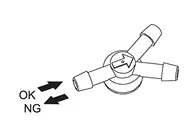
Check Valve
Check that air can pass through by blowing forward direction (toward nozzle side), and check that air cannot pass through by sucking reverse direction (toward washer tank side).